# Yaeris Bulk Messaging Documentation

Yaeris's documentation hub for its bulk-messaging platform, covering WhatsApp, Telegram, LINE, Signal, and iMessage blasting software and services.

This complete guide will explain everything to you as detail as possible.

> Yaeris is an alternative way to advertising.

## Quick links

{% content-ref url="/pages/CJ5ORNBpZrcBDkmiiCs9" %}
[Yaeris Mass Broadcasting Services](/overview/what-we-do)
{% endcontent-ref %}

{% content-ref url="/pages/dYSirWRZrTTfm2ajWezW" %}
[Glossary of Yaeris Blasting Terms](/overview/glossary-terms)
{% endcontent-ref %}

## Get Started

We've put together some helpful guides for you to get setup with our product quickly and easily.

{% content-ref url="/pages/ogp5RDPitnCDHvoIhEc1" %}
[WhatsApp Cloud Blaster Software](/software/whatsapp-cloud-blaster-software)
{% endcontent-ref %}

{% content-ref url="/pages/RbnLcDy5EU5zq95SeyZx" %}
[WhatsApp Blasting Service Overview](/services/whatsapp-blasting-service)
{% endcontent-ref %}

{% content-ref url="/pages/h9bV6s1xyBZN4UFdT4wU" %}
[iMessage Blasting Service Guide](/services/imessage-blasting-service)
{% endcontent-ref %}


# Yaeris Mass Broadcasting Services

Yaeris helps businesses reach large audiences via mass message broadcasting, sending high-volume campaigns within 24 hours through its online portal.

We are a small company with a strong passion for helping your business to gain more revenue through different forms of advert solutions. We use wide range of advert solutions to reach your targeted audience through the mass broadcasting method. We help you send large quantities amount of messages within 24 hours. You can launch your campaign by accessing our portal.&#x20;

{% hint style="info" %}
**Important Note**: All submitted unofficial blasting campaigns will take 24 hours to complete. Usually, your campaign will be in the queue. Need to wait for your campaign's turn.
{% endhint %}

{% hint style="info" %}
**Important Note**: Our server runs 24/7, 12pm to 7pm except for Sunday (for Malaysia, Indonesia & Singapore markets). For other countries, our server runs 24/7, 7pm to 12pm except for Sunday.
{% endhint %}


# Glossary of Yaeris Blasting Terms

Definitions of key Yaeris terms including delivery rate, unofficial vs. official WhatsApp API, and how blasting software and services differ.

### Delivery Rate&#x20;

The definition of our delivery rate is the percentage of successful messages sent out from our server. Please take note that delivery rate doesn't mean receiving rate.&#x20;

### Unofficial WhatsApp API

We develop our own WhatsApp API unofficially to allow customers to blast their promotional messages. Here is the limitation of this unofficial blasting.

{% content-ref url="/pages/otBBkPcK0hJcQKa3H5az" %}
[Unofficial WhatsApp Blasting](/limitation/unofficial-whatsapp-blasting)
{% endcontent-ref %}

### Official WhatsApp Business API

Using official WhatsApp Business API

* This package also known as WA Biz Blasting.&#x20;
* We need to apply with Meta if you want to use this service. Please check this page for more information.

{% content-ref url="/pages/3zj9WfJblXJEc11Z7lmJ" %}
[Official WhatsApp Business API Blasting](/services/whatsapp-blasting-service/official-wa-biz-blasting)
{% endcontent-ref %}

### Software

It is a cloud-based software delivery model where a service provider hosts applications and makes them available to end users over the internet. Instead of purchasing, installing, and maintaining software on individual computers or servers, users subscribe to the application (usually on a monthly or annual basis) and access it via a web browser or app.

{% content-ref url="/pages/9pzurOmX0rKwr4sTLdHk" %}
[Software](/software/whatsapp-cloud-blaster-software)
{% endcontent-ref %}

### Services

A blasting service (often referred to as mass messaging or bulk broadcasting) is a service that allows businesses or individuals to send a single message simultaneously to a large list of recipients across communication channels like WhatsApp, Telegram, SMS, LINE, or email.

{% content-ref url="/pages/zTNsuslhBSkgcv967SzG" %}
[Services](/services/whatsapp-blasting-service)
{% endcontent-ref %}


# Yaeris Campaign Report Explained

Yaeris campaign reports show delivered, undelivered, and sent message counts, and are generated within 24 hours for campaigns of 100+ numbers.

There are 3 things you need to know about our report.

1. Our report will only be generated if your WhatsApp/Telegram/Signal/LINE/Zalo campaign has more than 100 numbers. For anything less than 100 numbers in a campaign, the report will not be generated.
2. Our report will be generated within 24 hours after your WhatsApp/Telegram/Signal/LINE/Zalo campaign has been completed.
3. Our report only shows how many numbers have successfully been sent out from our server. Our report doesn't show how many numbers actually receive your message

In the report, it will show 3 types of status:&#x20;

* Delivered = our server has sent out the message from our server.&#x20;
* Undelivered = this number doesn't have WhatsApp/Telegram/Signal/LINE/Zalo number&#x20;
* Sent status = our server did try and send out the message to the respective number


# Yaeris Portal Setup Tutorial

Step-by-step guide to creating a Yaeris blasting campaign, file size limits for uploads, and how to add or manage reseller and user accounts.

Regardless of what blasting service you opt for, setting up a campaign is the same.

## File size limitation

Maximum file size:&#x20;

* Video: 5Mb&#x20;
* Picture: 1Mb&#x20;
* Profile Picture: 0.5Mb&#x20;
* PDF: 1Mb

## Unofficial Blasting Tutorial

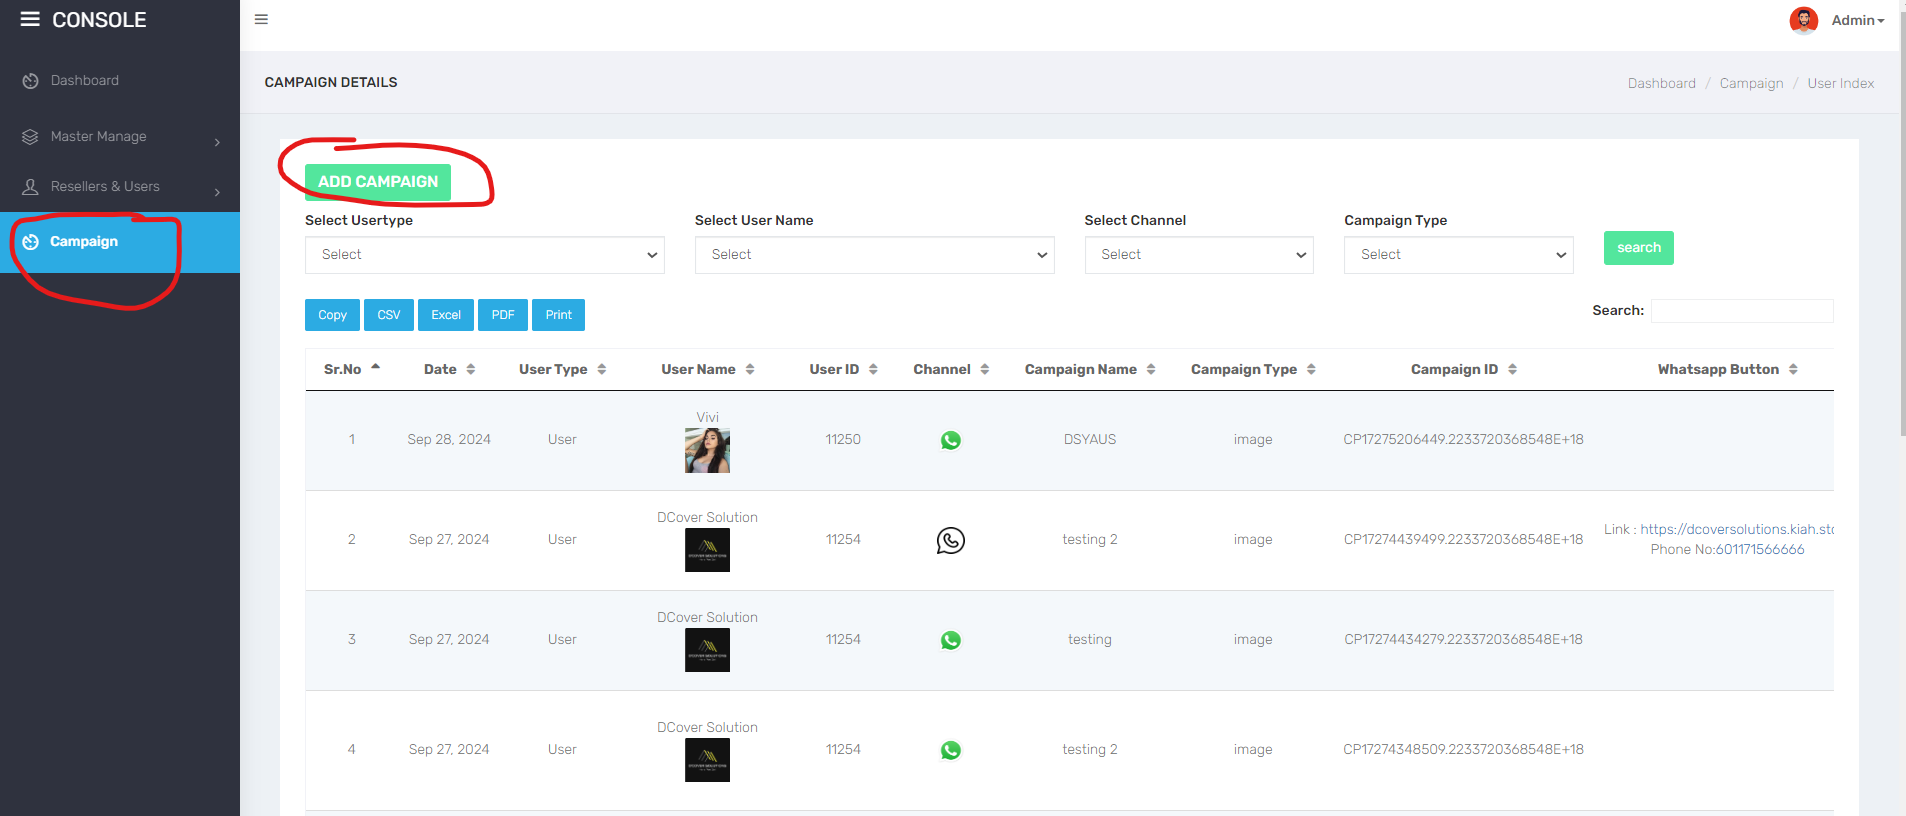
Create blasting campaign

<figure><img src="https://4071208254-files.gitbook.io/~/files/v0/b/gitbook-x-prod.appspot.com/o/spaces%2FQVxt1FPfwclnTSBjpHJc%2Fuploads%2F6vr76g3urNcF80fTKYXs%2Fimage.png?alt=media&amp;token=41d9af64-500b-4141-95b4-f43ef2297ae8" alt=""><figcaption><p>1st step: Go to "Campaign" > "Add Campaign"</p></figcaption></figure>

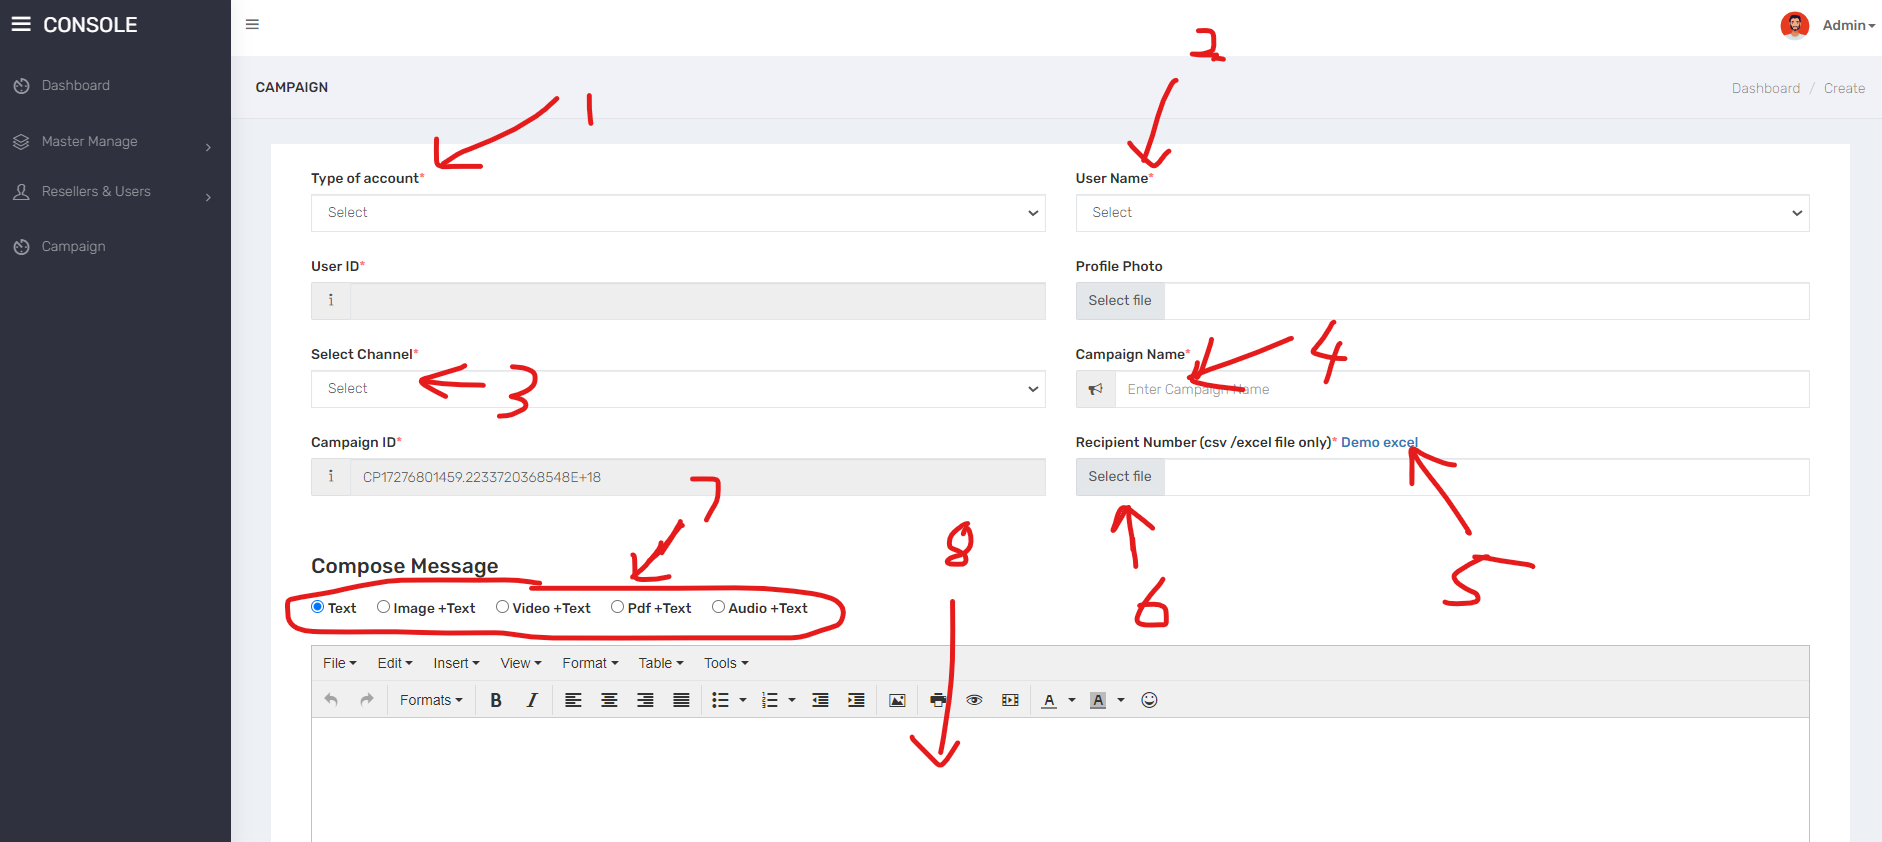
<figure><img src="https://4071208254-files.gitbook.io/~/files/v0/b/gitbook-x-prod.appspot.com/o/spaces%2FQVxt1FPfwclnTSBjpHJc%2Fuploads%2FjeK1VqVdTrCFZD8NlHqi%2Fimage.png?alt=media&amp;token=4401513b-3b07-4ec9-ab58-e27e2196a175" alt=""><figcaption><p>2nd Step</p></figcaption></figure>

1. **Type of account**: Choose your type of account
2. **Username**: Choose your username
3. **Select Channel**: Choose your channel you want to send out. For eg, WhatsApp, Telegram or etc
4. **Campaign Name**: Insert a campaign name for your own reference purpose.
5. **Demo Excel**: Download our Excel template and follow exactly with this format. Fail to follow our format, your campaign will be rejected and credit will be refund back to your wallet.
   1. **SR. No**: Kindly numbering in orderly manner based on the total number you have on "Contacts" / Column B
   2. **Contacts**: Kindly insert country code in front of your phone number without any spacing and + sign. Follow this format *\<country code>\<phone number>*.
6. **Select File**: Upload your Excel template which you have saved and inserted all your contact numbers
7. Insert your marketing message here.
8. Click "**Submit**" button after you have done.

{% hint style="info" %}
Hint: If you encounter 500 error when you click on "Submit" button, it means that your wallet probably doesn't have enough credit. If you have enough credit, it could mean other technical problem. Kindly reach our to us via [WhatsApp](https://wa.me/60196788636). We will look into it.&#x20;
{% endhint %}

{% embed url="<https://youtu.be/r2dPYUT4EpU>" %}

## Watch this video on how to assign new users

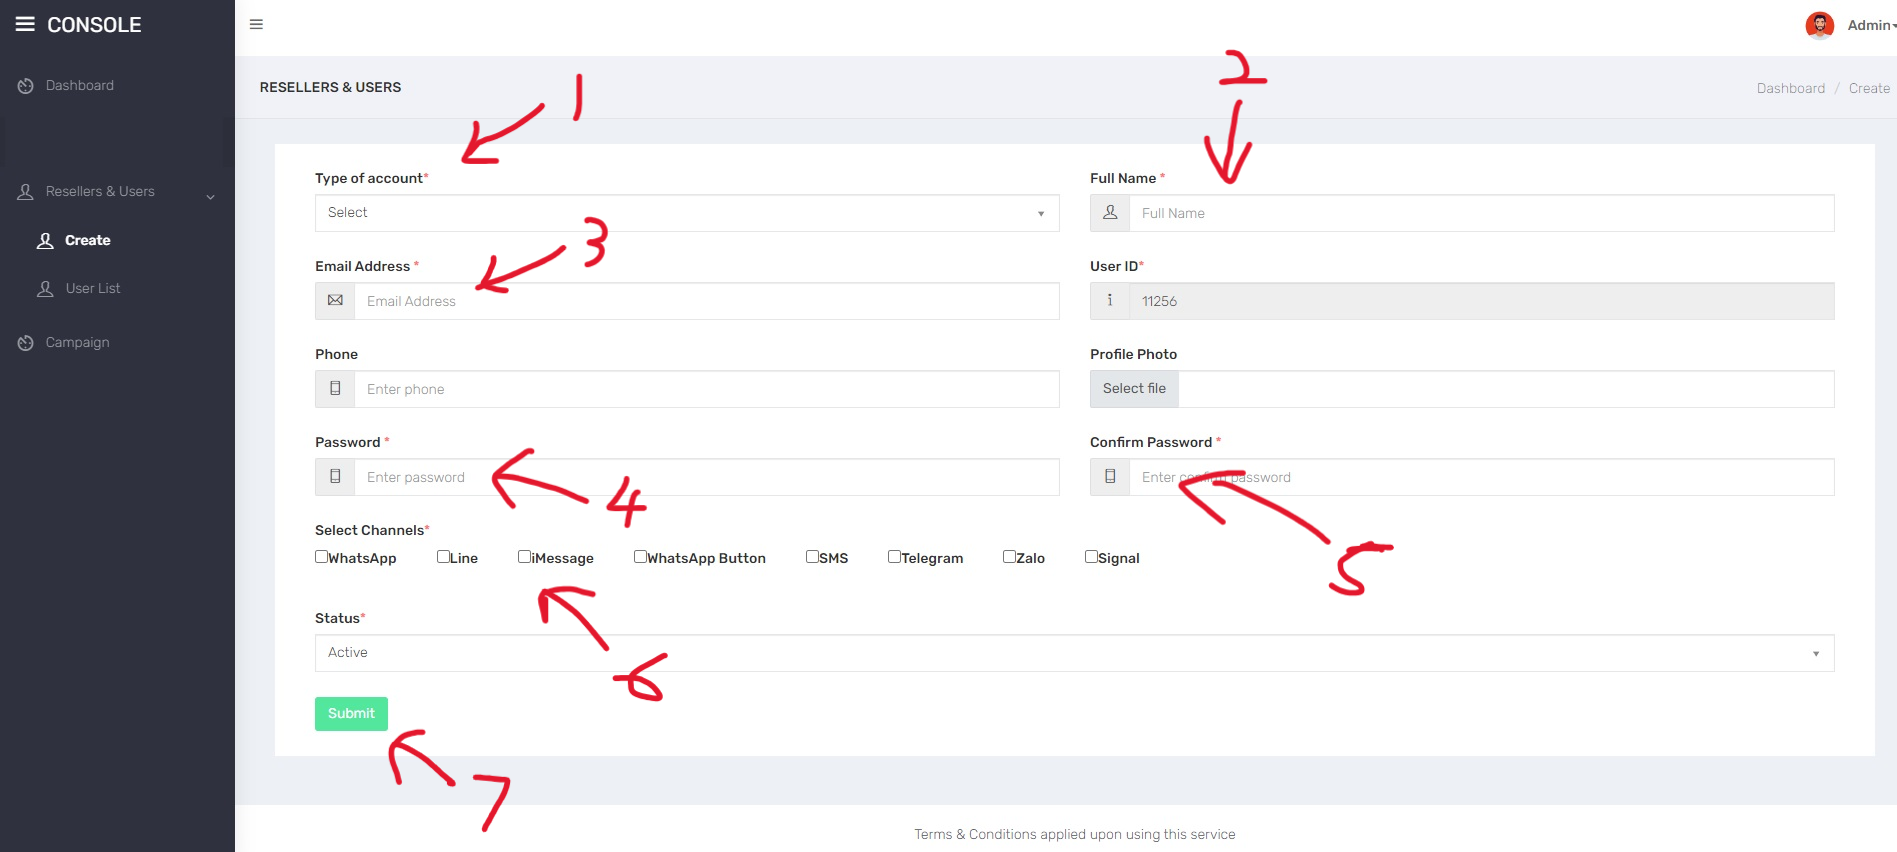
<figure><img src="https://4071208254-files.gitbook.io/~/files/v0/b/gitbook-x-prod.appspot.com/o/spaces%2FQVxt1FPfwclnTSBjpHJc%2Fuploads%2FxxjSPJj4Wh0Kxtukb4kt%2Fimage.png?alt=media&amp;token=e0ae9067-3a19-41ee-a2f5-43a36a65044f" alt=""><figcaption><p>1st step: Go to "Resellers &#x26; Users" > "Create"</p></figcaption></figure>

1. **Type of Account**: Choose between User or Reseller account to create for your customer.
2. **Full name**: Give a name for your customer account
3. **Email address**: Insert your customer/reseller's email address
4. **Password**: Insert more than 8 characters password
5. **Confirm password**: Repeat your password
6. **Select channel**: Choose channels you want to transfer your credit to. Kindly check whether you have enough of the credit to transfer to customer.
7. Click **Submit** button.

{% embed url="<https://youtu.be/ObUaSa47dgU>" %}

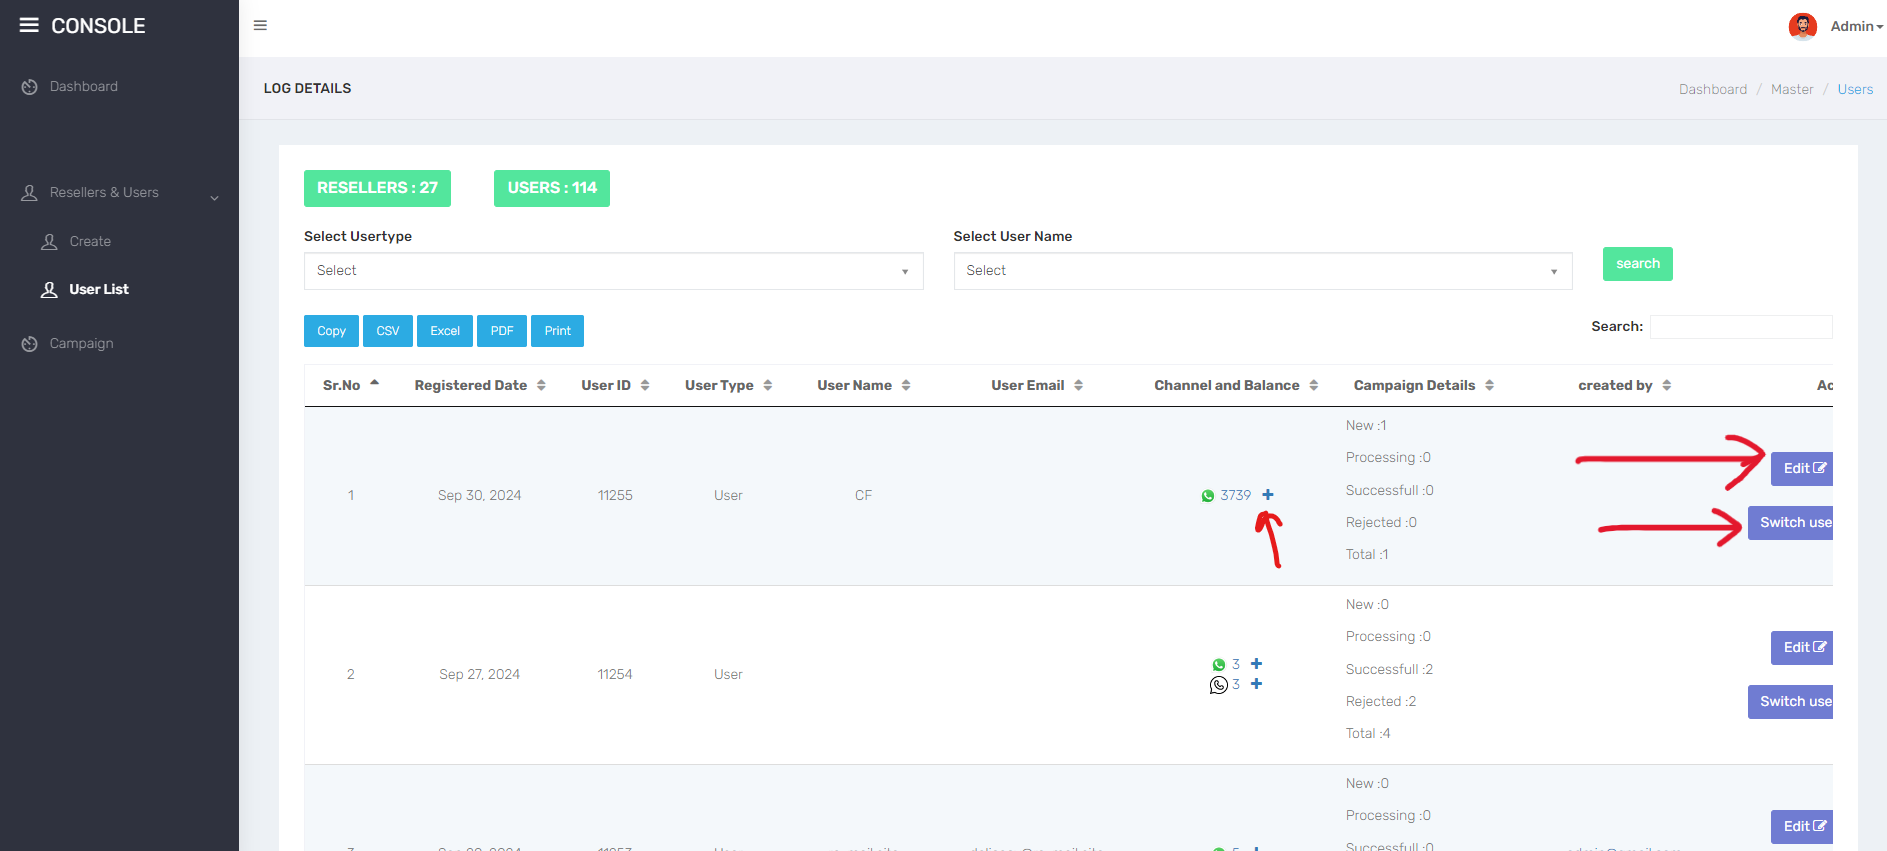
## How to manage existing users?

<figure><img src="https://4071208254-files.gitbook.io/~/files/v0/b/gitbook-x-prod.appspot.com/o/spaces%2FQVxt1FPfwclnTSBjpHJc%2Fuploads%2FfsWVajSFWlHSJffLvhNO%2FScreenshot%202024-09-30%20153009.png?alt=media&amp;token=761b41dc-c931-48be-884b-84082c3c4b20" alt=""><figcaption></figcaption></figure>

1. **+ sign**: Topup new credit to your existing customer by hitting the **+** sign
2. **Edit**: To reset your customer's type of account, full name, email address, update password and channels


# WhatsApp Cloud Blaster Software

Keep your WhatsApp blasting campaign running even your computer is turn off.

Blasting will go on even if your computer is turned off. This is a cloud-based blasting.&#x20;

{% hint style="info" %}
**Important Note**: [Terms and conditions](/faqs/terms-and-conditions/whatsapp-cloud-blaster) applied for using this software.
{% endhint %}

### Get Started

Here are the steps by steps guide on how to get started easily

1. Change timezone based on your country. It is important especially when you try to schedule your WhatsApp campaign based on your country timezone.
   1. Go to Accounts
   2. Select the correct timezone based on your country residence.
2. Go to WhatsApp module. For more information, please refer to the guide below.

{% content-ref url="/pages/U53IUUckUK0Tvv4orAps" %}
[WhatsApp Module Setup Guide](/software/whatsapp-cloud-blaster-software/whatsapp-module)
{% endcontent-ref %}

### Watch Video Tutorial

If you dislike reading, you can watch our full video tutorial.&#x20;

{% embed url="<https://www.youtube.com/watch?v=BVlnvrliTuE>" %}

{% hint style="warning" %}
**WARNING**: Please blast responsibly. We will not be hold accountable if your WhatsApp accounts are blocked.&#x20;
{% endhint %}


# WhatsApp Module Setup Guide

Step-by-step setup: connect WhatsApp Web, upload contacts, then build a bulk messaging campaign with template type, media, and send schedule.

### Continue Setup

1. Add your WhatsApp account using WhatsApp Web&#x20;

   <figure><img src="https://4071208254-files.gitbook.io/~/files/v0/b/gitbook-x-prod.appspot.com/o/spaces%2FQVxt1FPfwclnTSBjpHJc%2Fuploads%2FVTpfGGyVE2Z989J8KlXe%2Fadd%20whatsapp%20web.png?alt=media&amp;token=92a64a80-74c1-450c-b708-9fe2250b7cd6" alt=""><figcaption></figcaption></figure>
2. Go to Contacts module to upload your contacts

   <figure><img src="https://4071208254-files.gitbook.io/~/files/v0/b/gitbook-x-prod.appspot.com/o/spaces%2FQVxt1FPfwclnTSBjpHJc%2Fuploads%2FZVk6cOI8OlASLPnANHdh%2Fcontact%20group.png?alt=media&amp;token=8600901e-4d59-4261-a90c-254bd277fb2c" alt=""><figcaption></figcaption></figure>
3. Go to Bulk Messaging to create new campaign. Fill up all the campaign details.

   <figure><img src="https://4071208254-files.gitbook.io/~/files/v0/b/gitbook-x-prod.appspot.com/o/spaces%2FQVxt1FPfwclnTSBjpHJc%2Fuploads%2Fqg9r8lLyJMUoLtRwN6oE%2Fbulk%20messaging.png?alt=media&amp;token=438e1b68-d447-4e8b-8afe-f6d9a1a78bec" alt=""><figcaption></figcaption></figure>

   * **Select WhatsApp accounts**: Choose which WhatsApp accounts you want to use to send out your message
   * **Campaign name**: Name your WhatsApp campaign (*for your reference purpose only*)
   * **Contact Group**: Select the contact group which you want to blast out
   * **Type of template**: Choose the type of template you want to blast out
     * Text & Media: Insert text and media attachment without any WhatsApp button at all
     * Buttons: Create WhatsApp template with buttons appear where your customer can click on the button to improve CTR.&#x20;
     * List Messages: Create list messages. Example as below.
       * *Hi. Welcome to XXX. To continue, please select one of the following options:*
         1. *Product Information*
         2. *Pricing*
         3. *Talk to live agent*
   * **Media file**: Insert your attachment. Support image, video and PDF file.
   * **Caption**: Insert your message which you want to deliver.
   * **Time post**: Schedule your blasting time and date.
   * **Random message interval**: This function will help you to reduce the chance of getting blocked by WhatsApp. Basically, the system can wait/delay in sending your message out. For eg, after you have sent out the 1st message, the system will wait for a certain random duration before sending out the 2nd message. You can choose the range of waiting period/interval. For eg, sending messages & waiting period range from 60 seconds to 90 seconds.
   * **Schedule time**: The time format is usually in 24 hours. For eg, 18 means 6pm.&#x20;
4. Schedule your campaign.

{% hint style="danger" %}
**Disclaimer**: We are only a software provider if you subscribe for our software. We are not responsible if your WhatsApp account is blocked for any reason.
{% endhint %}


# WhatsApp Profile: Connected Accounts

View all connected WhatsApp accounts in one place, then click Add Account and scan the QR code to link another number.

View all your connected WhatsApp accounts in 1 glance. To connect to more WhatsApp accounts, please click on **Add Account** button.

<figure><img src="https://4071208254-files.gitbook.io/~/files/v0/b/gitbook-x-prod.appspot.com/o/spaces%2FQVxt1FPfwclnTSBjpHJc%2Fuploads%2FbyrtKSrKS18rsB6tXTCJ%2Fimage.png?alt=media&amp;token=521247b1-d35e-4ccc-9b86-2e0939e48ab0" alt=""><figcaption></figcaption></figure>

Then scan the QR code to connect.


# WhatsApp Bulk Messaging Campaigns

Build a WhatsApp blast: pick accounts and contact group, choose text, button, or list message type, set random send intervals, and schedule the time.

{% hint style="info" %}
**Important Note**: Before you begin to create bulk messaging campaign, please ensure you have connected your WhatsApp with our software. Also, please upload your [contact](/software/whatsapp-cloud-blaster-software/whatsapp-module/contacts) before hand.
{% endhint %}

### Steps:

1. Select your preferred WhatsApp accounts
2. Insert your campaign name (for your reference purpose only)
3. Select contact group which you want to send your message to
4. Select one of the message type you want to send out
   * Text & Media
   * Buttons
   * List messages
5. Upload your attachment in Media File section
6. Insert your WhatsApp caption/content. You can even save the caption for future use.
7. Schedule your posting time
8. Set your *random interval time for sending out messages* (**set at least 5 seconds minimum**). For eg, the system will automatically random pick interval between **60 seconds** to **90 seconds** before sending out the next message.
   * 1st message: Sent out successfully
   * *Wait for 65 seconds*
   * 2nd message: Sent out successfully
   * *Wait for 83 seconds*
   * 3rd message: Sent out successfully
   * *Wait for 75 seconds*
   * 4th message: Sent out successfully
   * *The list goes on.....*
9. Set the *schedule time* you want to send out your message
   * **Daytime**: Send your message during on business hours
   * **Nighttime**: Send your message during off business hours
   * **Odd**: Send your message with odd number such as 1, 3, 5, etc
   * **Even**: Send your message with even number such as 0, 2, 4, etc

{% hint style="info" %}
**Hint**: The number appears in *Schedule Time* represents time. For eg, 0 means 12am. 2 means 2am. 18 means 6pm.&#x20;
{% endhint %}

10. After you have setup everything according to your preference, now you may schedule your campaign.

{% hint style="danger" %}
**Disclaimer**: Any suggestion given by us on how to setup your campaign should be taken into serious consideration. At the end of the day, always remember you are the one who make the decision whether to use our suggestion or not. We are not responsible on the consequences of our suggestion.
{% endhint %}


# WhatsApp Autoresponder Setup

Configure an automatic reply to incoming WhatsApp messages, with status, recipient scope, message template, resend delay, and contact exclusions.

Now, you can set the auto reply message. If there is any incoming message, this auto reply message will be triggered. It is useful when you want to inform your customer that this number is actually a blasting number and your official number is another number. Redirect them to your official number.

<figure><img src="https://4071208254-files.gitbook.io/~/files/v0/b/gitbook-x-prod.appspot.com/o/spaces%2FQVxt1FPfwclnTSBjpHJc%2Fuploads%2FNlDBWlLzYcqL2AIW0uWT%2Fcreate%20autoresponder.png?alt=media&amp;token=ecd0779b-79f6-4f1e-a5f5-48b465b41e74" alt=""><figcaption></figcaption></figure>

Once you select your desired WhatsApp account, you will see a form which you are required to fill in.

* **Status:** Enable / Disable
* **Sent to:** All / Individual / Group
* **Type of template**: Choose the type of template you want to blast out
  * Text & Media: Insert text and media attachment without any WhatsApp button at all
  * Buttons: Create WhatsApp template with buttons appear where your customer can click on the button to improve CTR.&#x20;
  * List Messages: Create list messages. Example as below.
    * *Hi. Welcome to XXX. To continue, please select one of the following options:*
      1. *Product Information*
      2. *Pricing*
      3. *Talk to live agent*
* **Media file**: Insert your attachment. Support image, video and PDF file.
* **Caption**: Insert your message which you want to deliver.
* **Resubmit message only after (minutes)**: This function will reduce the likelihood of your WhatsApp account getting blocked
* **Except contacts**: You can choose which contact to exclude from sending out this auto reply message.


# WhatsApp Chatbot Keyword Replies

Set up a chatbot that auto-replies to customer messages by detecting preset keywords or full sentences you define in advance.

Create a chatbot which will response back to your customer who has replied your message.&#x20;

How it works?

If the chatbot detects keywords (which is preset by you, initially), it will send out an automated reply message to your customer.

You can choose to detect:&#x20;

* certain keywords
* the entire sentence

<figure><img src="https://4071208254-files.gitbook.io/~/files/v0/b/gitbook-x-prod.appspot.com/o/spaces%2FQVxt1FPfwclnTSBjpHJc%2Fuploads%2FWocSLEkTLnN6fjPiEWVg%2Fimage.png?alt=media&amp;token=2125a6fd-777a-4d7c-930d-95cc9c7d2479" alt=""><figcaption></figcaption></figure>


# Export WhatsApp Group Participants

Export contacts from any WhatsApp group: send a message to the group, select the account, then click Download next to that group in the list.

### How to use?

1. Send a message to group you want export participants
2. Select account you want export participants
3. Click Download button of group you want export on list


# WhatsApp Button Template Builder

Draft a WhatsApp message with image, description, and footer, then add text reply, link, or call-action buttons for customers to tap.

<figure><img src="https://4071208254-files.gitbook.io/~/files/v0/b/gitbook-x-prod.appspot.com/o/spaces%2FQVxt1FPfwclnTSBjpHJc%2Fuploads%2FD7mxaNokU0kfTGaaDuLz%2Fcreate%20whatsapp%20button%20template.png?alt=media&amp;token=f482f74a-2a84-4d3b-af65-271223e40af0" alt=""><figcaption></figcaption></figure>

Fill up the details of the template to create the button template message

1. **Name**: Insert a template title (*for your reference purpose only*)
2. **Main Image**: Insert your media. Support image, video and PDF.
3. **Main Description**: Insert your caption/message you want to deliver to your customer
4. **Footer**: Insert any footer message. For eg, *Terms and Condition applied*.
5. **List button**: Create button for your message
   * Text button: Insert a quick reply message in the button. So when your customer clicks on the button, the message (*which you have inserted in the first place*) will be automatically reply back to you.&#x20;
   * Link button: Insert link in the button
   * Call action button: Insert your phone number in the button so that your customer can call you.


# WhatsApp List Message Template

Create a WhatsApp list message that presents customers with multiple selectable options, like product info, pricing, or live agent.

<figure><img src="https://4071208254-files.gitbook.io/~/files/v0/b/gitbook-x-prod.appspot.com/o/spaces%2FQVxt1FPfwclnTSBjpHJc%2Fuploads%2FqOwnfoQjbnHtjqaoIkm1%2Fcreate%20list%20message%20template.png?alt=media&amp;token=1470a9dd-65a6-4fc5-ad7c-83ef9d419429" alt=""><figcaption></figcaption></figure>

### What is list message?

List message is a message which you send to your customers & provide them with several options to choose from. Below is the example of the message:

> *Hi. Welcome to XXX. To continue, please select one of the following options:*
>
> 1. *Product Information*
> 2. *Pricing*
> 3. *Talk to live agent*


# WhatsApp Contacts & Segmentation

Create contact groups and upload contacts into them to segment your list for more personalized WhatsApp campaign targeting.

<figure><img src="https://4071208254-files.gitbook.io/~/files/v0/b/gitbook-x-prod.appspot.com/o/spaces%2FQVxt1FPfwclnTSBjpHJc%2Fuploads%2FZVk6cOI8OlASLPnANHdh%2Fcontact%20group.png?alt=media&amp;token=8600901e-4d59-4261-a90c-254bd277fb2c" alt=""><figcaption></figcaption></figure>

Steps to import contacts:

1. Create a contact group
2. Upload your contacts in the contact group you have created.

{% hint style="info" %}
**TIPS**: Use this opportunity to segment your contacts so that you can achieve personalized marketing.
{% endhint %}


# WhatsApp Schedule Module

View every scheduled WhatsApp campaign in one place, including a calendar mode, to track upcoming and past blasts at a glance.

All scheduled WhatsApp campaigns will appear in this section. You can view in Calendar mode.

<figure><img src="https://4071208254-files.gitbook.io/~/files/v0/b/gitbook-x-prod.appspot.com/o/spaces%2FQVxt1FPfwclnTSBjpHJc%2Fuploads%2F1MMewfSF5yzTebfRZVnf%2Fschedule%20campaign.png?alt=media&amp;token=a467689f-760f-4dd6-b4f2-3fcbc411ca5f" alt=""><figcaption></figcaption></figure>


# WhatsApp Account Manager Module

Manage every connected WhatsApp account from one screen, with the option to view or remove any account you no longer use.

You can view and remove all your connected WhatsApp accounts in this section.


# WhatsApp File Manager Module

Browse every media attachment uploaded while building your WhatsApp campaigns, all stored and accessible from one file manager screen.

All your media attachments which you have uploaded during creating your WhatsApp campaign will appear right here.

<figure><img src="https://4071208254-files.gitbook.io/~/files/v0/b/gitbook-x-prod.appspot.com/o/spaces%2FQVxt1FPfwclnTSBjpHJc%2Fuploads%2FqTc1NsLs2YQx0d2wRloI%2Ffile%20manager.png?alt=media&amp;token=87787692-cd22-44b0-846d-678433360ab5" alt=""><figcaption></figcaption></figure>


# WhatsApp Proxies & Anti-Ban Setup

Add proxies to mask your device IP for WhatsApp blasting, plus anti-ban tips on report rates, message timing, and account age.

## How to use it? <a href="#how-to-use-it" id="how-to-use-it"></a>

There are 2 ways for end-users who can use the proxies.

1. The first one is that end-users can use their own proxies when they add their social accounts.
2. The second is that end users automatically use your proxies system. The proxy manager will randomly assign a proxy for them when they add their social account.

We recommend using the Proxy with port 80 or 8080

## How to add new proxy? <a href="#how-to-use-it" id="how-to-use-it"></a>

<figure><img src="https://4071208254-files.gitbook.io/~/files/v0/b/gitbook-x-prod.appspot.com/o/spaces%2FQVxt1FPfwclnTSBjpHJc%2Fuploads%2FjeVdfGr5zxYeCVwbIC7x%2Fproxies.png?alt=media&amp;token=ae082110-ffa1-433d-a2dc-a833c790db64" alt=""><figcaption><p>Go to Proxies Module &#x26; click on Add New button</p></figcaption></figure>

<figure><img src="https://4071208254-files.gitbook.io/~/files/v0/b/gitbook-x-prod.appspot.com/o/spaces%2FQVxt1FPfwclnTSBjpHJc%2Fuploads%2Fw1mGNvgr5jUjVz4mE5Bh%2Fadd%20proxy.png?alt=media&amp;token=a75aa23d-471e-4af0-8086-f1d4e602d4b6" alt=""><figcaption><p>Add your proxy address</p></figcaption></figure>

Follow this format to add your proxy. You can use either of the following layouts for authentication:

* <*username*>:<*password\@ip:port*>
* <*ip:port*>

For eg, *alanre:seh123\@135.181.45.166:8080* OR *135.181.45.166:8080*

<figure><img src="https://4071208254-files.gitbook.io/~/files/v0/b/gitbook-x-prod.appspot.com/o/spaces%2FQVxt1FPfwclnTSBjpHJc%2Fuploads%2FgBs4Vt1919gfHJZ5T26r%2Fsmartproxy-layout.png?alt=media&amp;token=05aa1a67-1d95-4e4c-913b-4adcb2e6cffa" alt=""><figcaption><p>Proxy layout example</p></figcaption></figure>

{% hint style="danger" %}
**WARNING**: Using proxies to mask your device IP address will not provide a 100% anti ban result. However, it will reduce the likelihood of getting blocked by WhatsApp. Hence, please take extra precaution before blasting. Do not use your official WhatsApp number to blast out.&#x20;
{% endhint %}

## Proxy Suggestion <a href="#proxy-suggestion" id="proxy-suggestion"></a>

All of you understand that WhatsApp & IG are very strict on their platform so we have to use proxies to use the script.

There are many proxy providers so it depends on your side and your WhatsApp / IG account which is suitable or not. As a result, we can not recommend exactly the proxy provider but you can try the top proxy companies.

Please check various proxy companies to find the best proxy for you on the internet.

### Anti Ban System

Before I explain on our anti ban system, it is crucial for you to understand how WhatsApp decides which number to ban. WhatsApp bans your number if:

1. A good amount of your recipients report your number as a spam. WhatsApp will block your number based on your device IP
2. Your blasting in between of message is too predictable. For eg, after sending out a message, your system waits for 3 seconds before sending out another message. For every interval is 3 seconds. Too predictable.
3. Your WhatsApp account is very new. New WhatsApp accounts are usually more prone to get blocked easier if you directly use it for blasting purpose. Hence, it is recommended for you to farm your WhatsApp account for 3-6 months before using for blasting purpose.

This is where our anti ban system comes in.

As for anti ban system, we are using multiple proxies to mask your real device IPs away from WhatsApp. This way WhatsApp will not block your real account.

This anti ban system is *not going to be 100% anti ban*. However, it will reduce the chance of your WhatsApp account getting blocked by WhatsApp for good. *Please bare in mind that we are only a software provider. We build useful functions that will help you, but we are not responsible to the result you expect to achieve. For eg, you expect/assume that your WhatsApp accounts will never get block for 1 year after you blast a large volume. We are not able to control this outcome.*


# WABA MultiChat User Overview

Manage conversations across multiple WhatsApp Business Accounts from one unified inbox, with support for support, sales, marketing, and team collaboration.

The **WABA MultiChat User** feature empowers businesses to manage conversations across multiple WhatsApp Business Accounts (WABA) from a single, unified interface. Whether you're handling customer support, sales, or marketing outreach, this functionality streamlines your communication, enhances team collaboration, and ensures no message goes unanswered. It's the ideal solution for businesses managing multiple brands, regions, or client accounts—all within one powerful platform.


# WABA MultiChat: Getting Started Tutorial

Start here for a full walkthrough of WABA MultiChat User, covering setup, channels, inbox, campaigns, and templates, with live WhatsApp support included.

#### This tutorial will give you a head start on how to use this software. Any support can reach out to us via [WhatsApp](https://wa.me/60196788636). <a href="#requirements" id="requirements"></a>


# WABA MultiChat: Account Setup Requirements

See what you need to set up WABA MultiChat: a phone number not on WhatsApp and a Facebook account, then connect via Meta embedded sign-up.

### Requirements <a href="#requirements" id="requirements"></a>

* A phone number that is not associated with any WhatsApp apps
* A Facebook account

WABA Connect allows you to connect your number with WhatsApp business API. Once you connect your number with WhatsApp Business API via WABA Connect ( using meta embedded sign up ), you will be able to use all the features including inbox, campaign, sequence provided by WABA Connect. So, overall after connecting your number you will be able to send marketing messages to your WhatsApp prospects using all the features. If you have all the requirements in place let's start setting up your account.

### Sign in or Sign up <a href="#sign-in-or-sign-up" id="sign-in-or-sign-up"></a>

Firstly, you need to request your WABA Connect account. You can reach out to us via [WhatsApp](https://wa.me/60196788636).


# WABA MultiChat: Dashboard Overview

The WABA MultiChat dashboard displays all of your workspace metrics in one place, giving you a quick snapshot of account activity at a glance.

Dashboard comes with all of your Workspace metrics.

<figure><img src="https://docs.lancepilot.com/~gitbook/image?url=https%3A%2F%2F1807628431-files.gitbook.io%2F%7E%2Ffiles%2Fv0%2Fb%2Fgitbook-x-prod.appspot.com%2Fo%2Fspaces%252FRtLhSWDbYt2p0m0cBDxo%252Fuploads%252FlcttsyU9uCAvlJpyUezE%252Fdashboard.png%3Falt%3Dmedia%26token%3D13f8f595-3636-4ce0-a88b-079e5cd2677d&#x26;width=768&#x26;dpr=4&#x26;quality=100&#x26;sign=faaa065b&#x26;sv=2" alt=""><figcaption></figcaption></figure>


# WABA MultiChat: Create a Channel

Create a channel to connect a phone number to the WhatsApp Business API, then update its profile photo and share a QR code so prospects can message you.

To connect your number to "WhatsApp business API" you need to create a "channel" using that "Phone Number". A channel represents your "Phone Number" that is connect with the "WhatsApp business API". To create a channel for your number you need the following requirements

#### Requirements <a href="#requirements" id="requirements"></a>

* A phone number that is not associated with any WhatsApp apps
* A Facebook account

If you have all of your requirements in place then you can start creating your channel from Channel module by clicking the "Create Channel" button.

### Create and connect a channel <a href="#create-and-connect-a-channel" id="create-and-connect-a-channel"></a>

If you are navigating to this section for the first time then you will need to create and connect a channel. Please check out the video and create and connect a channel.

<figure><img src="https://docs.lancepilot.com/~gitbook/image?url=https%3A%2F%2F1807628431-files.gitbook.io%2F%7E%2Ffiles%2Fv0%2Fb%2Fgitbook-x-prod.appspot.com%2Fo%2Fspaces%252FRtLhSWDbYt2p0m0cBDxo%252Fuploads%252F5MoFN8zTpXVIZQ3AukSN%252Fc1.png%3Falt%3Dmedia%26token%3D0ef42f50-20e7-4852-a02b-b1baf6925fae&#x26;width=768&#x26;dpr=4&#x26;quality=100&#x26;sign=39b5ff02&#x26;sv=2" alt=""><figcaption></figcaption></figure>

#### After you have created and connected a channel, then you will see all your channel related information here. <a href="#after-you-have-created-and-connected-a-channel-with-lancepilot-then-you-will-see-all-your-channel-re" id="after-you-have-created-and-connected-a-channel-with-lancepilot-then-you-will-see-all-your-channel-re"></a>

<figure><img src="https://docs.lancepilot.com/~gitbook/image?url=https%3A%2F%2F1807628431-files.gitbook.io%2F%7E%2Ffiles%2Fv0%2Fb%2Fgitbook-x-prod.appspot.com%2Fo%2Fspaces%252FRtLhSWDbYt2p0m0cBDxo%252Fuploads%252FLMPBDA5xa5SXFzzSJfpy%252Fc2.png%3Falt%3Dmedia%26token%3Dc5fd0e11-e477-490b-9981-5ac043b72d05&#x26;width=768&#x26;dpr=4&#x26;quality=100&#x26;sign=990a9115&#x26;sv=2" alt=""><figcaption></figcaption></figure>

#### How to change my numbers profile photo? <a href="#how-to-change-my-numbers-profile-photo" id="how-to-change-my-numbers-profile-photo"></a>

Click > visit channel manager

<figure><img src="https://docs.lancepilot.com/~gitbook/image?url=https%3A%2F%2F1807628431-files.gitbook.io%2F%7E%2Ffiles%2Fv0%2Fb%2Fgitbook-x-prod.appspot.com%2Fo%2Fspaces%252FRtLhSWDbYt2p0m0cBDxo%252Fuploads%252FqJp9G8Wz1CY6ChM4RePs%252Fc3.png%3Falt%3Dmedia%26token%3D009f82d1-956a-4ee6-800d-0c60c3b31cc2&#x26;width=768&#x26;dpr=4&#x26;quality=100&#x26;sign=382c137b&#x26;sv=2" alt=""><figcaption></figcaption></figure>

Then click Go to channel.

Then select the WhatsApp icon of your channel and click WABA business profile

<figure><img src="https://docs.lancepilot.com/~gitbook/image?url=https%3A%2F%2F1807628431-files.gitbook.io%2F%7E%2Ffiles%2Fv0%2Fb%2Fgitbook-x-prod.appspot.com%2Fo%2Fspaces%252FRtLhSWDbYt2p0m0cBDxo%252Fuploads%252Fe0vZSP6h9yLgtb1cvW5a%252Fc5.png%3Falt%3Dmedia%26token%3D05076c9c-0fcb-4a98-ba57-579039bed103&#x26;width=768&#x26;dpr=4&#x26;quality=100&#x26;sign=51ec133d&#x26;sv=2" alt=""><figcaption></figcaption></figure>

Then upload a new photo and click update

<figure><img src="https://docs.lancepilot.com/~gitbook/image?url=https%3A%2F%2F1807628431-files.gitbook.io%2F%7E%2Ffiles%2Fv0%2Fb%2Fgitbook-x-prod.appspot.com%2Fo%2Fspaces%252FRtLhSWDbYt2p0m0cBDxo%252Fuploads%252FwvERt5xPoZTGuVUxJNVH%252Fc6.png%3Falt%3Dmedia%26token%3De572acad-ec34-4323-bb09-a156c81dcd24&#x26;width=768&#x26;dpr=4&#x26;quality=100&#x26;sign=5256316c&#x26;sv=2" alt=""><figcaption></figcaption></figure>

#### Share QR code with your prospects <a href="#share-qr-code-with-your-prospects" id="share-qr-code-with-your-prospects"></a>

You can share this qrcode/link with your prospect so that they can directly send you message via WhatsApp. You can find your qrcode/link at Channel module.

<figure><img src="https://docs.lancepilot.com/~gitbook/image?url=https%3A%2F%2F1807628431-files.gitbook.io%2F%7E%2Ffiles%2Fv0%2Fb%2Fgitbook-x-prod.appspot.com%2Fo%2Fspaces%252FRtLhSWDbYt2p0m0cBDxo%252Fuploads%252FEEkrRltQaQ6Zkux8fPyh%252Fimage.png%3Falt%3Dmedia%26token%3D6826374b-b150-4455-a8e1-268a5d8564f6&#x26;width=768&#x26;dpr=4&#x26;quality=100&#x26;sign=cb47671a&#x26;sv=2" alt=""><figcaption></figcaption></figure>


# WABA MultiChat: Channel Wallet Guide

Understand Meta's 24-hour conversation fee, then recharge your channel wallet (from $10 by card or $50 by bank transfer) or transfer balance.

### What is a Channel Wallet? <a href="#what-is-a-channel-wallet" id="what-is-a-channel-wallet"></a>

When you send message to your prospects, meta charge a fee. This fee called as meta conversation charge. You will need to have balane within your channel wallet in order to create and submit template and start sending messages. Once you start sending messges to your whatsapp prospects meta will charge the conversation fee from this wallet directly. You can see your balance, transaction history and the conversation charges within this channel wallet section.

### When and How meta charge me? <a href="#when-and-how-meta-charge-me" id="when-and-how-meta-charge-me"></a>

Meta only chagrge once per 24 hours. So, for example i am the business and you are the prospects. So, if i send you a message now meta will charge me an amoung ( for example X ) and meta will create a 24 hours conversation window. So within this conversation window if i send multiple messages to you or the prospects then meta will not charge any money!

{% hint style="warning" %}
*Please note: incoming messages are fee of charges!*
{% endhint %}

### Can I track this 24 hours conversation window clock? <a href="#can-i-track-this-24-hours-conversation-window-clock" id="can-i-track-this-24-hours-conversation-window-clock"></a>

Yes, if you go to inbox and click a prospect then you will see if there is any open conversation window or not. Once the 24 hours window is over, it will show you expired!

<figure><img src="https://docs.lancepilot.com/~gitbook/image?url=https%3A%2F%2F1807628431-files.gitbook.io%2F%7E%2Ffiles%2Fv0%2Fb%2Fgitbook-x-prod.appspot.com%2Fo%2Fspaces%252FRtLhSWDbYt2p0m0cBDxo%252Fuploads%252FXn2YfWTeJcD713jGUHWp%252Fcw2.png%3Falt%3Dmedia%26token%3Debbca9be-25ec-4230-b08b-a3b575d01c92&#x26;width=768&#x26;dpr=4&#x26;quality=100&#x26;sign=b63908ff&#x26;sv=2" alt=""><figcaption></figcaption></figure>

### How can i recharge the channel wallet? <a href="#how-can-i-recharge-the-channel-wallet" id="how-can-i-recharge-the-channel-wallet"></a>

Click the + sign and you will be able to to recharge your channel wallet using your card or bank transfer.

<figure><img src="https://docs.lancepilot.com/~gitbook/image?url=https%3A%2F%2F1807628431-files.gitbook.io%2F%7E%2Ffiles%2Fv0%2Fb%2Fgitbook-x-prod.appspot.com%2Fo%2Fspaces%252FRtLhSWDbYt2p0m0cBDxo%252Fuploads%252FARInAgKYLRmVSLafTy5m%252Fcw3.png%3Falt%3Dmedia%26token%3D1c1bc4b0-0151-4b11-a249-f69846accbbb&#x26;width=768&#x26;dpr=4&#x26;quality=100&#x26;sign=13408bb8&#x26;sv=2" alt=""><figcaption></figcaption></figure>

### What is the minimum recharge amount? <a href="#what-is-the-minimum-recharge-amount" id="what-is-the-minimum-recharge-amount"></a>

1. For Cards minimum recharge amount is $10
2. For Bank Transfers minimum recharge amount is $50

### Can i transfer my balance? <a href="#can-i-transfer-my-balance" id="can-i-transfer-my-balance"></a>

yes you can transfer your balance only within your channels. That means if you have multiple numbers connected then you can transfer balance within your numbers To transfer balance click the transfer icon >

<figure><img src="https://docs.lancepilot.com/~gitbook/image?url=https%3A%2F%2F1807628431-files.gitbook.io%2F%7E%2Ffiles%2Fv0%2Fb%2Fgitbook-x-prod.appspot.com%2Fo%2Fspaces%252FRtLhSWDbYt2p0m0cBDxo%252Fuploads%252FLKtLqywZXZnSdHADRDEN%252Fcw4.png%3Falt%3Dmedia%26token%3D31bcace0-2528-45f4-8d7d-10785662a9c4&#x26;width=768&#x26;dpr=4&#x26;quality=100&#x26;sign=cfdcb2fe&#x26;sv=2" alt=""><figcaption></figcaption></figure>

Then click > transfer balance

<figure><img src="https://docs.lancepilot.com/~gitbook/image?url=https%3A%2F%2F1807628431-files.gitbook.io%2F%7E%2Ffiles%2Fv0%2Fb%2Fgitbook-x-prod.appspot.com%2Fo%2Fspaces%252FRtLhSWDbYt2p0m0cBDxo%252Fuploads%252FylzpdhaWeps5zMBYe3XF%252Fcw5.png%3Falt%3Dmedia%26token%3D21fbaa86-9d11-4561-b72e-c7a19a7ddaf0&#x26;width=768&#x26;dpr=4&#x26;quality=100&#x26;sign=23221bbb&#x26;sv=2" alt=""><figcaption></figcaption></figure>

Then type the number you want to transfer the balance to and the amount and click > transfer balance

<figure><img src="https://docs.lancepilot.com/~gitbook/image?url=https%3A%2F%2F1807628431-files.gitbook.io%2F%7E%2Ffiles%2Fv0%2Fb%2Fgitbook-x-prod.appspot.com%2Fo%2Fspaces%252FRtLhSWDbYt2p0m0cBDxo%252Fuploads%252FKHntWOJRwsSFL6dORPyi%252Fcw6.png%3Falt%3Dmedia%26token%3D853f4aa6-8e7d-4098-9b77-76d70e085167&#x26;width=768&#x26;dpr=4&#x26;quality=100&#x26;sign=59e49d73&#x26;sv=2" alt=""><figcaption></figcaption></figure>


# WABA MultiChat: Inbox Features

The unified inbox lets you chat with WhatsApp prospects in real time, assign conversations to teammates, send templates and quick replies, and view profiles.

### What is inbox Feature? <a href="#what-is-inbox-feature" id="what-is-inbox-feature"></a>

Inbox is a unified dynamic inbox where you can communicate with your whatsapp prospects in real time.

<figure><img src="https://docs.lancepilot.com/~gitbook/image?url=https%3A%2F%2F1807628431-files.gitbook.io%2F%7E%2Ffiles%2Fv0%2Fb%2Fgitbook-x-prod.appspot.com%2Fo%2Fspaces%252FRtLhSWDbYt2p0m0cBDxo%252Fuploads%252FDLeQvVPZxI0dqrh9mS7X%252Fi1.png%3Falt%3Dmedia%26token%3D4aa35333-f2d0-4d8d-a0a3-278ef8bade0b&#x26;width=768&#x26;dpr=4&#x26;quality=100&#x26;sign=2fa27ada&#x26;sv=2" alt=""><figcaption></figcaption></figure>

### How to access templates from inbox? <a href="#how-to-access-templates-from-inbox" id="how-to-access-templates-from-inbox"></a>

You can click the template icon to access all of your approved templates. If there is a green dot bipping, that means you do not have a open conversation window with that prospect and you must send a template message to initiate and continue the conversation with that prospect.

<figure><img src="https://docs.lancepilot.com/~gitbook/image?url=https%3A%2F%2F1807628431-files.gitbook.io%2F%7E%2Ffiles%2Fv0%2Fb%2Fgitbook-x-prod.appspot.com%2Fo%2Fspaces%252FRtLhSWDbYt2p0m0cBDxo%252Fuploads%252FPplbN5HXDOsUB1hK3i2Z%252Fi2.png%3Falt%3Dmedia%26token%3D2bf4ec1d-f2e9-4e31-9b1a-a19cdc27fd4b&#x26;width=768&#x26;dpr=4&#x26;quality=100&#x26;sign=cad349ae&#x26;sv=2" alt=""><figcaption></figcaption></figure>

Once your prospect respond to your message, you are free to write any custom message. if there is no green dot that means your prospect responded to your and you can continue conversation with any custom message.

<figure><img src="https://docs.lancepilot.com/~gitbook/image?url=https%3A%2F%2F1807628431-files.gitbook.io%2F%7E%2Ffiles%2Fv0%2Fb%2Fgitbook-x-prod.appspot.com%2Fo%2Fspaces%252FRtLhSWDbYt2p0m0cBDxo%252Fuploads%252Fw6BNBff0f40tRLPxyTTu%252Fi3.png%3Falt%3Dmedia%26token%3D61fe644d-45ef-49f9-8a88-5c53f0e3f729&#x26;width=768&#x26;dpr=4&#x26;quality=100&#x26;sign=6fa7c484&#x26;sv=2" alt=""><figcaption></figcaption></figure>

### Assign Chat to a team member <a href="#assign-chat-to-a-team-member" id="assign-chat-to-a-team-member"></a>

Click this assign chat icon to assign the specific conversation to your specific team member

<figure><img src="https://docs.lancepilot.com/~gitbook/image?url=https%3A%2F%2F1807628431-files.gitbook.io%2F%7E%2Ffiles%2Fv0%2Fb%2Fgitbook-x-prod.appspot.com%2Fo%2Fspaces%252FRtLhSWDbYt2p0m0cBDxo%252Fuploads%252Ft9fHuoPnuVbzJRLjhllU%252Fi4.png%3Falt%3Dmedia%26token%3Dd9803d16-9b70-4490-b5d0-7bad1fb49ea1&#x26;width=768&#x26;dpr=4&#x26;quality=100&#x26;sign=194204d2&#x26;sv=2" alt=""><figcaption></figcaption></figure>

### Access quick replies <a href="#access-quick-replies" id="access-quick-replies"></a>

Click this quick reply button to access all the saved quick replies

<figure><img src="https://docs.lancepilot.com/~gitbook/image?url=https%3A%2F%2F1807628431-files.gitbook.io%2F%7E%2Ffiles%2Fv0%2Fb%2Fgitbook-x-prod.appspot.com%2Fo%2Fspaces%252FRtLhSWDbYt2p0m0cBDxo%252Fuploads%252FyBMnl6wgyAe9YR2JaaEZ%252Fi5.png%3Falt%3Dmedia%26token%3D651cac4e-cdc0-4800-9d81-e3ad3fb9b3c5&#x26;width=768&#x26;dpr=4&#x26;quality=100&#x26;sign=12f79f2&#x26;sv=2" alt=""><figcaption></figcaption></figure>

### Customer Profile <a href="#customer-profile" id="customer-profile"></a>

Click this 3 dot button to open customer profile

<figure><img src="https://docs.lancepilot.com/~gitbook/image?url=https%3A%2F%2F1807628431-files.gitbook.io%2F%7E%2Ffiles%2Fv0%2Fb%2Fgitbook-x-prod.appspot.com%2Fo%2Fspaces%252FRtLhSWDbYt2p0m0cBDxo%252Fuploads%252F2xjGisTzUEbPUeruLZ4W%252Fi6.png%3Falt%3Dmedia%26token%3D70cb8859-1e3b-4bd0-a9ea-e48d0816ed1a&#x26;width=768&#x26;dpr=4&#x26;quality=100&#x26;sign=81a21e3c&#x26;sv=2" alt=""><figcaption></figcaption></figure>

You can check the lifetime cost for this customer, add tags, move to contact groups, check if this contact is a part of your campaign etc from this profile section

<figure><img src="https://docs.lancepilot.com/~gitbook/image?url=https%3A%2F%2F1807628431-files.gitbook.io%2F%7E%2Ffiles%2Fv0%2Fb%2Fgitbook-x-prod.appspot.com%2Fo%2Fspaces%252FRtLhSWDbYt2p0m0cBDxo%252Fuploads%252FG8nVGZgs031j7NWouWCQ%252Fi7.png%3Falt%3Dmedia%26token%3D31181eb9-064d-47aa-b057-53470b2a31e3&#x26;width=768&#x26;dpr=4&#x26;quality=100&#x26;sign=75074f6&#x26;sv=2" alt=""><figcaption></figcaption></figure>

Use this filter option to get access of specific conversation

<figure><img src="https://docs.lancepilot.com/~gitbook/image?url=https%3A%2F%2F1807628431-files.gitbook.io%2F%7E%2Ffiles%2Fv0%2Fb%2Fgitbook-x-prod.appspot.com%2Fo%2Fspaces%252FRtLhSWDbYt2p0m0cBDxo%252Fuploads%252F2N4cembV6X9dy9a5zMqd%252Fi8.png%3Falt%3Dmedia%26token%3Daa582ea2-27f4-4dcd-85b6-bcd31c060bb6&#x26;width=768&#x26;dpr=4&#x26;quality=100&#x26;sign=c89b35eb&#x26;sv=2" alt=""><figcaption></figcaption></figure>

Send document, location, image, video, emojis using these icon

<figure><img src="https://docs.lancepilot.com/~gitbook/image?url=https%3A%2F%2F1807628431-files.gitbook.io%2F%7E%2Ffiles%2Fv0%2Fb%2Fgitbook-x-prod.appspot.com%2Fo%2Fspaces%252FRtLhSWDbYt2p0m0cBDxo%252Fuploads%252FB4zIRkpTb5GwuZ0wFm8H%252Fi9.png%3Falt%3Dmedia%26token%3Db36198e7-43b7-4562-a12f-3eef7bcb4741&#x26;width=768&#x26;dpr=4&#x26;quality=100&#x26;sign=254b8df1&#x26;sv=2" alt=""><figcaption></figcaption></figure>

Use this reply button to reply to specific message

<figure><img src="https://docs.lancepilot.com/~gitbook/image?url=https%3A%2F%2F1807628431-files.gitbook.io%2F%7E%2Ffiles%2Fv0%2Fb%2Fgitbook-x-prod.appspot.com%2Fo%2Fspaces%252FRtLhSWDbYt2p0m0cBDxo%252Fuploads%252FSOIqwpNfpOWqrinHjnEX%252Fi10.png%3Falt%3Dmedia%26token%3D54a8c294-4790-48c3-966e-3974105ecf11&#x26;width=768&#x26;dpr=4&#x26;quality=100&#x26;sign=cffab061&#x26;sv=2" alt=""><figcaption></figcaption></figure>

Use this search option to find any specific contacts or chats

<figure><img src="https://docs.lancepilot.com/~gitbook/image?url=https%3A%2F%2F1807628431-files.gitbook.io%2F%7E%2Ffiles%2Fv0%2Fb%2Fgitbook-x-prod.appspot.com%2Fo%2Fspaces%252FRtLhSWDbYt2p0m0cBDxo%252Fuploads%252FostxGcI2zhyTdFuvl3ya%252Fi11.png%3Falt%3Dmedia%26token%3Df97e450d-d3d0-4d0c-bf5c-6214760f7647&#x26;width=768&#x26;dpr=4&#x26;quality=100&#x26;sign=94e511c7&#x26;sv=2" alt=""><figcaption></figcaption></figure>


# WABA MultiChat: Quick Replies Tab

Create saved quick replies to send fast, repeatable messages to WhatsApp prospects directly from the inbox without retyping common responses.

### What Is Quick Replies? <a href="#what-is-quick-replies" id="what-is-quick-replies"></a>

Quick replies could be used to send quick messages to your prospects from the inbox section. Here is from where you can easily access the saved quick replies within the inbox.

<figure><img src="https://docs.lancepilot.com/~gitbook/image?url=https%3A%2F%2F1807628431-files.gitbook.io%2F%7E%2Ffiles%2Fv0%2Fb%2Fgitbook-x-prod.appspot.com%2Fo%2Fspaces%252FRtLhSWDbYt2p0m0cBDxo%252Fuploads%252F31yCxmfocI4b0ElRNG8H%252Fqr.png%3Falt%3Dmedia%26token%3D482ec5b0-795f-44b5-aee8-c0fde2ed8662&#x26;width=768&#x26;dpr=4&#x26;quality=100&#x26;sign=6ca1b336&#x26;sv=2" alt=""><figcaption></figcaption></figure>

### How To Create Quick Replies? <a href="#how-to-create-quick-replies" id="how-to-create-quick-replies"></a>

Go to the quick replies tab > click create >

<figure><img src="https://docs.lancepilot.com/~gitbook/image?url=https%3A%2F%2F1807628431-files.gitbook.io%2F%7E%2Ffiles%2Fv0%2Fb%2Fgitbook-x-prod.appspot.com%2Fo%2Fspaces%252FRtLhSWDbYt2p0m0cBDxo%252Fuploads%252FktikPGLWcNHboGsbiuWZ%252Fqr2.png%3Falt%3Dmedia%26token%3D35350714-8353-4bf8-bf6c-7cbcbee3525a&#x26;width=768&#x26;dpr=4&#x26;quality=100&#x26;sign=5499a734&#x26;sv=2" alt=""><figcaption></figcaption></figure>

Fill out the input fields > click create a new quick reply

<figure><img src="https://docs.lancepilot.com/~gitbook/image?url=https%3A%2F%2F1807628431-files.gitbook.io%2F%7E%2Ffiles%2Fv0%2Fb%2Fgitbook-x-prod.appspot.com%2Fo%2Fspaces%252FRtLhSWDbYt2p0m0cBDxo%252Fuploads%252F6YkOhzZt5WIocVffR3fu%252Fqr3.png%3Falt%3Dmedia%26token%3Dfdc52786-034b-4e53-830e-a2ec28f01b78&#x26;width=768&#x26;dpr=4&#x26;quality=100&#x26;sign=85233b5e&#x26;sv=2" alt=""><figcaption></figcaption></figure>


# WABA MultiChat: Contacts Management

Manage WhatsApp contacts with custom fields and groups, then import contacts via CSV or Excel and export your list for use in message campaigns.

### All contacts <a href="#all-contacts" id="all-contacts"></a>

You can find all of your contacts here. You can use the export button to export your contacts in file format and use the create button to add a contact.

<figure><img src="https://docs.lancepilot.com/~gitbook/image?url=https%3A%2F%2F1807628431-files.gitbook.io%2F%7E%2Ffiles%2Fv0%2Fb%2Fgitbook-x-prod.appspot.com%2Fo%2Fspaces%252FRtLhSWDbYt2p0m0cBDxo%252Fuploads%252F6CrwDSYWyGzB4iNm6f2e%252Fcc1.png%3Falt%3Dmedia%26token%3D71645a58-a30b-4a22-9e1c-8fb876152c5f&#x26;width=768&#x26;dpr=4&#x26;quality=100&#x26;sign=dc77a992&#x26;sv=2" alt=""><figcaption></figcaption></figure>

### Fields <a href="#fields" id="fields"></a>

Add custom fields to your contacts

<figure><img src="https://docs.lancepilot.com/~gitbook/image?url=https%3A%2F%2F1807628431-files.gitbook.io%2F%7E%2Ffiles%2Fv0%2Fb%2Fgitbook-x-prod.appspot.com%2Fo%2Fspaces%252FRtLhSWDbYt2p0m0cBDxo%252Fuploads%252FwV4LDAgJ7HYslAMTbgUD%252Fcc2.png%3Falt%3Dmedia%26token%3Dee0a92ee-d4d4-4b47-9a00-fcb30eee6ab7&#x26;width=768&#x26;dpr=4&#x26;quality=100&#x26;sign=47a4fb14&#x26;sv=2" alt=""><figcaption></figcaption></figure>

### Groups <a href="#groups" id="groups"></a>

Create contacts groups to seperate contacts and use it for running campaign. You will be able to access the groups when crating a message campaign.

<figure><img src="https://docs.lancepilot.com/~gitbook/image?url=https%3A%2F%2F1807628431-files.gitbook.io%2F%7E%2Ffiles%2Fv0%2Fb%2Fgitbook-x-prod.appspot.com%2Fo%2Fspaces%252FRtLhSWDbYt2p0m0cBDxo%252Fuploads%252FtotcZulIJzkMe5dU5mrc%252Fcc3.png%3Falt%3Dmedia%26token%3D86b2bfd7-3120-4543-826f-ea786db9bee8&#x26;width=768&#x26;dpr=4&#x26;quality=100&#x26;sign=79cb71f6&#x26;sv=2" alt=""><figcaption></figcaption></figure>

### Import <a href="#import" id="import"></a>

You can import your contacts using xl or csv file format

<figure><img src="https://docs.lancepilot.com/~gitbook/image?url=https%3A%2F%2F1807628431-files.gitbook.io%2F%7E%2Ffiles%2Fv0%2Fb%2Fgitbook-x-prod.appspot.com%2Fo%2Fspaces%252FRtLhSWDbYt2p0m0cBDxo%252Fuploads%252F9yVrFKb9edyCjYhA50p1%252Fcc4.png%3Falt%3Dmedia%26token%3D4fb3575d-a8f2-4821-b74d-7c5d47f7cd63&#x26;width=768&#x26;dpr=4&#x26;quality=100&#x26;sign=e7e87b9f&#x26;sv=2" alt=""><figcaption></figcaption></figure>

You can choose your created group while importing contacts

<figure><img src="https://docs.lancepilot.com/~gitbook/image?url=https%3A%2F%2F1807628431-files.gitbook.io%2F%7E%2Ffiles%2Fv0%2Fb%2Fgitbook-x-prod.appspot.com%2Fo%2Fspaces%252FRtLhSWDbYt2p0m0cBDxo%252Fuploads%252FkIYRGyRDlws2eT6UnVPS%252Fcc5.png%3Falt%3Dmedia%26token%3D2356b2da-11d5-430b-baad-bc0c580a86b0&#x26;width=768&#x26;dpr=4&#x26;quality=100&#x26;sign=cd4a796&#x26;sv=2" alt=""><figcaption></figcaption></figure>


# WABA MultiChat: Message Campaigns

Run or schedule single-message WhatsApp campaigns to your contacts, then track delivery performance and analytics from the campaign dashboard.

You can run single message campaign to your whatsapp prospects using this campaign feature. To create a campaign simply go to campaing tab and click create.

<figure><img src="https://docs.lancepilot.com/~gitbook/image?url=https%3A%2F%2F1807628431-files.gitbook.io%2F%7E%2Ffiles%2Fv0%2Fb%2Fgitbook-x-prod.appspot.com%2Fo%2Fspaces%252FRtLhSWDbYt2p0m0cBDxo%252Fuploads%252FVUe6rkG1caCKH91Zs71r%252Fccc1.png%3Falt%3Dmedia%26token%3D48ebc1ec-0ac4-4f84-8aaf-6510dd023744&#x26;width=768&#x26;dpr=4&#x26;quality=100&#x26;sign=6486a417&#x26;sv=2" alt=""><figcaption></figcaption></figure>

Then fill out all the input field and click run campaign to initiate the campaign. You can also schedule your campaign to a specific date.

<figure><img src="https://docs.lancepilot.com/~gitbook/image?url=https%3A%2F%2F1807628431-files.gitbook.io%2F%7E%2Ffiles%2Fv0%2Fb%2Fgitbook-x-prod.appspot.com%2Fo%2Fspaces%252FRtLhSWDbYt2p0m0cBDxo%252Fuploads%252FCKFviTTlYXpupH54lbRs%252Fccc2.png%3Falt%3Dmedia%26token%3Dfdfe3c26-160b-4d1e-82fb-5002c0596694&#x26;width=768&#x26;dpr=4&#x26;quality=100&#x26;sign=86a5d3d7&#x26;sv=2" alt=""><figcaption></figcaption></figure>

After you have initiated your campaign go to campaign tab and click view for detailed analytics of your campaigns.

<figure><img src="https://docs.lancepilot.com/~gitbook/image?url=https%3A%2F%2F1807628431-files.gitbook.io%2F%7E%2Ffiles%2Fv0%2Fb%2Fgitbook-x-prod.appspot.com%2Fo%2Fspaces%252FRtLhSWDbYt2p0m0cBDxo%252Fuploads%252F3ZkKOQhSGqAnUZAaYBCe%252Fccc3.png%3Falt%3Dmedia%26token%3Db49c6218-d1f9-415e-9a15-5a36c545021c&#x26;width=768&#x26;dpr=4&#x26;quality=100&#x26;sign=67b6bf07&#x26;sv=2" alt=""><figcaption></figcaption></figure>

You will be able to see your campaign performance in this page

<figure><img src="https://docs.lancepilot.com/~gitbook/image?url=https%3A%2F%2F1807628431-files.gitbook.io%2F%7E%2Ffiles%2Fv0%2Fb%2Fgitbook-x-prod.appspot.com%2Fo%2Fspaces%252FRtLhSWDbYt2p0m0cBDxo%252Fuploads%252FRGHbUqyESaEUBFueEr3l%252Fccc4.png%3Falt%3Dmedia%26token%3D8ebc0dfc-ad0f-4d15-99de-93fcbace399a&#x26;width=768&#x26;dpr=4&#x26;quality=100&#x26;sign=95192247&#x26;sv=2" alt=""><figcaption></figcaption></figure>

You can take any contact to your inbox from here

<figure><img src="https://docs.lancepilot.com/~gitbook/image?url=https%3A%2F%2F1807628431-files.gitbook.io%2F%7E%2Ffiles%2Fv0%2Fb%2Fgitbook-x-prod.appspot.com%2Fo%2Fspaces%252FRtLhSWDbYt2p0m0cBDxo%252Fuploads%252FHfbKWQ00dM43vXPSdTOt%252Fccc5.png%3Falt%3Dmedia%26token%3Da9ccabfa-d525-4ea3-96cc-56f729eba973&#x26;width=768&#x26;dpr=4&#x26;quality=100&#x26;sign=39cf33e9&#x26;sv=2" alt=""><figcaption></figcaption></figure>


# WABA MultiChat: Create Templates

Create and submit Meta-approved WhatsApp template messages with headers, media, buttons, and variables, required before messaging any new prospect.

### What is Templates? <a href="#what-is-templates" id="what-is-templates"></a>

As a business, if you want to initiate a first message to your prospects, Then this first message has to be 'approved' by meta. Meta calls this a 'template' message. Example: I am a business and want to send my prospect the first message. So this message has to be a approved message.

{% hint style="warning" %}
Please note after your prospects respond to you, you can write any custom message. So basically, the first message has to be always a template message.
{% endhint %}

**You Can Easily create your templates messages directly from template section and send to meta and get it approved.**

To create a template message, first go to template section > Click create

<figure><img src="https://docs.lancepilot.com/~gitbook/image?url=https%3A%2F%2F1807628431-files.gitbook.io%2F%7E%2Ffiles%2Fv0%2Fb%2Fgitbook-x-prod.appspot.com%2Fo%2Fspaces%252FRtLhSWDbYt2p0m0cBDxo%252Fuploads%252FwNpu5JJ2JpDmkt53wuRW%252Ft1.png%3Falt%3Dmedia%26token%3D1f035784-5c6a-4d5d-8f37-f7c13f5d5942&#x26;width=768&#x26;dpr=4&#x26;quality=100&#x26;sign=4c428aca&#x26;sv=2" alt=""><figcaption></figcaption></figure>

After clicking create, you will see a new tab to create the template message.

1. You need to put a name of your template
2. Select template language ( message language )
3. Select template category ( first message always might be a marketing one so choose marketing )
4. Click next

<figure><img src="https://docs.lancepilot.com/~gitbook/image?url=https%3A%2F%2F1807628431-files.gitbook.io%2F%7E%2Ffiles%2Fv0%2Fb%2Fgitbook-x-prod.appspot.com%2Fo%2Fspaces%252FRtLhSWDbYt2p0m0cBDxo%252Fuploads%252Fx8YjjVJDA1ymySLp4Slm%252Ft2.png%3Falt%3Dmedia%26token%3Df20ab9a7-7808-4b78-a979-15d763d35506&#x26;width=768&#x26;dpr=4&#x26;quality=100&#x26;sign=8ee4fee8&#x26;sv=2" alt=""><figcaption></figcaption></figure>

You will be able to create 3 types of template messages

1. None
2. Text
3. media

<figure><img src="https://docs.lancepilot.com/~gitbook/image?url=https%3A%2F%2F1807628431-files.gitbook.io%2F%7E%2Ffiles%2Fv0%2Fb%2Fgitbook-x-prod.appspot.com%2Fo%2Fspaces%252FRtLhSWDbYt2p0m0cBDxo%252Fuploads%252FA2U0YWb8y1r0EohOuPVK%252Ft3.png%3Falt%3Dmedia%26token%3Dc231a8cf-6e5f-4eff-8f5a-839bf82bf07d&#x26;width=768&#x26;dpr=4&#x26;quality=100&#x26;sign=a3cdd1b7&#x26;sv=2" alt=""><figcaption></figcaption></figure>

#### 1. Message Type None: <a href="#id-1.-message-type-none" id="id-1.-message-type-none"></a>

In this type of message you will be able to add a body within your message.

<figure><img src="https://docs.lancepilot.com/~gitbook/image?url=https%3A%2F%2F1807628431-files.gitbook.io%2F%7E%2Ffiles%2Fv0%2Fb%2Fgitbook-x-prod.appspot.com%2Fo%2Fspaces%252FRtLhSWDbYt2p0m0cBDxo%252Fuploads%252FjwuUdBiR2bSTMFyfPqOS%252Ft4.png%3Falt%3Dmedia%26token%3D0fcf56e3-7da2-463e-8918-9f45c05441fa&#x26;width=768&#x26;dpr=4&#x26;quality=100&#x26;sign=c0ad5fc2&#x26;sv=2" alt=""><figcaption></figcaption></figure>

#### 2. Message Type: Text <a href="#id-2.-message-type-text" id="id-2.-message-type-text"></a>

In this type of message, you get a extra header to your message.

<figure><img src="https://docs.lancepilot.com/~gitbook/image?url=https%3A%2F%2F1807628431-files.gitbook.io%2F%7E%2Ffiles%2Fv0%2Fb%2Fgitbook-x-prod.appspot.com%2Fo%2Fspaces%252FRtLhSWDbYt2p0m0cBDxo%252Fuploads%252Fh87dbiU3Mtlm68Bcgo0w%252Ft5.png%3Falt%3Dmedia%26token%3D7e8e7244-b8b6-4019-a633-46f2607ca772&#x26;width=768&#x26;dpr=4&#x26;quality=100&#x26;sign=c2b9f64b&#x26;sv=2" alt=""><figcaption></figcaption></figure>

#### 3. Message type: Media <a href="#id-3.-message-type-media" id="id-3.-message-type-media"></a>

You can add three type of media within this message type. Image, document, Video.

<figure><img src="https://docs.lancepilot.com/~gitbook/image?url=https%3A%2F%2F1807628431-files.gitbook.io%2F%7E%2Ffiles%2Fv0%2Fb%2Fgitbook-x-prod.appspot.com%2Fo%2Fspaces%252FRtLhSWDbYt2p0m0cBDxo%252Fuploads%252F93seH2RbeaoOdx0zo41h%252Ft6.png%3Falt%3Dmedia%26token%3Dd870cbf4-16a8-42b5-8341-795330d3d2a4&#x26;width=768&#x26;dpr=4&#x26;quality=100&#x26;sign=795c627a&#x26;sv=2" alt=""><figcaption></figcaption></figure>

### Footer <a href="#footer" id="footer"></a>

Add a footer to your any type of message.

<figure><img src="https://docs.lancepilot.com/~gitbook/image?url=https%3A%2F%2F1807628431-files.gitbook.io%2F%7E%2Ffiles%2Fv0%2Fb%2Fgitbook-x-prod.appspot.com%2Fo%2Fspaces%252FRtLhSWDbYt2p0m0cBDxo%252Fuploads%252FVlbNhb9x0v2Mjw5oGbpf%252Ft7.png%3Falt%3Dmedia%26token%3D5ced7709-bc95-4caa-87b1-5543efbbc67e&#x26;width=768&#x26;dpr=4&#x26;quality=100&#x26;sign=52d6c5bc&#x26;sv=2" alt=""><figcaption></figcaption></figure>

### Add a Unsubscribe and Block Button in your message! <a href="#add-a-unsubscribe-and-block-button-in-your-message" id="add-a-unsubscribe-and-block-button-in-your-message"></a>

If you click the switch, it will add the unsubscribe and block button within your message. When you send a message including these buttons and your prospects click one of these buttons then our system automatically stop sending that prospects automated message. Ideology behind these buttons: So, when you are cold outreaching, many people would want to block you. So, to minimize the block and spam rate we implemented these dummy unsubscribe and block buttons so that people might click these buttons rather than actually blocking you from whatsapp

<figure><img src="https://docs.lancepilot.com/~gitbook/image?url=https%3A%2F%2F1807628431-files.gitbook.io%2F%7E%2Ffiles%2Fv0%2Fb%2Fgitbook-x-prod.appspot.com%2Fo%2Fspaces%252FRtLhSWDbYt2p0m0cBDxo%252Fuploads%252Fw3XMd3jBfkDpbkBiiazj%252Ft8.png%3Falt%3Dmedia%26token%3D33b79849-5263-4e9c-9e9c-fb6f2c4944f3&#x26;width=768&#x26;dpr=4&#x26;quality=100&#x26;sign=a38e5952&#x26;sv=2" alt=""><figcaption></figcaption></figure>

### Add customized button with Link and phone number <a href="#add-customized-button-with-link-and-phone-number" id="add-customized-button-with-link-and-phone-number"></a>

Click add buttons to add any cusomized link and phone number

<figure><img src="https://docs.lancepilot.com/~gitbook/image?url=https%3A%2F%2F1807628431-files.gitbook.io%2F%7E%2Ffiles%2Fv0%2Fb%2Fgitbook-x-prod.appspot.com%2Fo%2Fspaces%252FRtLhSWDbYt2p0m0cBDxo%252Fuploads%252FMg41QCFcd8y74wLEuzQC%252Ft9.png%3Falt%3Dmedia%26token%3D2d4560a6-e21b-4384-b3da-d1bf9fd2c580&#x26;width=768&#x26;dpr=4&#x26;quality=100&#x26;sign=3823eba5&#x26;sv=2" alt=""><figcaption></figcaption></figure>

Click Visit a website > to create a custom link button. You can add any link to your buttons. Your prospects will be redirected to the link upon clicking. You can add as many buttons as you want!

<figure><img src="https://docs.lancepilot.com/~gitbook/image?url=https%3A%2F%2F1807628431-files.gitbook.io%2F%7E%2Ffiles%2Fv0%2Fb%2Fgitbook-x-prod.appspot.com%2Fo%2Fspaces%252FRtLhSWDbYt2p0m0cBDxo%252Fuploads%252FMf5Ii7T5pKJwR4LxHPBI%252Ft10.png%3Falt%3Dmedia%26token%3Df775f7da-ed13-4b37-bbfb-552e43a24b92&#x26;width=768&#x26;dpr=4&#x26;quality=100&#x26;sign=ae7e18b8&#x26;sv=2" alt=""><figcaption></figcaption></figure>

Click call phone number > to create a button to show showing a phone number

<figure><img src="https://docs.lancepilot.com/~gitbook/image?url=https%3A%2F%2F1807628431-files.gitbook.io%2F%7E%2Ffiles%2Fv0%2Fb%2Fgitbook-x-prod.appspot.com%2Fo%2Fspaces%252FRtLhSWDbYt2p0m0cBDxo%252Fuploads%252FiaPWb9HL54ahx1PAafcX%252Ft11.png%3Falt%3Dmedia%26token%3Df6bca6fa-067b-45f3-995e-559b7433e34e&#x26;width=768&#x26;dpr=4&#x26;quality=100&#x26;sign=66445a17&#x26;sv=2" alt=""><figcaption></figcaption></figure>

### Now Submit to Meta For approval <a href="#now-submit-to-meta-for-approval" id="now-submit-to-meta-for-approval"></a>

After everything is done, click submit

<figure><img src="https://docs.lancepilot.com/~gitbook/image?url=https%3A%2F%2F1807628431-files.gitbook.io%2F%7E%2Ffiles%2Fv0%2Fb%2Fgitbook-x-prod.appspot.com%2Fo%2Fspaces%252FRtLhSWDbYt2p0m0cBDxo%252Fuploads%252Fqc3iZHtk34o3w1vGcqGI%252Ft12.png%3Falt%3Dmedia%26token%3D2cbf5679-6d7f-49e7-936a-f31e7d3d1cc9&#x26;width=768&#x26;dpr=4&#x26;quality=100&#x26;sign=94ff4710&#x26;sv=2" alt=""><figcaption></figcaption></figure>

After submitting, you will see the list of your submitted templates here > And initially submitted templates status will be shown as pending. Please note: The first template could take upto 24 hours to get approved by meta ( normally take few hours ). After your first template is approved the next templates takes only few second or minutes to get approved!

<figure><img src="https://docs.lancepilot.com/~gitbook/image?url=https%3A%2F%2F1807628431-files.gitbook.io%2F%7E%2Ffiles%2Fv0%2Fb%2Fgitbook-x-prod.appspot.com%2Fo%2Fspaces%252FRtLhSWDbYt2p0m0cBDxo%252Fuploads%252FT36fbQcSHJgi0VKkGql6%252Ft13.png%3Falt%3Dmedia%26token%3D9c4dce06-c3d8-46dc-a422-061f3d5d7566&#x26;width=768&#x26;dpr=4&#x26;quality=100&#x26;sign=f4e0566d&#x26;sv=2" alt=""><figcaption></figcaption></figure>

### Click sync button to check if your message is approved or rejected. <a href="#click-sync-button-to-check-if-your-message-is-approved-or-rejected" id="click-sync-button-to-check-if-your-message-is-approved-or-rejected"></a>

<figure><img src="https://docs.lancepilot.com/~gitbook/image?url=https%3A%2F%2F1807628431-files.gitbook.io%2F%7E%2Ffiles%2Fv0%2Fb%2Fgitbook-x-prod.appspot.com%2Fo%2Fspaces%252FRtLhSWDbYt2p0m0cBDxo%252Fuploads%252F27CiyiVBopuemLts2nMX%252Ft14.png%3Falt%3Dmedia%26token%3Dffcf77c0-12ce-4f43-9b28-636177e628c6&#x26;width=768&#x26;dpr=4&#x26;quality=100&#x26;sign=de423bb5&#x26;sv=2" alt=""><figcaption></figcaption></figure>

### What to do if my template is rejected? <a href="#what-to-do-if-my-template-is-rejected" id="what-to-do-if-my-template-is-rejected"></a>

Normally every template is approved by meta but in case if its rejected you can do 2 things.

1. Change the copy and resubmit
2. Change the template category to Service and submit again

### How to use variables in a Template message <a href="#how-to-use-variables-in-a-template-message" id="how-to-use-variables-in-a-template-message"></a>

You can use variables to put a dynamic value on the template message. To use a variable first you need to add the variable to your template message's header or body. To add a variable you can use this syntax `{{1}}` and this represents a variable.

Note that a variable cannot be added on the start or end of the text and on the header text only 1 variable is allowed.

<figure><img src="https://docs.lancepilot.com/~gitbook/image?url=https%3A%2F%2F1807628431-files.gitbook.io%2F%7E%2Ffiles%2Fv0%2Fb%2Fgitbook-x-prod.appspot.com%2Fo%2Fspaces%252FRtLhSWDbYt2p0m0cBDxo%252Fuploads%252FouQpMFqUkGbFr9PZv39g%252Fimage.png%3Falt%3Dmedia%26token%3D47c45f69-e820-413a-8bfd-4428db372d06&#x26;width=768&#x26;dpr=4&#x26;quality=100&#x26;sign=f8b7dce5&#x26;sv=2" alt=""><figcaption></figcaption></figure>

In addition you can click on the bottom right corner icon button to add a variable in body of the template message.

<figure><img src="https://docs.lancepilot.com/~gitbook/image?url=https%3A%2F%2F1807628431-files.gitbook.io%2F%7E%2Ffiles%2Fv0%2Fb%2Fgitbook-x-prod.appspot.com%2Fo%2Fspaces%252FRtLhSWDbYt2p0m0cBDxo%252Fuploads%252Fw0txCrsG8kvPW8bwfj99%252Fimage.png%3Falt%3Dmedia%26token%3D0b81d793-537a-4d86-bfa8-a54314e42fd0&#x26;width=768&#x26;dpr=4&#x26;quality=100&#x26;sign=e87e00bc&#x26;sv=2" alt=""><figcaption></figcaption></figure>

After you have added all of your variables you need to provide "example" values for that variable. So for example you created a variable for adding the name of the contact that you want to send the message to so you need to put a "example" for name like "John Doe" this is so that meta can understand what kind of values are you planning to use on the variable.

<figure><img src="https://docs.lancepilot.com/~gitbook/image?url=https%3A%2F%2F1807628431-files.gitbook.io%2F%7E%2Ffiles%2Fv0%2Fb%2Fgitbook-x-prod.appspot.com%2Fo%2Fspaces%252FRtLhSWDbYt2p0m0cBDxo%252Fuploads%252FlYIKRIwRltgay72FLehJ%252Fimage.png%3Falt%3Dmedia%26token%3Df326f90d-fcc7-4d54-a8ec-326507c8d2ec&#x26;width=768&#x26;dpr=4&#x26;quality=100&#x26;sign=73572398&#x26;sv=2" alt=""><figcaption></figcaption></figure>


# WABA MultiChat: Sequence Campaigns

Build automated multi-step WhatsApp sequences using approved templates, schedule each step by day, add variant messages, and track results.

### What is a Sequence Campaign <a href="#what-is-a-sequence-campaign" id="what-is-a-sequence-campaign"></a>

Using this sequence campaign you can automate and send multi step campaign to your whatsapp prospects.

<figure><img src="https://docs.lancepilot.com/~gitbook/image?url=https%3A%2F%2F1807628431-files.gitbook.io%2F%7E%2Ffiles%2Fv0%2Fb%2Fgitbook-x-prod.appspot.com%2Fo%2Fspaces%252FRtLhSWDbYt2p0m0cBDxo%252Fuploads%252Frg0I2u2vvmaU6Krjw1j2%252Fs1.png%3Falt%3Dmedia%26token%3D7a85e719-588f-4eda-b2be-e8dd3880af2b&#x26;width=768&#x26;dpr=4&#x26;quality=100&#x26;sign=ad00f8e9&#x26;sv=2" alt=""><figcaption></figcaption></figure>

### How to create a Sequence Campaign <a href="#how-to-create-a-sequence-campaign" id="how-to-create-a-sequence-campaign"></a>

Click create and give it a name

<figure><img src="https://docs.lancepilot.com/~gitbook/image?url=https%3A%2F%2F1807628431-files.gitbook.io%2F%7E%2Ffiles%2Fv0%2Fb%2Fgitbook-x-prod.appspot.com%2Fo%2Fspaces%252FRtLhSWDbYt2p0m0cBDxo%252Fuploads%252FU7pvS46SGx3RMDu4Vibw%252Fs2.png%3Falt%3Dmedia%26token%3D76082059-26e5-419d-8325-17475af2e1d3&#x26;width=768&#x26;dpr=4&#x26;quality=100&#x26;sign=51a4dc3c&#x26;sv=2" alt=""><figcaption></figcaption></figure>

After that you need to set step 1. So basically you need to select a message which you want to send on step 1. Since its a first message to your prospects then it has to be a template message. If you click add step > you will see all of your approved template message and you will need to select the template message you want to send.

<figure><img src="https://docs.lancepilot.com/~gitbook/image?url=https%3A%2F%2F1807628431-files.gitbook.io%2F%7E%2Ffiles%2Fv0%2Fb%2Fgitbook-x-prod.appspot.com%2Fo%2Fspaces%252FRtLhSWDbYt2p0m0cBDxo%252Fuploads%252FWoKMTWnN9XtZ6oHXWSqH%252Fs3.png%3Falt%3Dmedia%26token%3D9a016c24-382c-4874-96c4-1337200f3ca4&#x26;width=768&#x26;dpr=4&#x26;quality=100&#x26;sign=735ee7fc&#x26;sv=2" alt=""><figcaption></figcaption></figure>

select a template message

<figure><img src="https://docs.lancepilot.com/~gitbook/image?url=https%3A%2F%2F1807628431-files.gitbook.io%2F%7E%2Ffiles%2Fv0%2Fb%2Fgitbook-x-prod.appspot.com%2Fo%2Fspaces%252FRtLhSWDbYt2p0m0cBDxo%252Fuploads%252FEfYzgFhLKxtIgWj5u39L%252Fs4.png%3Falt%3Dmedia%26token%3D40c2eb03-1467-44b4-a131-f60959949232&#x26;width=768&#x26;dpr=4&#x26;quality=100&#x26;sign=9359a763&#x26;sv=2" alt=""><figcaption></figcaption></figure>

After selecting a message, you need to select the day 1 as this message will be running on day 1. You can also select a time as well. Then click add step >

{% hint style="info" %}
Please note: after signing up to WABA Connect, please go to your settings and set your time zone. As based on your time zone the message sending time will be shown.
{% endhint %}

<figure><img src="https://docs.lancepilot.com/~gitbook/image?url=https%3A%2F%2F1807628431-files.gitbook.io%2F%7E%2Ffiles%2Fv0%2Fb%2Fgitbook-x-prod.appspot.com%2Fo%2Fspaces%252FRtLhSWDbYt2p0m0cBDxo%252Fuploads%252FQRwEO679AzPmBMvRJO2f%252Fs5.png%3Falt%3Dmedia%26token%3Dc8addc60-3262-41a9-b639-e54dff6fa338&#x26;width=768&#x26;dpr=4&#x26;quality=100&#x26;sign=d0322272&#x26;sv=2" alt=""><figcaption></figcaption></figure>

Now you can see that your step 1 has been added

<figure><img src="https://docs.lancepilot.com/~gitbook/image?url=https%3A%2F%2F1807628431-files.gitbook.io%2F%7E%2Ffiles%2Fv0%2Fb%2Fgitbook-x-prod.appspot.com%2Fo%2Fspaces%252FRtLhSWDbYt2p0m0cBDxo%252Fuploads%252F5iutTmNONqwntRv5orSb%252Fs6.png%3Falt%3Dmedia%26token%3D6f6add3a-6fa8-4b3b-aead-4f7ec683663f&#x26;width=768&#x26;dpr=4&#x26;quality=100&#x26;sign=99184ac8&#x26;sv=2" alt=""><figcaption></figcaption></figure>

Now click again add step to add more steps. In each steps you will be able to set the day of that message. For example if you select day 5 then the second step message will be sent after 4 days of your first step.&#x20;

*Please note: You need to select the template message you want to send in each step*

<figure><img src="https://docs.lancepilot.com/~gitbook/image?url=https%3A%2F%2F1807628431-files.gitbook.io%2F%7E%2Ffiles%2Fv0%2Fb%2Fgitbook-x-prod.appspot.com%2Fo%2Fspaces%252FRtLhSWDbYt2p0m0cBDxo%252Fuploads%252FvRqYEcK550xr5NOACA3g%252Fs9.png%3Falt%3Dmedia%26token%3D9c5a5cf6-9513-4f33-ba55-b343b011c11c&#x26;width=768&#x26;dpr=4&#x26;quality=100&#x26;sign=34545819&#x26;sv=2" alt=""><figcaption></figcaption></figure>

<figure><img src="https://docs.lancepilot.com/~gitbook/image?url=https%3A%2F%2F1807628431-files.gitbook.io%2F%7E%2Ffiles%2Fv0%2Fb%2Fgitbook-x-prod.appspot.com%2Fo%2Fspaces%252FRtLhSWDbYt2p0m0cBDxo%252Fuploads%252FHWP9r1DTSTqb2jw0Uwpz%252Fs10.png%3Falt%3Dmedia%26token%3Db18bc3b0-7f83-440e-bc61-dc810ee50c02&#x26;width=768&#x26;dpr=4&#x26;quality=100&#x26;sign=6dcdd57a&#x26;sv=2" alt=""><figcaption></figcaption></figure>

<figure><img src="https://docs.lancepilot.com/~gitbook/image?url=https%3A%2F%2F1807628431-files.gitbook.io%2F%7E%2Ffiles%2Fv0%2Fb%2Fgitbook-x-prod.appspot.com%2Fo%2Fspaces%252FRtLhSWDbYt2p0m0cBDxo%252Fuploads%252FyV9ws5WjMLIo9CkCBpdP%252Fs11.png%3Falt%3Dmedia%26token%3Dfb60b75c-42e5-4da4-bedf-dd6dfe8976d4&#x26;width=768&#x26;dpr=4&#x26;quality=100&#x26;sign=1975c0da&#x26;sv=2" alt=""><figcaption></figcaption></figure>

### Add Variant Message to any step <a href="#add-variant-message-to-any-step" id="add-variant-message-to-any-step"></a>

If you want to send variant message to your prospects in any step then click add variant and select any template message to set as a variant message.

<figure><img src="https://docs.lancepilot.com/~gitbook/image?url=https%3A%2F%2F1807628431-files.gitbook.io%2F%7E%2Ffiles%2Fv0%2Fb%2Fgitbook-x-prod.appspot.com%2Fo%2Fspaces%252FRtLhSWDbYt2p0m0cBDxo%252Fuploads%252FrF1P39F9S3szfHkXDUkc%252Fs12.png%3Falt%3Dmedia%26token%3D45fdcf0d-236a-4d94-ab1b-53e6129bd73e&#x26;width=768&#x26;dpr=4&#x26;quality=100&#x26;sign=3a891c88&#x26;sv=2" alt=""><figcaption></figcaption></figure>

<figure><img src="https://docs.lancepilot.com/~gitbook/image?url=https%3A%2F%2F1807628431-files.gitbook.io%2F%7E%2Ffiles%2Fv0%2Fb%2Fgitbook-x-prod.appspot.com%2Fo%2Fspaces%252FRtLhSWDbYt2p0m0cBDxo%252Fuploads%252FH3thfEp8HMoa7z9NRqWX%252Fs13.png%3Falt%3Dmedia%26token%3D3b0282d3-365e-4456-8190-9ceceacd9e77&#x26;width=768&#x26;dpr=4&#x26;quality=100&#x26;sign=ff5c48f&#x26;sv=2" alt=""><figcaption></figcaption></figure>

### Add contacts to the Sequence <a href="#add-contacts-to-the-sequence" id="add-contacts-to-the-sequence"></a>

Go to contacts tab and add contact groups to run the sequence to the specific contact groups

<figure><img src="https://docs.lancepilot.com/~gitbook/image?url=https%3A%2F%2F1807628431-files.gitbook.io%2F%7E%2Ffiles%2Fv0%2Fb%2Fgitbook-x-prod.appspot.com%2Fo%2Fspaces%252FRtLhSWDbYt2p0m0cBDxo%252Fuploads%252FXaExbbGmZ6CzAowBUBuA%252Fs14.png%3Falt%3Dmedia%26token%3D57a0e333-fcb1-4745-bbba-4b70de947084&#x26;width=768&#x26;dpr=4&#x26;quality=100&#x26;sign=239b07c1&#x26;sv=2" alt=""><figcaption></figcaption></figure>

<figure><img src="https://docs.lancepilot.com/~gitbook/image?url=https%3A%2F%2F1807628431-files.gitbook.io%2F%7E%2Ffiles%2Fv0%2Fb%2Fgitbook-x-prod.appspot.com%2Fo%2Fspaces%252FRtLhSWDbYt2p0m0cBDxo%252Fuploads%252F0aSAoZWD906z7YGS3tos%252Fs16.png%3Falt%3Dmedia%26token%3D9bf244cc-9547-47d0-bc0e-bf11b4b05cca&#x26;width=768&#x26;dpr=4&#x26;quality=100&#x26;sign=2a27b756&#x26;sv=2" alt=""><figcaption></figcaption></figure>

<figure><img src="https://docs.lancepilot.com/~gitbook/image?url=https%3A%2F%2F1807628431-files.gitbook.io%2F%7E%2Ffiles%2Fv0%2Fb%2Fgitbook-x-prod.appspot.com%2Fo%2Fspaces%252FRtLhSWDbYt2p0m0cBDxo%252Fuploads%252F47EsQIwQznRHBb2vzbQM%252Fs15.png%3Falt%3Dmedia%26token%3D479e99a2-caf6-488a-b4cb-a06badbdfd95&#x26;width=768&#x26;dpr=4&#x26;quality=100&#x26;sign=54aff468&#x26;sv=2" alt=""><figcaption></figcaption></figure>

Go to reports section to check the performance of your sequence campaign

<figure><img src="https://docs.lancepilot.com/~gitbook/image?url=https%3A%2F%2F1807628431-files.gitbook.io%2F%7E%2Ffiles%2Fv0%2Fb%2Fgitbook-x-prod.appspot.com%2Fo%2Fspaces%252FRtLhSWDbYt2p0m0cBDxo%252Fuploads%252F5oHErlBm2ah2L6y90yyl%252Fs17.png%3Falt%3Dmedia%26token%3D2b1ee297-7295-4e7d-94b3-b5966c9cf9a3&#x26;width=768&#x26;dpr=4&#x26;quality=100&#x26;sign=5a4facac&#x26;sv=2" alt=""><figcaption></figcaption></figure>

### Run or Schedule the Sequence Campaign <a href="#run-or-schedule-the-sequence-campaign" id="run-or-schedule-the-sequence-campaign"></a>

Now you can either run your seqeunce now by clicking run sequence or schedule the sequence by clicking schedule sequence

<figure><img src="https://docs.lancepilot.com/~gitbook/image?url=https%3A%2F%2F1807628431-files.gitbook.io%2F%7E%2Ffiles%2Fv0%2Fb%2Fgitbook-x-prod.appspot.com%2Fo%2Fspaces%252FRtLhSWDbYt2p0m0cBDxo%252Fuploads%252FPDDnnk0EZmlM8oNXAEby%252Fs18.png%3Falt%3Dmedia%26token%3D27ed5d4e-9fb9-4e22-9287-96e24ece1d80&#x26;width=768&#x26;dpr=4&#x26;quality=100&#x26;sign=c24c231&#x26;sv=2" alt=""><figcaption></figcaption></figure>


# WABA MultiChat: Add Team Members

Add team members or staff to your WABA MultiChat workspace by creating a user account and assigning them the team member role.

You can add your team memers or staffs to manage your workspace. To add team members, please go to Users Tab > click create > fill the info > Choose type as team member > Click create user

<figure><img src="https://docs.lancepilot.com/~gitbook/image?url=https%3A%2F%2F1807628431-files.gitbook.io%2F%7E%2Ffiles%2Fv0%2Fb%2Fgitbook-x-prod.appspot.com%2Fo%2Fspaces%252FRtLhSWDbYt2p0m0cBDxo%252Fuploads%252FOfWdsP6nOhy5zbWoC5Bf%252Fw10.png%3Falt%3Dmedia%26token%3Dd41f1455-c9f8-4350-a00a-3228bfc9d240&#x26;width=768&#x26;dpr=4&#x26;quality=100&#x26;sign=6abb1bbf&#x26;sv=2" alt=""><figcaption></figcaption></figure>


# WABA MultiChat: Settings Tab

Manage your account, workspace, and custom domain settings for WABA MultiChat, all from one centralized settings tab.

### Account Settings <a href="#account-settings" id="account-settings"></a>

<figure><img src="https://docs.lancepilot.com/~gitbook/image?url=https%3A%2F%2F1807628431-files.gitbook.io%2F%7E%2Ffiles%2Fv0%2Fb%2Fgitbook-x-prod.appspot.com%2Fo%2Fspaces%252FRtLhSWDbYt2p0m0cBDxo%252Fuploads%252FbYozjpzVAMDpVMFEEAA3%252Fz2.png%3Falt%3Dmedia%26token%3D2f80ec05-7a77-4e60-9226-2285a9252b40&#x26;width=768&#x26;dpr=4&#x26;quality=100&#x26;sign=c0c0c15&#x26;sv=2" alt=""><figcaption></figcaption></figure>

### WorkSpace Settings <a href="#workspace-settings" id="workspace-settings"></a>

<figure><img src="https://docs.lancepilot.com/~gitbook/image?url=https%3A%2F%2F1807628431-files.gitbook.io%2F%7E%2Ffiles%2Fv0%2Fb%2Fgitbook-x-prod.appspot.com%2Fo%2Fspaces%252FRtLhSWDbYt2p0m0cBDxo%252Fuploads%252FWqBuAkqn4MTVbF2niur3%252Fz3.png%3Falt%3Dmedia%26token%3D8071f970-b242-4c8a-b850-35f20d30fb83&#x26;width=768&#x26;dpr=4&#x26;quality=100&#x26;sign=d43b8746&#x26;sv=2" alt=""><figcaption></figcaption></figure>

### Custom Domain Settings <a href="#custom-domain-settings" id="custom-domain-settings"></a>

<figure><img src="https://docs.lancepilot.com/~gitbook/image?url=https%3A%2F%2F1807628431-files.gitbook.io%2F%7E%2Ffiles%2Fv0%2Fb%2Fgitbook-x-prod.appspot.com%2Fo%2Fspaces%252FRtLhSWDbYt2p0m0cBDxo%252Fuploads%252F3uCN5QDMycmFbeMnZLiZ%252Fz4.png%3Falt%3Dmedia%26token%3Db9f3f9ac-c69b-435d-9e00-e1226f275133&#x26;width=768&#x26;dpr=4&#x26;quality=100&#x26;sign=b09c4e14&#x26;sv=2" alt=""><figcaption></figcaption></figure>


# WABA: How to Register a New Number

Step-by-step guide to registering a new phone number on the WhatsApp Business API via Meta's embedded sign-up, including OTP and 2FA PIN setup.

### Requirements <a href="#requirements" id="requirements"></a>

1. Phone Number not on WhatsApp ( should be able to receive calls / sms )
2. Old Facebook account
3. 4-5 pages professional website

### How to Sign up with WhatsApp API/ Register a Number with WhatsApp API via WABA Connect? <a href="#how-to-sign-up-with-whatsapp-api-register-a-number-with-whatsapp-api-via-lancepilot" id="how-to-sign-up-with-whatsapp-api-register-a-number-with-whatsapp-api-via-lancepilot"></a>

* Sign in to WABA Connect > Channel > Click "Create a channel"
* You will be redirected click "Go to channel"
* Click on **"Add New Channel"** and select your WABA currency
* Click on **"Connect"** and log in with Facebook.
* Choose to create a new business portfolio, a Meta business account, or select an existing one.

<figure><img src="https://4071208254-files.gitbook.io/~/files/v0/b/gitbook-x-prod.appspot.com/o/spaces%2FQVxt1FPfwclnTSBjpHJc%2Fuploads%2FOi1JrQgQfOU2zpZlIQkx%2FWhatsApp%20Image%202025-12-10%20at%2013.36.39.jpeg?alt=media&amp;token=5b131bf3-faac-432e-a10f-230a922ff17b" alt=""><figcaption></figcaption></figure>

* Click on **"Next"**. Always opt to create a new WhatsApp account.

{% hint style="warning" %}
**NOTE**: Always select "*Start with a new WhatsApp phone number*". Do not choose "**Share existing WhatsApp phone numbers**".
{% endhint %}

* Enter your WhatsApp account name (your brand name or business legal name) and select a category.
* Enter your phone number and verify the OTP received via phone call or text message.
* Click on **"Continue"** and then **"Finish."**
* Wait a few seconds for the popup to close automatically. Your channel will then be displayed.
* Copy **Channel ID**

<figure><img src="https://4071208254-files.gitbook.io/~/files/v0/b/gitbook-x-prod.appspot.com/o/spaces%2FQVxt1FPfwclnTSBjpHJc%2Fuploads%2FjFtD8PzLDvM01exTQV4K%2FWhatsApp%20Image%202025-12-10%20at%2013.38.59.jpeg?alt=media&amp;token=02ffcf37-70ac-431b-a919-e11d443a5fea" alt=""><figcaption></figcaption></figure>

* Click on **"Connect,"** enter a name for your channel, select a color, and click on **"Create Channel."**
* You will see your channel with the status **"Pending."**
* Click on the WhatsApp icon, go to **Two-Factor Authentication**, and enter a six-digit pin. Remember this pin.

<figure><img src="https://4071208254-files.gitbook.io/~/files/v0/b/gitbook-x-prod.appspot.com/o/spaces%2FQVxt1FPfwclnTSBjpHJc%2Fuploads%2FpcdRf5panzBG9JxX5pGz%2FWhatsApp%20Image%202025-12-10%20at%2013.41.13.jpeg?alt=media&amp;token=40a9578c-3bb9-4d23-95d3-e17696b61ccc" alt=""><figcaption></figcaption></figure>

* Click on **"Register Pin."**
* Refresh the page. Your number should now be connected.
* Now click 3 dots icon and click "Copy channel ID"

![](https://docs.lancepilot.com/~gitbook/image?url=https%3A%2F%2F1807628431-files.gitbook.io%2F%7E%2Ffiles%2Fv0%2Fb%2Fgitbook-x-prod.appspot.com%2Fo%2Fspaces%252FRtLhSWDbYt2p0m0cBDxo%252Fuploads%252FItgf9bip8a0SKZrrXyD4%252Fimage.png%3Falt%3Dmedia%26token%3D1bad5ec8-e4ab-4129-957c-9487eeaacd40\&width=768\&dpr=4\&quality=100\&sign=6d1e9541\&sv=2)

* Go back to WABA Connect > Channel
* Click "connect channel"

<figure><img src="https://4071208254-files.gitbook.io/~/files/v0/b/gitbook-x-prod.appspot.com/o/spaces%2FQVxt1FPfwclnTSBjpHJc%2Fuploads%2FSLHCjHgUFbkTeMexpbv4%2FWhatsApp%20Image%202025-12-10%20at%2013.38.59%20(1).jpeg?alt=media&amp;token=6787c6fd-fc71-4a01-83bc-72544589aeb5" alt=""><figcaption></figcaption></figure>

* Paste the copied Channel ID & click "Connect Your Channel"


# Fix WABA Migration & Permissions Errors

Resolve a stuck WhatsApp API migration or permissions error by deleting the number, permanently disabling the old channel, and re-registering it.

When encountering a migration error, it's necessary to take specific steps to resolve the issue. It's important to understand that this error is often external, possibly stemming from Meta, and not directly caused by our services. To address this, follow the procedure below:

**Step 1 - Delete the number from WhatsApp API**

**Please Note**

* All existing messaging templates will be lost.
* Any verified status, such as the green tick, will also be removed.

**Step 2 - Permanently Disable Existing Channel -**

Navigate to your channel, click on the three dots menu, and select "Permanently disable channel."

**Step 3 - Register the WhatsApp API Number**


# How to Change Your WhatsApp Display Name

Change your WhatsApp Business API display name by applying through WhatsApp Manager, then re-enabling two-factor authentication once approved.

### How to Change Your WhatsApp API Display Name <a href="#how-to-change-your-whatsapp-api-display-name" id="how-to-change-your-whatsapp-api-display-name"></a>

Changing your WhatsApp API display name involves two main steps. Here's how to do it:

**Step 1: Apply for a New Display Name**

1. Navigate to the [WhatsApp Manager](https://business.facebook.com/wa/manage).
2. Submit your request for a new display name. Be sure to follow WhatsApp's naming guidelines to increase your chance of approval.
3. If your request is rejected, revise your submission and apply again. Repeat this process until your request is approved.

**Step 2: Set Your New Display Name**

Once your new display name is approved, set two-factor authentication again for your WhatsApp Number.

This process ensures your WhatsApp API account reflects your new display name.


# How to Apply for Meta Business Verification

Verify your Meta Business account for WhatsApp API with a registration certificate, address proof, and a matching business website, reviewed in about two days.

To verify your Meta Business account for WhatsApp Business API:

1. Go to Channels, click on the WhatsApp icon (WABA Options) and then click on "Complete business verification" and follow these steps.

**Before** starting the verification process, ensure you have the following:

* Government Registration certificate with company name
* 1 Address proof with company name and address (phone number in some cases)
* Working website with 4-5 pages and company name exactly as per document in website footer
* Email Id with website domain

1. Click on "start verification" and "get started."
2. If you're unsure about the required documents, click on "accepted documents" for guidance.
3. Ensure the details match your legal documents character by character.
4. Upload the appropriate documents requested by Meta.
5. Verify your email address by entering the OTP received from Meta.
6. Verify your phone number if required, either by phone call or SMS.
7. Ensure your website footer displays your business name exactly as per your documents.

Meta will review and verify your business within approximately two working days. If there are any issues, you'll find more details on the verification page.


# How to Increase Your WhatsApp Number Limit

Request a higher WhatsApp phone number limit through Meta Business Support. Most requests up to 20 numbers per account are approved within days.

To request an increase in your phone number limit for your WhatsApp Business account or Facebook Business Manager, follow these steps:

1. Go to [business.facebook.com/support](https://business.facebook.com/support).
2. Click on the "Ask a Question" tab and select "Dev Account and WABA" as the topic.
3. Choose "Increase Phone Number Limit" as the request type and select your WhatsApp Business account.
4. Select the phone number and allow Meta to share the permission to third parties.
5. Write a reason or title and description of the request, such as having a dedicated number for each team member or employee.
6. The most easily permissible limit is 20 phone numbers. Meta may not easily approve a limit above 20.
7. Click on "Confirm" and Meta should respond to your support ticket within a few working days.


# WhatsApp Account Quality Rating Explained

Understand WhatsApp's green, yellow, and red quality ratings based on 7-day feedback, and how to recover a flagged account by pausing messages.

The quality rating, based on customer feedback over the past seven days, includes reasons like blocking your number or reporting issues.

**Where to Find: Phone Numbers Tab in Meta WhatsApp Manager**

* **Quality Rating Column** shows:

  * **Green:** High quality
  * **Yellow:** Medium quality
  * **Red:** Low quality

  **Improving Your Rating**

  * Hover over the rating for insights into block reasons.
  * Aim to maintain a high-quality rating to unlock more features.
  * Reasons for blocking include: No longer needed, Didn't sign up, Spam, Offensive messages, or No reason.

  **Notifications**

  You will receive updates via email and Meta Business Manager notifications for status changes or messaging limits updates.

  **Status Changes**

  * **Connected:** Normal operation within messaging limits.
  * **Flagged:** Low quality; if not improved in 7 days, messaging limit decreases.
  * **Restricted:** Reach messaging limit; no outgoing messages for 24 hours, but responses to customer-initiated messages are allowed.

**What to do** when account quality is yellow or red?

* It is suggested that you don't send any message for 7 days for quality to improve.


# Cold Outreach Best Practices

Must FOLLOW the best practices if you are planning to do full on cold whatsapp outreach

If you’re diving into full-on cold WhatsApp outreach, it’s crucial to stick to best practices to keep your number safe.

Even if Meta lets you send messages, too many blocks from prospects can get your number banned. Meta doesn’t ban you just for sending messages; it bans you if your number gets blocked frequently.

To keep your cold WhatsApp outreach on point, follow these steps. Many of our clients use these practices daily:

Connect your number. Verify your business through Meta Business Manager. Warm up your number for 2 weeks by interacting only with opted-in or existing clients. You can ask your current clients to message your API number. Once warmed up, start your cold outreach. Begin with 10-30 ( or even 50-100 ) messages a day and gradually ramp up. Once you start cold outreach, make sure to regularly check your quality score in WABA Connect under the "Channel" section. After you finish sending out a campaign, go to WABA Connect > Channel, click "Refresh Channel Details," and check your score.

Since your business is verified and set up correctly, Meta won’t ban you right away even if you get blocked by cold prospects. Instead, Meta will give you a warning with a yellow quality score.

{% hint style="warning" %}
If your quality score drops to YELLOW, pause cold messaging for 7 days. After a week, once your score is back to GREEN, you can start messaging again. To keep track, just go to WABA Connect > Channel and click "Refresh Channel Details" to see your current score.
{% endhint %}

<figure><img src="https://docs.lancepilot.com/~gitbook/image?url=https%3A%2F%2F1807628431-files.gitbook.io%2F%7E%2Ffiles%2Fv0%2Fb%2Fgitbook-x-prod.appspot.com%2Fo%2Fspaces%252FRtLhSWDbYt2p0m0cBDxo%252Fuploads%252FD1aiOiRHGXMtuW7NjcsD%252FScreenshot_1.png%3Falt%3Dmedia%26token%3Df6da2a70-cc74-4bb4-b84d-5d439e7b43f0&#x26;width=768&#x26;dpr=4&#x26;quality=100&#x26;sign=715faa5c&#x26;sv=2" alt=""><figcaption></figcaption></figure>

This way, you can keep your number safe and continue cold WhatsApp outreaching.

This approach helps you protect your number while keeping up with cold WhatsApp outreach.

You can also improve your results by personalizing your messages and using the unsubscribe/block buttons. This will help reduce your block rate and make your outreach more effective.


# WABA Message Error Codes & Fixes

Look up common WhatsApp API message errors, like code 131026 (message undeliverable), with their causes and step-by-step solutions.

Code

`131026`

Message Undeliverable

Description

Unable to deliver message. Reasons can include:

* The recipient phone number is not a WhatsApp phone number.
* Sending an [authentication template](https://developers.facebook.com/docs/whatsapp/business-management-api/authentication-templates) to a WhatsApp user who has a +91 country calling code (India). Authentication templates currently cannot be sent to WhatsApp users in India.
* Recipient has not accepted our new Terms of Service and Privacy Policy.
* Recipient using an old WhatsApp version; must use the following WhatsApp version or greater:
  * Android: 2.21.15.15
  * SMBA: 2.21.15.15
  * iOS: 2.21.170.4
  * SMBI: 2.21.170.4
  * KaiOS: 2.2130.10
  * Web: 2.2132.6
* The message was not delivered to create a high quality user experience. See [Per-User Marketing Template Message Limits](https://developers.facebook.com/docs/whatsapp/cloud-api/guides/send-message-templates#per-user-marketing-template-message-limits)

Possible Solutions

Using a non-WhatsApp communication method, ask the WhatsApp user to:

* Confirm that they can actually send a message to your WhatsApp business phone number.
* Confirm that they have accepted our latest Terms of Service (**Settings** > **Help**, or **Settings** > **Application information** will prompt them to accept the latest terms/policies if they haven't done so already)
* Update to the latest version of the WhatsApp client.

HTTP Status Code

`400`

Bad Request


# WABA MultiChat: Supported Countries

See the full list of countries where WABA MultiChat currently supports WhatsApp Business API messaging, with coverage continuing to expand worldwide.

Due to various regulations we cannot operate in every country yet. We are continuously trying to expand our operation world wide.🌍

#### We are currently available in the following countries <a href="#we-are-currently-available-in-the-following-countries" id="we-are-currently-available-in-the-following-countries"></a>

1. Albania
2. Algeria
3. Andorra
4. Angola
5. Argentina
6. Armenia
7. Australia
8. Austria
9. Azerbaijan
10. Bahamas
11. Bahrain
12. Bangladesh
13. Barbados
14. Belarus
15. Belgium
16. Belize
17. Benin
18. Bhutan
19. Bolivia
20. Bosnia and Herzegovina
21. Botswana
22. Brazil
23. Brunei
24. Bulgaria
25. Burkina Faso
26. Burundi
27. Cabo Verde
28. Cambodia
29. Cameroon
30. Canada
31. Central African Republic
32. Chad
33. Chile
34. China
35. Colombia
36. Congo (Brazzaville)
37. Congo (Kinshasa)
38. Costa Rica
39. Croatia
40. Cuba
41. Cyprus
42. Czech Republic
43. Denmark
44. Djibouti
45. Dominica
46. Dominican Republic
47. Ecuador
48. Egypt
49. El Salvador
50. Eritrea
51. Estonia
52. Eswatini
53. Ethiopia
54. Fiji
55. Finland
56. France
57. Gambia
58. Georgia
59. Germany
60. Ghana
61. Greece
62. Grenada
63. Guatemala
64. Guinea
65. Guinea-Bissau
66. Guyana
67. Haiti
68. Honduras
69. Hungary
70. Iceland
71. India
72. Indonesia
73. Ireland
74. Italy
75. Ivory Coast
76. Jamaica
77. Japan
78. Jordan
79. Kazakhstan
80. Kenya
81. Kuwait
82. Kyrgyzstan
83. Laos
84. Latvia
85. Lebanon
86. Liechtenstein
87. Lithuania
88. Luxembourg
89. Malawi
90. Malaysia
91. Maldives
92. Mali
93. Malta
94. Marshall Islands
95. Mauritania
96. Mauritius
97. Mexico
98. Moldova
99. Monaco
100. Mongolia
101. Montenegro
102. Morocco
103. Mozambique
104. Namibia
105. Nepal
106. Netherlands
107. New Zealand
108. Nicaragua
109. Niger
110. Nigeria
111. North Macedonia
112. Norway
113. Oman
114. Pakistan
115. Palau
116. Panama
117. Papua New Guinea
118. Paraguay
119. Peru
120. Philippines
121. Poland
122. Portugal
123. Qatar
124. Romania
125. Russia
126. Rwanda
127. Saint Kitts and Nevis
128. Saint Lucia
129. Saint Vincent and the Grenadines
130. Samoa
131. San Marino
132. Saudi Arabia
133. Senegal
134. Serbia
135. Singapore
136. Slovakia
137. Slovenia
138. Solomon Islands
139. Somalia
140. South Africa
141. South Sudan
142. Spain
143. Sri Lanka
144. Sudan
145. Sweden
146. Switzerland
147. Syria
148. Taiwan
149. Tajikistan
150. Tanzania
151. Thailand
152. Trinidad and Tobago
153. Tunisia
154. Turkey
155. Turkmenistan
156. Uganda
157. Ukraine
158. United Arab Emirates
159. United Kingdom
160. United States
161. Uruguay
162. Uzbekistan
163. Vanuatu
164. Vatican City
165. Venezuela
166. Vietnam
167. Yemen
168. Zambia
169. Zimbabwe


# Yaeris AI GPT Chatbot Service

Yaeris's AI chatbot uses GPT, Claude, or Gemini for 24/7 support, lead capture, and appointment booking, from $180/year with WhatsApp integration.

### Building an AI Chatbot Tailored to Your Business in Malaysia

#### Overview

Yaeris provides an **AI-powered chatbot service** designed for businesses in Malaysia. The chatbot leverages advanced Large Language Models (LLMs) like GPT-3.5 Turbo, Claude, Gemini, and others to deliver **24/7 automated support, lead generation, and customer engagement**.

This service helps businesses handle customer inquiries, capture leads, and even book appointments — all while reducing costs and ensuring consistency.

### Video Demo

{% embed url="<https://www.youtube.com/watch?v=Un2B1xta9MM>" %}

#### Key Features

* **Customer Support with Knowledge Library**\
  Provides accurate, up-to-date responses about your products and services.
* **Automatic Lead Capture**\
  Collects and qualifies leads even outside business hours.
* **Appointment Booking**\
  Integrates with scheduling tools (e.g., Calendly) for seamless appointment setting.
* **Embeddable Chatbot**\
  Deploy easily on websites or apps using embed code.
* **Continuous Updates**\
  Yaeris keeps the chatbot current with your business changes (new products, updates, FAQs).
* **Multi-Platform Integration**\
  Works across WhatsApp, Facebook, Instagram, Google Sheets, and other apps.

***

#### Plans & Pricing

| Plan                                     | Price           | Details                                                                                                                                                                                                              |
| ---------------------------------------- | --------------- | -------------------------------------------------------------------------------------------------------------------------------------------------------------------------------------------------------------------- |
| **AI Chatbot BYOK** (Bring Your Own Key) | USD $180 / year | 1 chatbot, 32M characters of training data, file uploads (.TXT, PDF, DOCX up to 50 MB), live chat, digital business card, integrations (WhatsApp API, Twilio, FB, IG, Google Sheets). Requires your own LLM API key. |
| **AI Chatbot Non-BYOK**                  | USD $300 / year | Same as BYOK, but Yaeris provides the API access. No need for your own LLM key.                                                                                                                                      |

***

#### Supported LLM Providers

* **OpenAI (GPT-3.5 Turbo, GPT-4 Turbo)**
* **Anthropic Claude**
* **Google Gemini**
* **Deepseek**

***

#### Integrations

* **WhatsApp Business API** (direct or via Twilio)
* **Facebook Messenger & Instagram**
* **Google Sheets** for data capture
* **Website / App Embed Code** for deployment
* **Custom Business Systems** (via API support)

***

#### Deployment Scenarios

* **Websites** (embedded live chat)
* **Mobile / Web Apps** (via embed code)
* **Messaging Platforms** (WhatsApp, Facebook, Instagram)

***

#### Benefits

* 24/7 customer support without extra staffing
* Consistent answers through knowledge base training
* Lead generation and qualification automation
* Seamless scheduling for customer appointments
* Scalable and customizable for different industries

***

#### Getting Started

1. **Choose a Plan**: BYOK (bring your own API key) or Non-BYOK.
2. **Set Up Training Data**: Upload documents (TXT, PDF, DOCX) to train the chatbot.
3. **Configure Integrations**: Connect WhatsApp, social platforms, or website embed code.
4. **Go Live**: Deploy your chatbot across chosen channels.
5. **Maintain & Update**: Yaeris keeps your chatbot updated with business changes.

***

#### FAQ

**Q1: What is BYOK?**\
*Bring Your Own Key (BYOK)* means you use your own API key from providers like OpenAI or Anthropic. This can reduce long-term costs if you already have API access.

**Q2: Do I need technical skills?**\
No. The chatbot comes with a user-friendly dashboard. Yaeris also handles setup and updates.

**Q3: Can the chatbot handle multiple languages?**\
Yes, depending on the LLM used (e.g., GPT models support multiple languages, including English and Malay).

**Q4: Can I embed the chatbot into my existing website?**\
Yes, you can embed it with a simple HTML code snippet.

**Q5: Who benefits most from this chatbot?**

* SMEs needing affordable customer support
* Companies wanting 24/7 lead capture
* Service providers requiring appointment scheduling
* E-commerce brands aiming for scalable customer engagement

**Q6: How do I login to live chat dashboard?**

You can login using this link, <https://chatbot.yaeris.com/livechat/login>


# Yaeris Launchpad: Strapi Hosting Platform

Vercel-style Strapi hosting with push-to-deploy, zero-downtime releases, and bring-your-own-database — you keep full control of your CMS data.

Launchpad is Yaeris's Vercel-style hosting platform for headless CMS projects (Strapi at launch). Connect a GitHub repo, and every push builds and deploys automatically to a live URL -- no servers to manage, no Docker knowledge required.

**What makes Launchpad different:**

* **Bring your own database (BYODB).** Launchpad never stores your CMS content. You connect your own Postgres database (Supabase, Neon, or any provider you choose) via an environment variable, and Launchpad only ever runs your application code against it. This keeps your data entirely under your own control.
* **Push-to-deploy.** Connect a GitHub repository once, and every push to your tracked branch builds and deploys automatically. Pull requests get their own preview URL.
* **Zero-downtime deploys.** A new version is built and health-checked *before* traffic is switched over -- your site never goes down mid-deploy, and a bad deploy never takes down what was already working.
* **White-label ready.** Agencies can host CMS instances for their own clients under a fully branded dashboard and custom domain.

This section covers everything from your first deploy to advanced features like branch deploys, monorepo support, and the `launchpad-cli` command-line tool.

### In this section

* **Getting Started** -- sign up, connect GitHub, and deploy your first project
* **Deploying Your Project** -- push-to-deploy, manual deploys, rollback
* **Environments & Branch Deploys** -- production, PR previews, and optional branch deploys
* **Environment Variables & Your Database** -- BYODB setup and secrets management
* **Custom Domains & White-Label** -- your own domain, agency branding
* **Billing & Plans** -- Personal, Pro, and Team/Agency pricing explained
* **Firewall & Security** -- IP blocking, path rules, deployment protection
* **Analytics & Logs** -- traffic dashboards and runtime logs
* **The Launchpad CLI** -- deploy, view logs, and manage env vars from your terminal
* **Team & Roles** -- inviting teammates and managing permissions
* **Monorepo Support** -- deploying a project that lives in a subdirectory


# Launchpad Getting Started Guide

Sign up, connect GitHub, and import your first Strapi repo — Launchpad reads your Dockerfile and deploys to a live \*.hosting.yaeris.com URL.

## 1. Sign up

Head to the Launchpad sign-up page and create an account. Registration is handled securely -- Launchpad never sees or stores your password directly.

## 2. Connect GitHub

Right after signing up, you'll land on Connect GitHub -- the first step of onboarding. Click Connect GitHub to install the Launchpad GitHub App on your account or organization. You choose exactly which repositories to grant access to; you don't have to give access to everything you own.

If you've already connected GitHub before (e.g. adding a second organization later), you can also start this from Import in the dashboard sidebar at any time.

## 3. How it works

After connecting GitHub, you'll see a short explainer covering the core mechanics:

1. Import a repo -- pick any repo the GitHub App can see. Launchpad reads its Dockerfile to know how to build and run it.
2. Push to deploy -- every push to your tracked branch triggers a real build automatically.
3. Get a live URL -- a successful build gets its own \*.hosting.yaeris.com subdomain (or your own custom domain), deployed with zero downtime.
4. Bring your own database -- Launchpad never hosts your CMS data; you connect your own Postgres database.

Click Go to dashboard to finish onboarding -- you won't see this explainer again.

## 4. Import your first project

From the dashboard, go to Import, find your repo, and click Import. Launchpad automatically detects the port your app listens on from your Dockerfile's EXPOSE line, then builds and deploys it. Once the build succeeds, your project is live at .hosting.yaeris.com.

### What your repo needs

Your repository needs a working Dockerfile at its root (or in a subdirectory -- see Monorepo Support) that builds and runs your CMS. Launchpad doesn't require any special configuration file beyond that -- if docker build works locally, it will work on Launchpad.


# How to Migrate Strapi to Launchpad

Move an existing Strapi project to Launchpad from a self-hosted VPS, AWS, or Strapi Cloud, including environment variable and DNS cutover steps.

Moving an existing Strapi project onto Launchpad looks very different depending on where it's coming from. Because Launchpad is BYODB (Bring Your Own Database -- see Environment Variables & Your Database), migrating your *database* usually isn't a separate step at all. The honest exception is Strapi Cloud, covered below.

## From a self-hosted setup (DigitalOcean, AWS EC2/ECS, a VPS)

If your Strapi instance already talks to an external Postgres you control (a DigitalOcean Managed Database, AWS RDS, or anything similar), this is the easy case -- there's no data export/import at all, because you're not moving the database, only where the application code runs.

1. **Push your repo to GitHub**, if it isn't already. Launchpad deploys from a GitHub repo with a working `Dockerfile`.
2. **Import the repo into Launchpad** and copy your environment variables over. This is the step that actually needs care: `APP_KEYS`, `API_TOKEN_SALT`, `ADMIN_JWT_SECRET`, and `JWT_SECRET` must be copied **exactly** as they are today. If these change, every existing admin session and API token breaks the moment you cut over.
3. **Point `DATABASE_URL` at your existing database** -- unchanged. Launchpad never takes ownership of it.
4. **If you use S3, Cloudinary, or another external provider for media**, those env vars carry over the same way -- there's nothing to migrate on the media side either, since Launchpad never stores your media locally.
5. **Deploy and verify on Launchpad's temporary `*.hosting.yaeris.com` URL first**, against your real data, before touching DNS.
6. **Cut your domain over** once you've confirmed it works. See the cutover note below.

## From Strapi Cloud

This is the one case with real friction, worth being upfront about rather than promising a copy-paste move. Strapi Cloud provisions and manages its own Postgres for you -- there's no `DATABASE_URL` you can just copy, because you don't get direct external access to that database.

The real path is Strapi's own first-party data-transfer tool:

```
strapi transfer --to <your-new-launchpad-instance-url>
```

Run this from your Strapi Cloud project to export its content and import it into a fresh Postgres database you provision yourself (Supabase, Neon, or anywhere else) for your new Launchpad project. This is a genuine data migration step, not a config change -- budget real time for it, and test on a staging database first if your content volume is large.

## From AWS specifically

If you're running Strapi on AWS against your own RDS Postgres, follow the self-hosted path above -- it's the same situation. If you're behind a managed layer you can't directly connect to or dump from (e.g. a fully managed Aurora setup with no external access), treat it like the Strapi Cloud case: export via `strapi transfer` or a database dump/restore into a Postgres you control, then follow the self-hosted steps from step 3 onward.

## Cutting DNS over

Once your new Launchpad deployment is verified and working, add your domain under **Domains** and update your DNS records. Be honest with yourself about one thing: DNS propagation isn't instant. There's a real (if usually short) window -- seconds to a few minutes depending on your DNS TTL and resolver caching -- where traffic could still hit your old host. Lowering your domain's TTL a day before the cutover minimizes this. It's not the multi-hour outage people fear from an infrastructure move, but it also isn't literally zero.

## Checklist

* [ ] Repo pushed to GitHub with a working Dockerfile
* [ ] `APP_KEYS`, `API_TOKEN_SALT`, `ADMIN_JWT_SECRET`, `JWT_SECRET` copied exactly
* [ ] `DATABASE_URL` set (existing DB for self-hosted, or a fresh one populated via `strapi transfer` for Strapi Cloud)
* [ ] Media storage env vars (S3/Cloudinary/etc.) copied, if used
* [ ] Verified working on the temporary `*.hosting.yaeris.com` URL against real data
* [ ] DNS TTL lowered ahead of cutover
* [ ] Domain added and DNS updated


# Deploying Your Project

How push-to-deploy, manual deploys, zero-downtime releases, instant rollback, and build/runtime logs work on Launchpad.

## Push-to-deploy

Once a project is imported, every push to its tracked branch (usually main) triggers a build automatically. You'll see build status posted directly to your commit/PR on GitHub as a check, so you know immediately whether a push built successfully.

## Manual deploys

You can also trigger a deploy manually from the project's dashboard, or via the launchpad-cli deploy command (see The Launchpad CLI).

## Zero-downtime deploys

When a new deploy starts, Launchpad builds the new version and health-checks it before switching any traffic over. Your previous version keeps serving live requests the entire time. Only once the new version responds successfully is traffic moved to it -- if the new build fails its health check, your site keeps running on the last working version and the deploy is marked failed. This means a bad deploy never takes your site offline.

## Rollback

Every deployment records the exact image it built. If a deploy causes a problem, you can instantly roll back to any previous deployment from the Deployments tab -- this reuses the already-built image rather than rebuilding from source, so it's fast, and it goes through the same zero-downtime swap as a normal deploy.

## Build logs

Each deployment's full build output is available from the Deployments tab, so you can see exactly what happened if a build fails.

## Runtime logs

Once a project is running, its live stdout/stderr output (the last 300 lines) is available under the Logs tab -- useful for debugging application errors without needing server access.


# Environments & Branch Deploys

Production, PR previews, and optional branch deploys on Launchpad -- how preview databases work and how to password-protect non-production URLs.

Launchpad supports three kinds of environments for a project:

## Production

Your tracked branch (usually main) always deploys to your project's production environment -- the URL you share with the world.

## Pull request previews

When you open a pull request against your tracked branch, Launchpad automatically builds a preview deployment at its own URL (pr--.hosting.yaeris.com), so you can review changes before merging. Preview deployments are automatically torn down when the PR is closed.

Previews require a preview database. Because Strapi and Payload both run schema migrations automatically on boot, a preview environment must never share your production database -- doing so risks a destructive PR migrating (and corrupting) your live data. Set a PREVIEW\_DATABASE\_URL under Environment Variables (preview kind) before opening a PR, or preview deployments will be skipped.

## Branch deploys (optional)

By default, only your tracked branch and pull requests deploy. If you want every branch pushed to your repo to get its own preview URL (e.g. feature/new-editor), turn on Deploy any branch under your project's Settings. This is off by default -- existing projects are unaffected unless you turn it on.

Branch deploys share the same preview-database requirement as PR previews, and are capped at 10 concurrent branch environments per project to protect shared hosting capacity. A branch deploy isn't automatically removed when its branch is deleted on GitHub -- clean up old branch deploys manually if you no longer need them.

## Deployment protection

You can password-protect every non-production environment (previews and branch deploys) for a project from Settings. This never applies to your production URL.


# Environment Variables & Your Database

How to connect your own Postgres database (BYODB) to a Launchpad project, set encrypted environment variables, and configure preview databases.

## Bring your own database (BYODB)

Launchpad is built around BYODB: your CMS's actual content always lives in a database you control -- Supabase, Neon, a self-hosted Postgres, or anything else that speaks Postgres. Launchpad never stores, backs up, or has standing access to your content; it only runs your application container against the connection string you provide.

This keeps you in full control of your data and means there's no migration or lock-in risk if you ever decide to leave.

## Setting your database connection

From your project's Environment Variables tab, add a DATABASE\_URL variable pointing at your own database. This is used for your production environment.

For preview deployments (PRs and, if enabled, branch deploys), set a separate PREVIEW\_DATABASE\_URL -- switch to the preview kind at the top of the Environment Variables tab to set this. One preview database is shared across all of a project's previews/branch deploys; it is never the same database as production.

## How env vars are stored

Every environment variable value is encrypted at rest (AES-256-GCM) and only decrypted at deploy time, when it's injected into your running container. Values are never shown back to you after being set -- only the variable's key name is visible in the dashboard, the same way most platforms handle secrets.

## Database region

Under your project's Settings, you can tell Launchpad where your database is actually hosted (e.g. AP-Southeast, US-East). This is purely informational -- it doesn't provision or move anything -- but if your database is far from Singapore (where Launchpad's infrastructure runs), you'll see a latency warning so you know what to expect.


# Custom Domains & White-Label

Add a custom domain with automatic SSL, or fully white-label Launchpad under your own brand and domain on the Team/Agency plan.

## Custom domains

Every project gets a free .hosting.yaeris.com subdomain automatically. You can also add your own domain from the project's Domains tab -- Launchpad shows you the DNS records to add, then automatically provisions and renews TLS/SSL once your domain verifies. Domain status is shown as Valid, Pending, or Misconfigured, so you always know exactly where things stand.

## White-label branding (Team/Agency plan)

Agencies on the Team/Agency plan can brand the entire Launchpad experience for their own clients:

* A branded subdomain (your own CNAME domain pointed at Launchpad's infrastructure) instead of hosting.yaeris.com
* Custom dashboard branding (logo and accent color)
* The "Powered by Launchpad" badge removed

This lets you resell CMS hosting to your own clients under your own brand -- what you charge them is entirely up to you.

## Agency client sub-accounts

Team/Agency accounts can also manage multiple client sub-teams from one place, with an audit log tracking who changed what across your projects.


# Launchpad Pricing: Personal, Pro & Team Plans

Compare Launchpad's free Personal tier, $20/mo Pro plan with usage credits, and $89/mo Team/Agency plan with white-label branding and audit logs.

Launchpad has three plans. Project creation is unlimited on every plan -- there's no plan that caps how many projects you can host.

## Personal -- Free

* Unlimited projects, Strapi only, Singapore region
* 100 build minutes/mo, 10GB bandwidth/mo -- hard-capped, no overage (no card required)
* 1,000 image transforms/mo, hard-capped
* 3 firewall IP rules and 3 path rules per project
* Idle projects automatically hibernate after 30 minutes of no traffic to save shared resources, and wake automatically (with a few seconds' delay) the next time someone visits

## Pro -- $20/mo

A flat $20/mo -- not per project. Includes:

* Everything in Personal, plus custom domains, SSL, and PR preview deployments
* A $20/mo usage credit that's drawn down by your actual usage at real per-unit rates: $0.01/build-minute, $0.12/GB bandwidth, $0.0003/image transform. Usage within $20 worth costs nothing extra.
* Once you exceed the credit, the same per-unit rates apply automatically -- no manual "upgrade" prompt, no surprise plan change
* 20 firewall IP rules and 20 path rules per project

## Team/Agency -- $89/mo

* Everything in Pro, plus white-label branding, agency client sub-accounts, and an audit log
* The same $20/mo usage credit as Pro, at the same per-unit rates -- the remaining $69/mo of the base price covers the white-label and agency features, not usage
* 40 firewall IP rules and 40 path rules per project

### Optional +$15/mo add-on blocks

On the Team/Agency plan, you can add capacity blocks at $15/mo each from Billing. Each block is both a $15/mo charge and adds $15 more to your monthly usage credit -- so buying a block gives you real extra headroom before overage billing kicks in, it isn't just an unexplained line item. A block purchased mid-cycle applies starting the next billing month.

## Usage dashboard

Your Billing page shows real usage-vs-allowance for the current month across build minutes, bandwidth, image transforms, and firewall rule counts, so you always know where you stand before anything is billed.


# Launchpad Firewall: IP & Path Rules

Block IPs and CIDR ranges, create path rules, verify Googlebot traffic, and password-protect preview URLs to secure your Launchpad project.

Each project has a Firewall tab covering the traffic-protection features Launchpad supports today.

## Traffic dashboard

See a real-time summary of the last 24 hours of traffic to your project: allowed, denied, and logged request counts, plus a bot-traffic breakdown -- known-good crawlers (Googlebot, Bingbot, GPTBot, and other recognized crawlers), verified Googlebot (confirmed via real reverse-DNS lookup against Google's own published verification method, not just a spoofable user-agent string), and other bot-like traffic. You can also see your top IPs, top user agents, and top request paths.

## IP blocking

Block specific IP addresses or CIDR ranges from reaching your project entirely.

## Path rules

Create rules to either log or deny requests matching a specific path pattern -- useful for blocking known attack paths (e.g. /wp-admin) or quietly monitoring suspicious activity without blocking it outright.

## Deployment protection

Password-protect your preview and branch-deploy URLs so only people with the password can view them (see Environments & Branch Deploys). Production is never affected.

## Plan limits

Firewall rule counts scale with your plan: Personal (3 IP / 3 path rules per project), Pro (20/20), Team/Agency (40/40).


# Launchpad Analytics & Runtime Logs

Track request volume, status codes, and latency per project, plus live stdout/stderr logs — debug application errors without SSH or server access.

## Analytics

Each project's Analytics tab shows real traffic data: request volume over time (with hourly/6-hourly trend charts and a 24h/7-day toggle), status code breakdown, average and peak response latency, and a top-routes table (with numeric/UUID path segments normalized, e.g. /api/articles/123 and /api/articles/456 both roll up into /api/articles/:id).

## Runtime logs

The Logs tab shows your running container's live stdout/stderr -- the last 300 lines, read directly from the container. This is the fastest way to debug an application error without needing server/SSH access.

You can also fetch logs from your terminal with launchpad-cli logs -- see The Launchpad CLI.


# launchpad-cli: Deploy from Your Terminal

Deploy, view logs, and manage environment variables from the command line with launchpad-cli, a dependency-free Node.js script for CI pipelines.

launchpad-cli lets you deploy, view logs, and manage environment variables from your terminal or a CI pipeline, without opening the dashboard.

## Getting a token

From Settings -> CLI tokens, click Create token and give it a label (e.g. "My laptop" or "CI pipeline"). The token is shown to you exactly once -- copy it immediately, as it can't be retrieved again afterward. A token authenticates as your whole team, so treat it like a password, and revoke it from the same page if it's ever compromised.

## Installing

The CLI is a dependency-free Node.js script -- no npm install required, just Node 18 or newer.

```
node launchpad-cli.js login <your-token>
```

This saves your token to \~/.launchpad/config.json (created with restricted file permissions, the same sensitivity as an SSH key).

## Commands

| Command                         | What it does                                            |
| ------------------------------- | ------------------------------------------------------- |
| launchpad-cli login             | Save a CLI token                                        |
| launchpad-cli deploy            | Trigger a deploy of the project's tracked branch        |
| launchpad-cli logs              | Print the last 300 lines of runtime logs                |
| launchpad-cli env ls            | List environment variable keys (values are never shown) |
| launchpad-cli env set KEY=value | Set an environment variable                             |

### Example

```
launchpad-cli login lp_xxxxxxxxxxxxxxxxxxxxxxxxxxxxxxxx
launchpad-cli deploy my-strapi-site
launchpad-cli logs my-strapi-site
launchpad-cli env set my-strapi-site DATABASE_URL=postgres://...
```

A project's slug is the name shown in its dashboard URL (hosting.yaeris.com/dashboard/).

deploy triggers the exact same build pipeline as a real git push or clicking Redeploy in the dashboard -- there's no separate, different deploy path for the CLI.


# Launchpad Team Roles & Permissions

Invite teammates to your Launchpad team and assign Owner, Member, or Viewer roles with real enforced permissions on billing and deployments.

## Inviting teammates

From the Team page, invite a teammate by email. Note: they must have already signed in to Launchpad at least once themselves before you can add them -- Launchpad has no way to create a working login for someone else.

## Roles

* Owner -- full control, including billing and team management
* Member -- can create, deploy, and manage projects, but not billing/team settings
* Viewer -- read-only access; can see everything (deployments, logs, analytics) but cannot make any changes

A viewer attempting to make a change (deploy, edit an env var, change a setting) is cleanly blocked with a clear message, rather than the action silently failing.

## Agency client sub-accounts

On the Team/Agency plan, you can manage separate client sub-teams under your own agency account -- see Custom Domains & White-Label.


# Launchpad Monorepo Deployments

Deploy a CMS project living inside a subdirectory of a larger monorepo by setting a root directory — no separate repository required.

If your CMS project lives inside a subdirectory of a larger monorepo (e.g. apps/cms in a repo that also has apps/web and packages/shared), you don't need a separate repository just for Launchpad.

## Setting a root directory

From your project's Settings, set Root directory to the path containing your project's Dockerfile (e.g. apps/cms). Leave it blank if your Dockerfile is at the repository root (the default for every project).

## How it works

Launchpad builds using the same approach as running docker build -f apps/cms/Dockerfile . from your repo root: the build context stays the whole repository, only which Dockerfile is used changes. This means your Dockerfile can still COPY files from outside its own directory -- for example, a shared package your CMS depends on -- exactly like it would with a normal local monorepo build.


# Yaeris Radar: Outreach & Crawling Tool

Pay-as-you-go dashboard for Google rank checks, website crawling, email campaigns, and AI voice calls — all billed from one shared credit balance.

Radar is Yaeris's combined lead-generation and outreach dashboard. Instead of juggling separate tools for checking Google rankings, crawling websites for contact details, and running email or AI-voice-call campaigns, everything lives in one place, billed from a shared credit balance.

**What makes Radar different:**

* **No monthly plan — top up credits, use them whenever.** You only pay for what you actually run.
* **Bring your own sending/calling accounts.** Radar orchestrates your email and voice-call campaigns, but the messages/calls themselves go out through your own connected Smartlead, Instantly, MailRush, Bland.ai, or Retell AI account — you keep full control (and billing) of the sending side.
* **Everything feeds into everything else.** A SERP Lookup's results can be sent straight into a crawl; a crawl's discovered emails and phone numbers can be imported straight into your Email Outreach or AI Call Outreach contact list.
* **Also available via API/MCP**, if you'd rather trigger any of these from your own code or from an AI assistant.

This guide covers Radar's **Outreach** category — the tools for finding leads and reaching them.

### In this section

* **SERP Lookup** -- check where a keyword ranks on Google right now, then send the ranking URLs straight into a crawl
* **Crawler** -- pull business name, phone, and email from one brand website or a directory listing page
* **Bulk Crawl** -- crawl many brand websites in a single job, sharing one combined page limit
* **Email Outreach** -- connect Smartlead, Instantly, or MailRush and run tracked email campaigns
* **AI Call Outreach** -- connect Bland.ai or Retell AI and run AI voice-call campaigns


# Radar SERP Lookup: Google Rank Checks

Check which URLs rank for up to 20 keywords on Google right now, then send any ranking URL straight into a crawl to pull contact details.

Get a live Google ranking check for up to 20 keywords at once, then send any of the ranking URLs straight into a crawl to pull contact details from them.

### Steps

1. Go to **Outreach → SERP Lookup**.
2. In the **Keywords** box, type one keyword per line (or comma-separated) — up to 20 at a time. You can also use search operators like `site:acme.co pricing`.
3. Choose a **Location** (defaults to Malaysia).
4. Choose a **Device** — Desktop or Mobile.
5. Choose a **Depth** — Top 10, Top 30, or Top 100 results per keyword.
6. Click **Run Search**.
7. Review the results table: **Keyword**, **Pos.** (ranking position), and **URL** for every match found.
8. Tick the checkbox beside any result(s) you want to follow up on (or tick the header checkbox to select every row).
9. Once at least one row is selected, a bar appears at the bottom of the screen. Choose **Pages per site** (10/30/50/100) and click **Add to Crawl** — this immediately starts a new crawl job using the selected URLs as its starting points.

{% hint style="info" %}
Also available via API / MCP if you'd rather trigger lookups from your own code — rate limit: 10 requests/minute per key.
{% endhint %}

{% hint style="info" %}
Each lookup is billed from your credit balance based on real usage cost — if your balance is empty, you'll see an "Insufficient credits" message instead of results.
{% endhint %}


# Radar Crawler: Extract Contact Info

Point Radar's crawler at a brand site or directory page to automatically pull business name, phone, email, and website from what it finds.

Point the crawler at a website and it extracts contact details — business name, phone, email, and website — automatically from what it finds.

### Steps

1. Go to **Outreach → Crawler**.
2. Choose a crawl type:
   * **Brand site** — crawls one business's homepage and its contact-related pages.
   * **Directory** — crawls a listing page that links out to many different businesses at once.
3. Enter the **Site URL** (Brand) or **Directory listing URL** (Directory).
4. If you chose Directory, you can optionally add a **Category label** for your own reference (e.g. `plumbers-austin-tx`).
5. Set the **Page limit** — the maximum number of pages this job will visit (up to 5,000).
6. If you chose Brand site, also set the **Depth limit** — how many links deep the crawler will follow from your starting URL (up to 5).
7. Click **Start crawl**.
8. Your job appears in the **Jobs** table below, moving through **Queued → Running → Done**. Pages crawled, duration, and status update live.
9. Click a job's URL to open its detail page — every page visited, its HTTP status, and (where found) Business Name, Email, Phone, and Website.
10. Once a job has results, click **Export CSV** to download everything it found.

{% hint style="info" %}
Also available via API / MCP — rate limit: 60 requests/minute per key.
{% endhint %}


# Radar Bulk Crawl: Multi-Site Jobs

Crawl many brand websites in one job with a shared page limit, ideal for working through a list of URLs pulled from a SERP Lookup.

Crawl many brand websites in a single job instead of starting one crawl per site — useful when you already have a list of URLs to work through (for example, from a SERP Lookup).

### Steps

1. Go to **Outreach → Bulk Crawl**.
2. Paste one site URL per line into the **Site URLs** box. The number of sites detected updates live as you type.
3. Set the **Page limit** — the total number of pages allowed across *all* sites in this job combined (up to 5,000, default 500).
4. Set the **Depth limit** — how many links deep the crawler follows on each individual site (up to 5, default 2).
5. Click **Start bulk crawl**.
6. Track progress in the **Bulk jobs** table: Sites, Pages, Duration, Status, Created.
7. Click a job to open the same detail view used by regular Crawler jobs — every page visited, plus a CSV export once results come in.

{% hint style="info" %}
Bulk Crawl jobs also show up in the regular **Crawler** page's own Jobs list — Bulk Crawl is simply the same crawl engine, filtered to jobs that were started with more than one URL at once.
{% endhint %}


# Radar Email Outreach Campaigns

Connect Smartlead, Instantly, MailRush, or your own email (SMTP) to build a contact list, write your email, and run tracked campaigns.

Connect your own email-sending provider, build a contact list, and launch outreach campaigns — tracked opens, clicks, replies, and bounces where your provider supports it.

{% hint style="info" %}
You'll need to connect a provider before you can create a campaign — the **New campaign** button only appears once at least one connection is active.
{% endhint %}

### Connecting a provider

1. Go to **Outreach → Email Outreach → + Connect provider**.
2. Choose a provider:
   * **Smartlead** — full campaign platform, sequences, warmed sending accounts, webhook-driven tracking (opens/clicks/replies/bounces).
   * **Instantly** — same as Smartlead, plus AI reply classification.
   * **MailRush** — send-only. No campaigns, sequences, or tracking of any kind — Radar will only ever know whether a send succeeded or failed.
   * **Your Email (SMTP)** — send through your own Gmail, Outlook, or other mailbox instead of signing up for a dedicated provider. Also send-only, no tracking, and capped by whatever daily sending limit your mailbox provider enforces (roughly 500/day for personal Gmail, less for Outlook) — see the warning below before using this for any real volume.
3. Optionally give the connection a **Label** for your own reference (e.g. "Main Smartlead account").
4. For Smartlead/Instantly/MailRush, paste your provider **API key**. For **Your Email (SMTP)**, pick a Gmail/Outlook preset (or enter a custom host/port), then enter your email address and an **app password** — not your normal password. Generate one at [myaccount.google.com/apppasswords](https://myaccount.google.com/apppasswords) (Gmail) or your provider's security settings, after turning on 2-Step Verification.
5. Click **Connect** — Radar tests the credentials before saving them. Everything is stored encrypted.

{% hint style="warning" %}
**MailRush and SMTP have no tracking.** Neither supports campaigns, sequences, or webhooks — Radar will only ever know whether a send succeeded or failed, never opens/clicks/replies/bounces. SMTP carries an extra real risk on top of that: sending bulk-looking mail from a personal Gmail/Outlook mailbox can get that mailbox rate-limited or suspended by Google/Microsoft, which affects your real inbox too — not just the campaign. If you want tracking or real send volume, connect Smartlead or Instantly instead.
{% endhint %}

### Building your contact list

1. Go to **Contacts**.
2. Import contacts one of three ways:
   * **From a crawl** — pick a completed crawl job from the dropdown and import every email address it found.
   * **Add one** — manually enter an **Email**, plus optional Company, First name, and Last name.
   * **Paste CSV** — paste rows in the format `email,first_name,last_name,company` (a header row is detected and skipped automatically).
3. Manage the list from the contacts table — **Unsubscribe**/**Resubscribe** a contact, or **Remove** it entirely.

{% hint style="info" %}
Unsubscribing a contact only stops *future Radar campaigns* from including them — it does not call your provider's own unsubscribe or suppression list.
{% endhint %}

### Writing your email template

There's no drag-and-drop email designer in Radar today — the **Body** field on the New Campaign form takes HTML directly, which you write or paste in yourself.

1. Write (or paste) your email as HTML into **Body**.
2. Personalize it with merge tags — `{{first_name}}`, `{{last_name}}`, `{{company}}`, `{{email}}` — each one is replaced with that recipient's real value when the email actually sends.
3. There's no saved/reusable template library yet. Each new campaign's Subject/Body starts blank, so keep your own copy of anything you want to reuse (a doc, a snippet file, or just an old campaign you can copy the HTML from).

{% hint style="info" %}
**An AI assistant (Claude, ChatGPT, etc.) can generate this HTML for you** — ask it for a clean, inline-styled HTML email (not a full webpage), then paste the result straight into Body. Worth telling it explicitly: inline CSS only (no `<style>` block — many inboxes strip it), a single-column layout around 600px wide (avoid CSS grid/flexbox — Outlook desktop doesn't support them), no JavaScript (stripped everywhere), and real hosted image URLs rather than embedded/base64 images (most inboxes block or strip those).
{% endhint %}

**Via API/MCP, this already works without the dashboard at all.** The same `body` field on `POST /email-outreach/campaigns` (REST) and the `create_email_campaign` MCP tool accepts this HTML directly — an AI agent can generate the email and launch the campaign in the same request, no copy-pasting required. See **Settings → MCP** in the dashboard for connection details, or the full API reference for the exact request shape.

### Launching a campaign

1. Go to **New campaign**.
2. Choose **Send with** — which connected provider/account to send from.
3. Choose your **sending account(s)**: Smartlead/Instantly/SMTP let you tick from a live list of your connected sending inboxes (SMTP always shows exactly one — the mailbox you connected); MailRush asks you to type a from-address that's already active on your MailRush account (Radar can't verify it in advance).
4. Name the campaign.
5. Write your **Subject** and **Body** (see [Writing your email template](#writing-your-email-template) above).
6. Tick who to send to from your contact list (up to 500 at a time — unsubscribed contacts are excluded automatically). Use **Select all** / **Deselect all** to speed this up.
7. Click **Send campaign**.
8. Open the campaign afterward to see live counts per status: Queued, Sent, Opened, Clicked, Replied, Failed, Bounced, Unsubscribed (SMTP/MailRush connections only ever show Queued/Sent/Failed — no tracking beyond that).

{% hint style="info" %}
Sending needs a positive Radar credit balance — if your balance runs out, campaign creation is blocked with a message asking you to top up.
{% endhint %}


# Radar AI Call Outreach Campaigns

Connect Bland.ai or Retell AI, build a phone contact list, and launch AI voice-call campaigns that dial contacts automatically.

Connect your own AI voice-call provider, build a phone contact list, and launch campaigns where an AI agent calls each contact automatically.

{% hint style="info" %}
You'll need to connect a provider before you can create a campaign — the **New campaign** button only appears once at least one connection is active.
{% endhint %}

### Connecting a provider

1. Go to **Outreach → AI Call Outreach → + Connect provider**.
2. Choose a provider:
   * **Bland.ai** — write a free-text call script per campaign; calls go out from Bland's own shared number pool, no phone number setup needed.
   * **Retell AI** — runs against an agent (voice + LLM + prompt) you've already built in your own Retell dashboard; there's no script to write per campaign.
3. Optionally give the connection a **Label**.
4. Paste your provider **API key**.
5. If you chose Retell, also enter your **Agent ID** (`agent_xxxxxxxxxxxx`) and a **From number** already set up in your Retell account, in E.164 format (e.g. `+15551234567`).
6. If you chose Bland, you can optionally add a **Webhook signing secret** from your Bland Account Settings — without it, calls still place, but Radar won't receive live status, recordings, or transcripts back.
7. Click **Connect** — Radar test-calls the provider's API before saving. Your key is stored encrypted.

{% hint style="warning" %}
**Retell needs one extra manual step.** Retell has no per-call webhook — it only sends status updates to a URL you configure yourself in your Retell dashboard. After connecting, copy the webhook URL Radar shows you and paste it into your Retell account's webhook settings, or you won't receive status/transcript updates.
{% endhint %}

### Building your phone contact list

1. Go to **Contacts**.
2. Import contacts one of three ways:
   * **From a crawl** — pick a completed crawl job and import every phone number it found (in E.164 format).
   * **Add one** — manually enter a **Phone number** (E.164 format, e.g. `+15551234567`), plus optional Business name, First name, and Last name.
   * **Paste CSV** — paste rows in the format `phone_number,first_name,last_name,business_name`.
3. Manage the list — mark a contact **Do not call** / **Allow calls** again, or **Remove** it entirely.

### Launching a campaign

1. Go to **New campaign**.
2. Choose **Call with** — which connected provider/account to call from.
3. If you're calling through Bland, write a **Call script** — merge tags `{{first_name}}`, `{{last_name}}`, and `{{business_name}}` personalize it per contact. If you're calling through Retell, there's nothing to write here — it runs the agent already configured in your Retell dashboard.
4. Name the campaign.
5. Tick who to call from your contact list (up to 500 at a time — contacts marked "Do not call" are excluded automatically).
6. Click **Start calling**.
7. Track live results on the campaign page: status per contact (Queued, Ringing, In progress, Completed, No answer, Voicemail, Failed), call duration, a **Listen** link for the recording where available, and — if your connection has webhooks/transcripts enabled — the full call transcript.

{% hint style="info" %}
The calls themselves, and their per-minute cost, run through your own connected Bland.ai or Retell AI account — Radar's own credit balance only needs to be positive to start a campaign; it doesn't charge per call.
{% endhint %}


# Radar Crawler REST API & MCP Tools

Call Radar's Crawler from your own code or AI agent via REST API or MCP tools — same crawl engine, pricing, and contact extraction as the dashboard.

Everything the Crawler does in the dashboard — Brand and Directory crawls, contact extraction, and the optional HTML/Markdown page output — is also available as a REST API and as MCP tools, so you can call it from your own code or point an AI agent at it directly.

### Authentication

Create a key at **Settings → API Keys** in the dashboard. The plaintext key is shown exactly once — store it yourself, Radar only keeps a hash. Send it as a bearer token on every request:

```
Authorization: Bearer rdr_live_...
```

{% hint style="info" %}
Rate limit: 60 requests/minute per key, shared across every Radar API/MCP operation. An invalid or revoked key returns `401`; going over the limit returns `429` with a `Retry-After` header.
{% endhint %}

### REST API

Base URL: `https://radar.yaeris.com/api/v1`

**`POST /crawl`** — start a crawl.

```json
{
  "type": "BRAND",
  "urls": ["https://example.com"],
  "pageLimit": 30,
  "depthLimit": 2,
  "format": ["contacts", "markdown"]
}
```

* `type`: `"BRAND"` (crawl one or more business sites directly) or `"DIRECTORY"` (crawl a listing/index page and follow individual listings).
* `urls`: required, non-empty.
* `pageLimit` / `depthLimit`: optional (default 100 / 2).
* `format`: optional, defaults to `["contacts"]`. Any combination of:
  * `"contacts"` — business name/phone/email/website (today's default behavior).
  * `"html"` — the raw fetched page HTML, capped at 300,000 characters (truncated with a trailing marker past that).
  * `"markdown"` — a readability-cleaned Markdown version of the page content, capped at 100,000 characters — the format an LLM/RAG pipeline typically wants, far cheaper in tokens than raw HTML. Falls back to converting the whole page if it isn't article-shaped enough for readability extraction to find a main content block (e.g. a directory listing page), so it's never returned empty just because a page isn't an article.

→ `202 { "jobId": "...", "status": "QUEUED" }`

**`GET /crawl/:jobId`** — status and results.

```json
{
  "jobId": "...",
  "type": "BRAND",
  "status": "DONE",
  "error": null,
  "createdAt": "...",
  "finishedAt": "...",
  "pages": [
    { "url": "...", "httpStatus": 200, "fetchStatus": "SUCCESS", "businessName": "...", "phone": "...", "email": "...", "websiteUrl": "...", "html": null, "markdown": "..." }
  ]
}
```

`status` is one of `QUEUED` / `RUNNING` / `DONE` / `FAILED`. A page's `fetchStatus` (`SUCCESS` / `BLOCKED` / `FAILED` / `TIMEOUT`) explains that specific page even when the overall job succeeded. `html`/`markdown` are `null` unless requested via `format` on the original `POST /crawl` call.

{% hint style="info" %}
Charged 1 credit per page crawled, once the job finishes — plus 1 extra credit per page if `format` includes `"html"` and/or `"markdown"` (both admin-configurable in the dashboard's Admin → Pricing). Your balance is checked against the maximum possible cost (page limit × rate) before the crawl starts, so an empty balance returns a `402` immediately rather than the crawl starting and failing partway through — the actual charge afterward is capped by pages actually visited, never more.
{% endhint %}

#### Errors

| Status | Meaning                                                        |
| ------ | -------------------------------------------------------------- |
| `400`  | Bad request — missing/invalid fields (message explains which). |
| `401`  | Missing, malformed, or invalid `Authorization` header.         |
| `402`  | Insufficient credit balance for this operation.                |
| `404`  | The referenced job doesn't exist on this project.              |
| `429`  | Rate limit exceeded — check `Retry-After`.                     |

Every error body is `{ "error": "..." }`.

### MCP server

Endpoint (Streamable HTTP, stateless): `https://radar.yaeris.com/api/mcp`

Same bearer-token auth as the REST API, sent as a header on the connection.

**Claude Code** (project-scoped `.mcp.json`, or `claude mcp add`):

```json
{
  "mcpServers": {
    "radar": {
      "url": "https://radar.yaeris.com/api/mcp",
      "headers": { "Authorization": "Bearer rdr_live_..." }
    }
  }
}
```

**Claude.ai / other MCP clients**: add a remote MCP connector pointing at the same URL, with the same `Authorization` header.

| Tool            | Equivalent to       |
| --------------- | ------------------- |
| `start_crawl`   | `POST /crawl`       |
| `get_crawl_job` | `GET /crawl/:jobId` |

Each tool wraps the identically-named REST operation above — same inputs, same validation, same credit charges. A typical agent calls `start_crawl`, then polls `get_crawl_job` until `status` is no longer `QUEUED`/`RUNNING`.

{% hint style="info" %}
Dashboard-only for now: Bulk Crawl (crawling many starting URLs from a saved list in one go). The API/MCP tools above cover single and multi-URL Brand/Directory crawls, just not that saved-list workflow yet.
{% endhint %}


# WhatsApp Blasting Service Overview

Yaeris offers unofficial, Cloud Blaster, and official WhatsApp Business API blasting, with campaign, report, and credit refund status tracking.

Launch your WhatsApp advertisement by broadcasting your messages to the list of mobile numbers you have. We have 3 types of WhatsApp Blasting:

* Service: Unofficial blasting WhatsApp Blasting *without* button
* Software: WhatsApp Cloud Blaster
* Software: Official blasting using WhatsApp Business API (*can choose with/without button*)

{% hint style="info" %}
**Important Note**: Delivery rate means the percentage of recipients actually receive your message.&#x20;
{% endhint %}

{% hint style="warning" %}
**Warning**: Our *delivery rate*" doesn't imply that all of your recipients will receive your message. Instead, it implies that our blasting server has sent out your messages.
{% endhint %}

{% hint style="info" %}
**Important Note:** WhatsApp button blasting is currently not available at the moment.
{% endhint %}

All unofficial WhatsApp API Blasting with/without button are bound to its **limitation**.

{% content-ref url="/pages/otBBkPcK0hJcQKa3H5az" %}
[Unofficial WhatsApp Blasting](/limitation/unofficial-whatsapp-blasting)
{% endcontent-ref %}

{% hint style="info" %}
**Important Note**: [Terms and Conditions](/faqs/terms-and-conditions/whatsapp-blasting-service) applied for using this service.
{% endhint %}

## Report status of WhatsApp Blasting

There are 4 types of reporting status

1. **Campaign Status**
   1. **New**: When you submit a new campaign, your campaign will usually fall under New campaign status. It means that our server has not picked up your campaign yet because our server is working on the earlier campaign.
   2. **Processing**: Our server is currently processing your campaigns. Kindy be reminded that in this stage, your campaign is currently on queue and waiting for its turn to be processed.
   3. **Successful**: Our server has successfully completed your campaign. Kindly be reminded, our server only able to track 1 tick delivery or 0 tick status. We are not able to track blue tick & double tick.
   4. **Rejected**: If your campaign got rejected, it means that there are something which you have done incorrectly during campaign creation. You can check the reasoning by pointing your mouse on the word "**Reason**".&#x20;
2. Report Status (*All reports need to take another 24 hours to generate after your campaign completes*)
   1. Empty: The server has not yet picked up your campaign to generate report yet.&#x20;
   2. Generating: The server is currently generating your report for you. It will usually take within 24 hours to complete this process.
   3. Ready to download: Now, you can download the report in Excel format. Kindly be reminded that our report only indicates 0 tick or 1 tick delivery status. Our report will not indicate 2 tick or blue tick delivery status as we are not able to track this information.

{% hint style="info" %}
**Hint**: If your campaign contains less than 100 numbers, our server will not generate report. Our server will only generates report if your campaign has more than 100 numbers.
{% endhint %}

3. Credit Refund Status
   1. Empty: Your campaign got nothing to refund.
   2. Processing: Server is currently calculating the total amount of credit to be refunded to your wallet on based on your campaign.
   3. Refunded: Server has fully refunded the necessary credit back to your wallet.

{% hint style="info" %}
**Hint**: Our server will only refund 0 tick delivery status. If there is no 0 tick delivery status, then there is no refund requires.&#x20;
{% endhint %}


# Unofficial WhatsApp Blasting Service

Yaeris's unofficial WhatsApp blasting service sends bulk messages without a button, using the unofficial WhatsApp API, subject to delivery limitations.

All unofficial WhatsApp API Blasting with/without button are bound to its **limitation**.

{% content-ref url="/pages/otBBkPcK0hJcQKa3H5az" %}
[Unofficial WhatsApp Blasting](/limitation/unofficial-whatsapp-blasting)
{% endcontent-ref %}


# Unofficial WhatsApp Button Blasting

WhatsApp button blasting via unofficial API offers up to 90% or 100% delivery-rate packages, with file size limits of 5Mb video and 1Mb images/PDF.

Unofficial blasting WhatsApp Blasting *with* button

* **Up to 90% delivery rate** package
  * Our server only able to deliver 0% to 90% delivery rate. This is because of WhatsApp bans the sim card which will cause the message not being able to deliver to your recipients.
* **100% delivery rate** package
  * When you sign up this package, you are entitled to blast additional 2 more times for free without editing your existing campaign.

{% hint style="info" %}
**Important Note**: Delivery rate means the percentage of messages actually sent out from our server. Not the percentage of messages received by your recipients. We do not have this information so we don't have the answer for you.
{% endhint %}

{% hint style="warning" %}
**Important Note**: "*100% delivery rate*" package doesn't imply that all of your recipients will receive your message. Instead, it means that the percentage of messages actually sent out from our server.
{% endhint %}

All unofficial WhatsApp API Blasting with/without button are bound to its **limitation**.

{% content-ref url="/pages/otBBkPcK0hJcQKa3H5az" %}
[Unofficial WhatsApp Blasting](/limitation/unofficial-whatsapp-blasting)
{% endcontent-ref %}

## File size limitation

Maximum file size:&#x20;

* Video: 5Mb&#x20;
* Picture: 1Mb&#x20;
* Profile Picture: 0.5Mb&#x20;
* PDF: 1Mb

## Watch WhatsApp Button video demo

{% embed url="<https://youtu.be/H9Udks8lte0>" %}

## Watch this video on how to assign new users

{% embed url="<https://youtu.be/ObUaSa47dgU>" %}


# Official WhatsApp Business API Blasting

Official WA Biz Blasting uses Meta's official WhatsApp Business API for 100% message delivery, requiring a connected messaging software like oChats.io.

Official WA Biz Blasting allows you to blast out your message to all of your recipients at 100% message receiving rate. This can only be done if you use official WhatsApp API from Meta.&#x20;

To get the access of this API, you must subscribe a messaging software which supports this API connection/integration. You can check oChats.io out.

{% embed url="<https://www.ochats.io>" %}

You can apply official WhatsApp API through oChats.io. You may contact them for more information.


# Telegram Blasting Service Guide

An introduction to Yaeris's Telegram Blasting Service, including a video walkthrough and the terms and conditions that apply to the service.

{% hint style="info" %}
**Important Note**: [Terms and Conditions](/faqs/terms-and-conditions/telegram-blasting-service) applied for using this service.
{% endhint %}

You can watch this video to have a better understanding of how our Telegram Blasting works.

{% embed url="<https://youtu.be/CB1Kjom0Ms4>" %}


# Yaeris LINE Blasting Service Guide

An introduction to Yaeris's LINE Blasting Service portal, including a video walkthrough and the terms and conditions that apply.

{% hint style="info" %}
**Important Note**: [Terms and Conditions](/faqs/terms-and-conditions/line-blasting-service) applied for using this service.
{% endhint %}

Watch this video for better understanding on how our LINE portal works

{% embed url="<https://youtu.be/5HKxLsYG79E>" %}


# Yaeris Signal Blasting Service Guide

An introduction to Yaeris's Signal Blasting Service portal, including a video walkthrough and the terms and conditions that apply.

{% hint style="info" %}
**Important Note**: [Terms and Conditions](/faqs/terms-and-conditions/signal-blasting-service) applied for using this service.
{% endhint %}

Watch this video for better understanding on how our Signal portal works

{% embed url="<https://youtu.be/5HKxLsYG79E>" %}


# iMessage Blasting Service Guide

An introduction to Yaeris's iMessage Blasting Service, including a video demo and the terms and conditions that apply to the service.

{% hint style="info" %}
**Important Note**: [Terms and Conditions](/faqs/terms-and-conditions/imessage-blasting-service) applied for using this service.
{% endhint %}

Here is the iMessage video demo:

{% embed url="<https://www.youtube.com/watch?v=4chQtnBgTUw>" %}


# Dedicated Broadcast Number (WhatsApp)

Move your WhatsApp Business number to the WhatsApp Business API for 100% delivery, 2-way messaging, and no risk of number bans, via oChats.io.

## How Dedicated Broadcast Number works?

You can use back your existing WhatsApp Business number to blast your marketing campaign without worrying about having blocked by WhatsApp. However, we need to submit an application to Facebook to move your existing number from WhatsApp Business to WhatsApp Business API. Once the number has successfully moved over to WhatsApp Business API, you can blast your promotional message to your target audience with a 100% delivery rate (as long as WhatsApp approved your content before you blast, then it will be ok).

## Benefits

* Blast WhatsApp message without worry the number will ever get blocked. As long as Facebook approves your content before blasting, you can blast without worry anything.
* Have a dedicated number where your customers can revert back to you with inquiries.
* Able to perform 2-way communication. You can even monitor who receives, reads & reply to your WhatsApp message.
* Do not need to share sim cards with other people. Your number is solely dedicated to your brand/company.&#x20;
* Using an official way of blasting. Using the official WhatsApp Business API to blast your promotional campaign.
* Use your existing number as brand recognition for your company.

## There are 3 costs which need to pay:

1. [Software subscription fee](https://www.ochats.io/pricing):&#x20;
   * You need software to connect your new WhatsApp Business API. After connecting, only you can do the above benefits. You can check the price of the software here, ochats.io/pricing.
2. [WhatsApp fee](https://developers.facebook.com/docs/whatsapp/pricing/):&#x20;
   * WhatsApp will charge your company around US$0.08 per message. WhatsApp is US company so the charge will be in US dollar. However, WhatsApp is giving 1st 1000 messages for free every month. There are no charges. Exceed 1000 messages per month, the charges will be around US$0.08 per message.
3. WhatsApp service provider fee:&#x20;
   * WhatsApp has appointed 2 service providers to help WhatsApp to distribute their API to businesses like yourself. These service providers also charge a fee. The 2 service providers are Gupshup & 360dialog. Gupshup charges US$0.001 for every incoming & outgoing message. 360dialog charges US$25/mth for unlimited incoming & outgoing messages.

{% embed url="<https://ochats.io/pricing>" %}


# Unofficial WhatsApp Blasting

Limitation on using unofficial WhatsApp API to blast WhatsApp message.

We are not able to track double tick or who receives the message. So we couldn't provide you the information on who received the message and who didn't receive the message.

{% embed url="<https://www.whatsapp.com/legal/commerce-policy>" %}

### WhatsApp Button Limitation

Currently, WhatsApp Button Blasting is not available.

## Understand how unofficial API blasting really works

{% embed url="<https://youtu.be/B6ggrhTTSfs>" %}

## Understand what limitations & solutions of unofficial WhatsApp API blasting

{% embed url="<https://youtu.be/AcAFGzde85Y>" %}


# Telegram Blasting Limitations Explained

Yaeris sends one-way Telegram blasts from thousands of its own accounts; credit is deducted even if recipient privacy settings block delivery.

We will be using our own thousands of Telegram accounts to blast out your message. This is a 1-way communication.

Credit will not be refunded if you breach our Terms and Conditions

* Our report only shows you the message that has been successfully sent out from our server. *Not the number of messages received by your customer*. We are not able to track which recipients receive your message since we are not using any API to blast your message. There is no transparency here.&#x20;
* We will deduct the credit as long as we have sent out your messages from our server.&#x20;
* Your message will *not be received by your contacts* if:
  * your recipients decide to set the phone number privacy from Everybody to Nobody. In this case, *the credit will still be deducted*.
  * your recipients set the phone number privacy from Everybody to My Contacts. In this case, *the credit will still be deducted*.

If your message contains these contents listed in Telegram Terms of Service, then the delivery rate of the message will usually be very low.

{% embed url="<https://telegram.org/tos>" %}


# LINE Blasting Limitations Explained

Yaeris sends one-way LINE broadcasts using thousands of its own accounts; content that violates LINE's guidelines lowers delivery rates.

We will be using our own thousands of LINE accounts to blast out your message. This is a 1-way communication.

If your message contains these contents, then the delivery rate of the message will usually be very low.

{% embed url="<https://linecorp.com/en/safety/contributionStandard>" %}


# Signal Blasting Limitations Explained

Yaeris sends one-way Signal blasts using thousands of its own accounts; content violating Signal's terms of service reduces delivery rates.

We will be using our own thousands of Signal accounts to blast out your message. This is a 1-way communication.

If your message contains these contents, then the delivery rate of the message will usually be very low.

{% embed url="<https://signal.org/legal/#terms-of-service>" %}


# iMessage Blasting Limitations Explained

Yaeris sends iMessage blasts using thousands of its own accounts in a one-way messaging format, with no reply-back capability for recipients.

We will be using our own thousands of iMessage accounts to blast out your message. This is a 1-way communication.


# General FAQs for Blasting Services

Covers country code rules, non-expiring credits, WhatsApp report timing, demo accounts, and self-service campaigns across messaging channels.

<details>

<summary>Do I need to put my country code in every of number mobile number?</summary>

Yes. You need to put country code at each of your mobile number which you are going to send out.

</details>

<details>

<summary>Will my credit expires?</summary>

No. Your WhatsApp credits will never expires.

</details>

<details>

<summary>Is there any content which is prohibited from using your service?</summary>

No. All contents are eligible to use our service.

</details>

<details>

<summary>How long will take for your server to generate WhatsApp report?</summary>

It will take one business day after the WhatsApp campaign has been successfully completed.

</details>

<details>

<summary>Will report be generated regardless of any condition?</summary>

Report will only be generated if you launch WhatsApp campaign more than 100 numbers in a single campaign.

</details>

<details>

<summary>Can Your Reports Indicate Which Number Has Already Read My Promotional Message?</summary>

No. Our report only shows which numbers have delivered successfully from our server and which report does not. However, we do not guarantee all number which has been delivered successfully will receive at the recipients’ end.

</details>

<details>

<summary>Do you provide list of mobile numbers or database for my blasting campaign?</summary>

No. We only provide blasting services.&#x20;

</details>

<details>

<summary>Do You Provide Any Demo Account?</summary>

Yes, we do. You can message to us via [WhatsApp](https://wa.me/60196788636) to request for demo account.

</details>

<details>

<summary>Are you going to help me to launch the blasting campaign?</summary>

We will provide you an access to log into our web based portal where you can launched the campaign yourself. It is as easy as 123.&#x20;

</details>

<details>

<summary>I am not able to receive message on my end. What happen? Why is this happening? Is there any solution to resolve this issue?</summary>

We have no solution to this problem. This is about receiving message issue. Those sim cards that are supposed to send out messages to your numbers are blocked. There is no way to verify it since the sender sim cards are blocked.

Moreover, there are thousands of sim cards we are using for blasting. It is almost impossible for us to take out the sim card 1 by 1 & login to whatsapp 1 by 1 to check for you.

Furthermore, if we do that, other customers' campaigns will be put on hold and delayed as we promise our customer on our 24 hours campaign completion SLA level.

In conclusion, there is no solution to this except you blast it yourself using your own whatsapp accounts which you have already done it before. Since you are using/borrowing/renting our whatsapp accounts to blast out your message, there is no much control & transparency you can have.

</details>


# WhatsApp Cloud Blaster Software FAQs

Answers on QR code errors, anti-ban proxy features, account blocking risk, emoji glitches, stalled campaigns, and delivery report accuracy.

<details>

<summary>Sometimes I fail to connect QR code. Why is this happening?</summary>

Some cases of QR code errors are due to API temporarily down or QR code expired. You need to refresh the page & wait for next scanning attempts.

</details>

<details>

<summary>Why is my WhatsApp account got blocked? I thought by using your WhatsApp Cloud Blaster software with anti ban system and my WhatsApp account won't get blocked?</summary>

Our software already installs all these functions to help you to reduce the rate of getting blocked:

* advanced proxy to mask the real device IP address
* Spintax function
* delay in sending messages between WhatsApp accounts

Also, maybe this tips will help you.

* Farm your WhatsApp accounts for 3 months before you use it for blasting purpose. Use it for normal conversation
* Register your WhatsApp accounts with WhatsApp Business
* Install proxy to your account to make it even harder for WhatsApp to detect your IP address. Bare in mind that on our backend of the software, we have already installed proxies. If you need more proxies, you can add more yourself. Go through our guide to know how, <https://docs.yaeris.com/services/whatsapp-cloud-blaster-software/proxies-module>

Also, please bare in mind that we are providing blasting software to you. We do not responsible if your WhatsApp account got blocked. So please don't use your real official WhatsApp accounts.

</details>

<details>

<summary>How does your anti ban system works with advanced proxy?</summary>

As for anti ban system, we are using multiple proxies to mask your real device IPs away from WhatsApp. This way WhatsApp will not block your real account.

This anti ban system is not going to be 100% anti ban. However, it will reduce the chance of your WhatsApp account getting blocked by WhatsApp for good. **Please bare in mind that we are only a software provider. We build useful functions that will help you, but we are not responsible to the result you expect to achieve. For eg, you expect/assume that your WhatsApp accounts will never get block for 1 year after you blast a large volume. We are not able to control this** **outcome**.

Our software has given you a function where you can install your own proxy in the software to mask the WhatsApp accounts you are using to blast your message.

</details>

<details>

<summary>Why does the reports show the system has sent out 2 additional messages?</summary>

The report maybe misleading as this system is built upon NodeJS. This error occurs due to operation within NodeJS server. Hence, the error will not be fixed anytime soon.

</details>

<details>

<summary>Why do I receive question marks for the emoji I have inserted?</summary>

This is because you are not using our software emoji. You need to use our internal software emoji.

</details>

<details>

<summary>Why is there no WhatsApp group pops out in the Export Participants module?</summary>

You need to send a message in the WhatsApp Group which you want to export out first. Once you have sent any message in the group, the system will be able to detect your WhatsApp group which you want to export the contact out.

</details>

<details>

<summary>Why my campaign fails to send out message?</summary>

This is because the connection to your WhatsApp account has been cut off. You need to reconnect to your WhatsApp account again and recreate your campaign again.

</details>

<details>

<summary>Why my campaign is not moving at all? It has been more than 2 hours</summary>

The reason your campaign is not moving at all is due to:

* Lost connection with WhatsApp Web
  * Solution: Remove existing WhatsApp Web connection and reconnect again by scanning the QR code again
* Temporary spike in high usage of server traffic
  * Solution: Be patient and come back to check your campaign after 24 hours
* The WhatsApp account got blocked/banned
  * Solution: Replace another new WhatsApp account

</details>


# WhatsApp Blasting Service FAQs

Explains cross-country sending, random sender numbers, credit refunds for invalid numbers, single-tick delivery reporting, and profile picture resets.

<details>

<summary>Can I broadcast WhatsApp message to different countries?</summary>

Yes. We send WhatsApp messages to different countries. All you need to do is to enter .

</details>

<details>

<summary>What will the number displays in my customer's WhatsApp?</summary>

It will be displaying in random Malaysia mobile numbers.

</details>

<details>

<summary>Do I need to use the filter in your WhatsApp admin panel?</summary>

You don’t have to. System will automatically refund all WhatsApp credits to you if it fails to send out messages due to non-WhatsApp numbers.&#x20;

</details>

<details>

<summary>Do you guarantee all WhatsApp numbers I have uploaded are being sent out and successfully received by all my prospect?</summary>

**We do not guarantee double ticks or blue ticks** for your WhatsApp deliverables. **We only guarantee 1 tick or 0 tick** which will be indicated in our report. Our job is to send out your message. Whether or not your recipients receive or read, we do not know and have this information.

**We will deduct the credit as long as we have sent out your messages from our server**. In other words, as long as we achieve 1 tick, the credit will be deducted from your account.

</details>

<details>

<summary>I never receive the message. Why your report indicates that you deliver the message?</summary>

Our report only shows you the message that has been successfully sent out from ou**r server. Not the number of messages received** by your customer. In other words, we can only let you know which number is 1 tick and which number has 0 tic**k. We are not able to track double tick or blue tick**. We are not using any API to blast your message. There is no transparency her&#x65;**.**

So our assumption is we send out your message to WhatsApp server, but WhatsApp has just blocked our WhatsApp account which is responsible in sending your message to your number and WhatsApp server is not releasing your message to your number.&#x20;

<img src="https://4071208254-files.gitbook.io/~/files/v0/b/gitbook-x-prod.appspot.com/o/spaces%2FQVxt1FPfwclnTSBjpHJc%2Fuploads%2FtlOMxPty2w2al07gG2fe%2Fimage.png?alt=media&amp;token=afeef64f-c68a-4157-bba3-ff7346086d83" alt="" data-size="original">

</details>

<details>

<summary>I have inserted a profile picture. Why the profile picture is not displaying exactly what I have uploaded when I receive the message?</summary>

The profile picture that you inserted during creating the **campaign will not stay** there forever because we are sharing our WhatsApp accounts with all of our customers. Other customers also have their profile picture to upload which will cause your profile picture to be replaced by theirs once your campaign has been completed.

</details>


# Telegram Blasting Service FAQs

Covers cross-country sending, random sender usernames, automatic credit refunds, the 98% minimum delivery rate, and phone-number-only uploads.

<details>

<summary>Can I broadcast Telegram message to different countries?</summary>

Yes. We send Telegram messages to different countries. All you need to do is to enter .

</details>

<details>

<summary>What will the number displays in my customer's Telegram?</summary>

It will be displaying in random Telegram username.

</details>

<details>

<summary>Do I need to use the filter in your Telegram admin panel?</summary>

You don’t have to. System will automatically refund all Telegram credits to you if it fails to send out messages due to non-Telegram numbers.&#x20;

</details>

<details>

<summary>Do you guarantee all Telegram numbers I have uploaded are being sent out and successfully received by all my prospect?</summary>

We do not guarantee our delivery rate will be at 100%. However, we guarantee that our delivery rate will be at least 98%.

</details>

<details>

<summary>Can I upload phone number / Telegram username?</summary>

You can only upload Telegram phone number. We do not support Telegram username.

</details>

[<br>](https://yaeris.com/telegram-bot-broadcast/)


# LINE Blasting Service FAQs

Explains cross-country LINE broadcasts, random sender usernames, automatic credit refunds for failed sends, and the 98% minimum delivery rate.

<details>

<summary>Can I broadcast LINE message to different countries?</summary>

Yes. We send LINE messages to different countries. All you need to do is to enter .

</details>

<details>

<summary>What will the number displays in my customer's LINE?</summary>

It will be displaying in random LINE username.

</details>

<details>

<summary>Do I need to use the filter in your LINE admin panel?</summary>

You don’t have to. System will automatically refund all LINE credits to you if it fails to send out messages due to non-LINE numbers.&#x20;

</details>

<details>

<summary>Do you guarantee all LINE numbers I have uploaded are being sent out and successfully received by all my prospect?</summary>

We do not guarantee our delivery rate will be at 100%. However, we guarantee that our delivery rate will be at least 98%.

</details>


# Signal Blasting Service FAQs

Explains cross-country Signal broadcasts, random sender usernames, automatic credit refunds for failed sends, and the 98% minimum delivery rate.

<details>

<summary>Can I broadcast Signal message to different countries?</summary>

Yes. We send Signal messages to different countries. All you need to do is to enter .

</details>

<details>

<summary>What will the number displays in my customer's Signal?</summary>

It will be displaying in random Signal username.

</details>

<details>

<summary>Do I need to use the filter in your Signal admin panel?</summary>

You don’t have to. System will automatically refund all Signal credits to you if it fails to send out messages due to non-Signal numbers.&#x20;

</details>

<details>

<summary>Do you guarantee all Signal numbers I have uploaded are being sent out and successfully received by all my prospect?</summary>

We do not guarantee our delivery rate will be at 100%. However, we guarantee that our delivery rate will be at least 98%.

</details>


# iMessage Blasting Service FAQs

Covers supported countries, random sender numbers, credit refunds for non-iMessage numbers, delivery rate definition, and phone-only uploads.

<details>

<summary>Can I broadcast iMessage message to different countries?</summary>

Yes. We send iMessage messages to different countries except for China, Hong Kong, Israel & maybe Taiwan. All you need to do is to insert your phone number in this format, *\<country code> \<phone number>*

</details>

<details>

<summary>What will the number displays in my customer's iMessage?</summary>

It will be displaying in random iMessage phone number.

</details>

<details>

<summary>Do I need to use the filter in your iMessage admin panel?</summary>

You don’t have to. System will automatically refund all iMessage credits to you if it fails to send out messages due to non-iMessage numbers.&#x20;

</details>

<details>

<summary>Do you guarantee all iMessage numbers I have uploaded are being sent out and successfully received by all my prospect?</summary>

We do not guarantee our delivery rate will be at 100%. Our definition of delivery rate is defined as the total number has successfully sent out from our server (*not defined as total number which receive your message*).&#x20;

</details>

<details>

<summary>Can I upload email address instead of phone number?</summary>

No, you cannot. We only accept phone number with this format, *\<country code> \<phone number>*

</details>


# SMS Blasting Service FAQs & Answers

Explains why links and illegal content are blocked under Malaysian law, supported countries, random sender numbers, and delivery rate definition.

{% hint style="warning" %}
Important Note: Our SMS blasting service ***cannot insert link/URL*** in the message and ***cannot send illegal content*** out due to Malaysia's government regulation.
{% endhint %}

<details>

<summary>Can I broadcast SMS message to any countries?</summary>

Yes, except for China and Hong Kong. Our company is located in Malaysia. So, we are sending SMS from this country to whichever country you want except for China and Hong Kong

</details>

<details>

<summary>What will the number displays in my customer's phone?</summary>

It will be displaying in random Malaysia phone number.

</details>

<details>

<summary>Do you guarantee all phone numbers I have uploaded are being sent out and successfully received by all my prospect?</summary>

We do not guarantee our delivery rate will be at 100%. Our definition of delivery rate is defined as the total number has successfully sent out from our server (*not defined as total number which receive your message*).&#x20;

</details>


# Dedicated Broadcast Number FAQs

Explains how dedicated number broadcasting works, the required move to WhatsApp Business API, free onboarding, and current pricing.

<details>

<summary>How does your dedicated number broadcast works?</summary>

Basically, you need to sign up a software which enables you to connect to your existing WhatsApp number. However, your existing WhatsApp number is required to move to WhatsApp Business API first before you are able to connect to oChats. We will provide a free onboarding for you once you have signed up.

</details>

<details>

<summary>What kind of cost I am looking to pay?</summary>

You can refer to this pricing [here](https://yaeris.com/dedicated-server-broadcast/#pricing).

</details>


# Official WhatsApp API FAQs

Clarifies that Yaeris provides the WhatsApp API only; integration must be handled by the client or their own software provider.

<details>

<summary>Are You Going To Help Me Integrate Your WhatsApp API To My Software?</summary>

No. We only provide you API. Integration must be done from your end or your software provider.&#x20;

</details>

If you didn't find your question here, you can check this section out too. Perhaps, you can see your question in it.&#x20;

{% content-ref url="/pages/Y0EuJrhzoqnEe4TvF2Oo" %}
[General FAQs for Blasting Services](/faqs/general-faqs)
{% endcontent-ref %}

For more information on official WhatsApp API, you can refer to this section.

{% content-ref url="/pages/ItIc3LwmHhfexO8no0nd" %}
[Dedicated Broadcast Number (WhatsApp)](/services/dedicated-broadcast-number)
{% endcontent-ref %}


# All Services Terms & Conditions

Index of Yaeris terms and conditions for each blasting service: WhatsApp, iMessage, Telegram, SMS, LINE, Signal, and WhatsApp Cloud Blaster software.

This is our T\&C for all of our software and services

{% content-ref url="/pages/JNrSj7Gs3AmiFgasuZZH" %}
[WhatsApp Blasting Terms & Conditions](/faqs/terms-and-conditions/whatsapp-blasting-service)
{% endcontent-ref %}

{% content-ref url="/pages/KqTrLfZR1zRkxuqxrJaN" %}
[iMessage Blasting Terms & Conditions](/faqs/terms-and-conditions/imessage-blasting-service)
{% endcontent-ref %}

{% content-ref url="/pages/wo3WhhNzoRoYVXuF0wZW" %}
[Telegram Blasting Terms & Conditions](/faqs/terms-and-conditions/telegram-blasting-service)
{% endcontent-ref %}

{% content-ref url="/pages/1Jm1K83BhFTGapH7RuST" %}
[SMS Blasting Terms & Conditions](/faqs/terms-and-conditions/sms-blasting-service)
{% endcontent-ref %}

{% content-ref url="/pages/pWpoGPMSyARXw897Bxos" %}
[LINE Blasting Terms & Conditions](/faqs/terms-and-conditions/line-blasting-service)
{% endcontent-ref %}

{% content-ref url="/pages/J8VR5nCRQdJi8ZSaH3Ig" %}
[Signal Blasting Terms & Conditions](/faqs/terms-and-conditions/signal-blasting-service)
{% endcontent-ref %}

{% content-ref url="/pages/aGVfVdgJAHZDipSXfkwt" %}
[WhatsApp Cloud Blaster Terms & Conditions](/faqs/terms-and-conditions/whatsapp-cloud-blaster)
{% endcontent-ref %}


# WhatsApp Blasting Terms & Conditions

Details the no-refund policy, 24-hour campaign SLA, 3-campaigns-per-day limit, delivery-tick reporting limits, and campaign duplication rules.

Please take note of our Terms & Conditions before placing your order. It is very important:

General

1. We do not 100% guarantee the blasting speed. All campaigns will be completed in 24 hours. You will not be able to choose which exact time to start sending out your message.
2. We do not 100% guarantee on receiving rate. Our job is to send out your message. Whether or not your recipients receive or read, we do not know and have this information.
3. We do not have a refund policy. Client not receiving the message may be caused by WhatsApp/Telegram/LINE/Zalo/Signal/iMessage server-side error, SIM card got banned, the recipient has set his own privacy in their own app & other factors.
4. The credits for all completed campaigns will be refunded back to you within 24 hours after your campaign has been completed
5. This is 1-way blasting/communication. There is no way to reply back to your interested audience.
6. You are allowed to submit/create 3 campaigns per day (max). 1 campaign can contains unlimited numbers in it (depend on remaining credit left in your wallet). Any additional campaign created will be rejected. This is to protect our 24-hour campaign fulfillment SLA level to our customers.
7. Campaign spamming is prohibited. If our QA team finds out that you submit multiple campaigns with same content message, your account will be suspended with no refund given.
8. Our delivery rate defines as percentage of messages sent out from our server. It doesn't mean percentage of messages received by your recipients.
9. We are not able to send to China, Hong Kong & Taiwan phone number.
10. Campaign duplication is prohibited & will result in account suspension with no refund. Campaign duplication occurs when a user submits multiple campaigns with the same content messages, same attachment & same list of phone numbers per day.&#x20;
11. To ensure your campaigns always deliver with deliver ability ratio, we assign one sender number for every 5 recipients number. We always use the same number to send to the same recipients to lower the risk of getting banned.&#x20;
12. Client is not allowed to determine the way we run our business operation, especially the way we setup our blasting sequence.&#x20;
13. We are allowed to run and change the business operation the w**ay we de**em fit.

WhatsApp

1. We do not guarantee double ticks or blue ticks for your WhatsApp deliverables. We only guarantee 1 tick or 0 tick which will be indicated in our report.
2. Our report only shows you the message that has been successfully sent out from our server. Not the number of messages received by your customer. In other words, we can only let you know which number is 1 tick and which number has 0 tick. We are not able to track double tick or blue tick. We are not using any API to blast your message. There is no transparency here.
3. We will deduct the credit as long as we have sent out your messages from our server. In other words, as long as we achieve 1 tick, the credit will be deducted from your account.
4. The link that you insert in your content may be unclickable due to WhatsApp security measures against spamming. Hence, you need to guide your audience to activate the link, he/she needs to reply back the message.
5. The profile picture that you inserted during creating the campaign will not stay there forever because we are sharing our WhatsApp accounts with all of our customers. Other customers also have their profile picture to upload which will cause your profile picture to be replaced by theirs once your campaign has been completed.

Advise performing to insert your own number in the list that you want to blast out. If your number is received, you can only safely assume that all the numbers you have uploaded in the campaign are received as well. Even though your number didn't receive the message, the credit will still be deducted from your account as we have used up our sim card quota to send out messages. In this scenario, we are not responsible for ensuring you receive your message on your end.&#x20;

⭐Understand how blasting really works: <https://youtu.be/B6ggrhTTSfs> ⭐Understand what limitations & solutions WhatsApp blasting: <https://youtu.be/AcAFGzde85Y>

{% hint style="warning" %}
After you have placed the order, it also implies that you have agreed to our Terms & Conditions.
{% endhint %}


# iMessage Blasting Terms & Conditions

Covers the no-refund policy, 24-hour SLA, 3-campaigns-per-day limit, SMS fallback for non-iMessage numbers, and Apple's link-removal rules.

Please take note of our Terms & Conditions before placing your order. It is very important:

General

1. We do not 100% guarantee the blasting speed. All campaigns will be completed in 24 hours. You will not be able to choose which exact time to start sending out your message.
2. We do not 100% guarantee on receiving rate. Our job is to send out your message. Whether or not your recipients receive or read, we do not know and have this information.
3. We do not have a refund policy. Client not receiving the message may be caused by WhatsApp/Telegram/LINE/Zalo/Signal/iMessage server-side error, SIM card got banned, the recipient has set his own privacy in their own app & other factors.
4. The credits for all completed campaigns will be refunded back to you within 24 hours after your campaign has been completed
5. This is 1-way blasting/communication. There is no way to reply back to your interested audience.
6. You are allowed to submit/create 3 campaigns per day (max). 1 campaign can contains unlimited numbers in it (depend on remaining credit left in your wallet). Any additional campaign created will be rejected. This is to protect our 24-hour campaign fulfillment SLA level to our customers.
7. Campaign spamming is prohibited. If our QA team finds out that you submit multiple campaigns with same content message, your account will be suspended with no refund given.
8. Our delivery rate defines as percentage of messages sent out from our server. It doesn't mean percentage of messages received by your recipients.
9. We are not able to send to China, Hong Kong & Taiwan phone number.
10. Campaign duplication is prohibited & will result in account suspension with no refund. Campaign duplication occurs when a user submits multiple campaigns with the same content messages, same attachment & same list of phone numbers per day.&#x20;
11. To ensure your campaigns always deliver with deliver ability ratio, we assign one sender number for every 5 recipients number. We always use the same number to send to the same recipients to lower the risk of getting banned.&#x20;
12. Client is not allowed to determine the way we run our business operation, especially the way we setup our blasting sequence.&#x20;
13. We are allowed to run and change the business operation the w**ay we de**em fit.

iMessage

1. Our report only shows you the message that has been successfully sent out from our server. Not the number of messages received by your customer. We are not able to track which recipients receive your message since we are not using any API to blast your message. There is no transparency here.
2. We will deduct the credit as long as we have sent out your messages from our server.
3. The link that you insert in your content may be removed by Apple if Apple deems your link as malicious. We are not responsible for that and not going to refund any credit if this situation happens. We only refund credit to you when we detect the number that you upload does not have an iMessage account. That is the only reason we do that.
4. The profile picture that you inserted during creating the campaign will not stay there forever because we are sharing our iMessage accounts with all of our customers. Other customers also have their profile picture to upload which will cause your profile picture to be replaced by theirs once your campaign has been completed.
5. If our system detects one of the phone numbers you upload doesn't have iMessage account, our system will send out sms instead. If your message contains any link or illegal contents, the sms will not send out due to government regulation. In this case, your credit will still be deducted.
6. We use RCS / iMessage account to send out your messages. If your recipient doesn't have either one of these messaging apps, they will not receive your message. In this scenario, the **credit** will still be deducted.

Advise performing to insert your own number in the list that you want to blast out. If your number is received, you can only safely assume that all the numbers you have uploaded in the campaign are received as well. Even though your number didn't receive the message, the credit will still be deducted from your account as we have used up our sim card quota to send out messages. In this scenario, we are not responsible for ensuring you receive your message on your end.&#x20;

⭐Understand how blasting really works: <https://youtu.be/B6ggrhTTSfs> ⭐Understand what limitations & solutions WhatsApp blasting: <https://youtu.be/AcAFGzde85Y>

{% hint style="warning" %}
After you have placed the order, it also implies that you have agreed to our Terms & Conditions.
{% endhint %}


# Telegram Blasting Terms & Conditions

Details the no-refund policy, 24-hour campaign SLA, 3-campaigns-per-day limit, and how recipient privacy settings can block delivery.

Please take note of our Terms & Conditions before placing your order. It is very important:

General

1. We do not 100% guarantee the blasting speed. All campaigns will be completed in 24 hours. You will not be able to choose which exact time to start sending out your message.
2. We do not 100% guarantee on receiving rate. Our job is to send out your message. Whether or not your recipients receive or read, we do not know and have this information.
3. We do not have a refund policy. Client not receiving the message may be caused by WhatsApp/Telegram/LINE/Zalo/Signal/iMessage server-side error, SIM card got banned, the recipient has set his own privacy in their own app & other factors.
4. The credits for all completed campaigns will be refunded back to you within 24 hours after your campaign has been completed
5. This is 1-way blasting/communication. There is no way to reply back to your interested audience.
6. You are allowed to submit/create 3 campaigns per day (max). 1 campaign can contains unlimited numbers in it (depend on remaining credit left in your wallet). Any additional campaign created will be rejected. This is to protect our 24-hour campaign fulfillment SLA level to our customers.
7. Campaign spamming is prohibited. If our QA team finds out that you submit multiple campaigns with same content message, your account will be suspended with no refund given.
8. Our delivery rate defines as percentage of messages sent out from our server. It doesn't mean percentage of messages received by your recipients.
9. We are not able to send to China, Hong Kong & Taiwan phone number.
10. Campaign duplication is prohibited & will result in account suspension with no refund. Campaign duplication occurs when a user submits multiple campaigns with the same content messages, same attachment & same list of phone numbers per day.&#x20;
11. To ensure your campaigns always deliver with deliver ability ratio, we assign one sender number for every 5 recipients number. We always use the same number to send to the same recipients to lower the risk of getting banned.&#x20;
12. Client is not allowed to determine the way we run our business operation, especially the way we setup our blasting sequence.&#x20;
13. We are allowed to run and change the business operation the w**ay we de**em fit.

Telegram

1. Our report only shows you the message that has been successfully sent out from our server. Not the number of messages received by your customer. We are not able to track which recipients receive your message since we are not using any API to blast your message. There is no transparency here.
2. We will deduct the credit as long as we have sent out your messages from our server.
3. The profile picture that you inserted during creating the campaign will not stay there forever because we are sharing our Telegram accounts with all of our customers. Other customers also have their profile picture to upload which will cause your profile picture to be replaced by theirs once your campaign has been completed.
4. Your message will not be received by your contacts if your recipients decide to set the phone number privacy from Everybody to Nobody. In this case, the credit will still be deducted.

Advise performing to insert your own number in the list that you want to blast out. If your number is received, you can only safely assume that all the numbers you have uploaded in the campaign are received as well. Even though your number didn't receive the message, the credit will still be deducted from your account as we have used up our sim card quota to send out messages. In this scenario, we are not responsible for ensuring you receive your message on your end.&#x20;

⭐Understand how blasting really works: <https://youtu.be/B6ggrhTTSfs> ⭐Understand what limitations & solutions WhatsApp blasting: <https://youtu.be/AcAFGzde85Y>

{% hint style="warning" %}
After you have placed the order, it also implies that you have agreed to our Terms & Conditions.
{% endhint %}


# SMS Blasting Terms & Conditions

Covers the no-refund policy, 24-hour SLA, Malaysia-only sending, link and illegal-content restrictions, and reliance on Malaysian telcos.

{% hint style="warning" %}
Our SMS has limitations:

* Cannot insert link in the message
* Do not support illegal content
* Only can send to malaysia numbers
  {% endhint %}

Please take note of our Terms & Conditions before placing your order. It is very important:

General

1. We do not 100% guarantee the blasting speed. All campaigns will be completed in 24 hours. You will not be able to choose which exact time to start sending out your message.
2. We do not 100% guarantee on receiving rate. Our job is to send out your message. Whether or not your recipients receive or read, we do not know and have this information.
3. We do not have a refund policy. Client not receiving the message may be caused by WhatsApp/Telegram/LINE/Zalo/Signal/iMessage server-side error, SIM card got banned, the recipient has set his own privacy in their own app & other factors.
4. The credits for all completed campaigns will be refunded back to you within 24 hours after your campaign has been completed
5. This is 1-way blasting/communication. There is no way to reply back to your interested audience.
6. You are allowed to submit/create 3 campaigns per day (max). 1 campaign can contains unlimited numbers in it (depend on remaining credit left in your wallet). Any additional campaign created will be rejected. This is to protect our 24-hour campaign fulfillment SLA level to our customers.
7. Campaign spamming is prohibited. If our QA team finds out that you submit multiple campaigns with same content message, your account will be suspended with no refund given.
8. Our delivery rate defines as percentage of messages sent out from our server. It doesn't mean percentage of messages received by your recipients.
9. We are not able to send to China, Hong Kong & Taiwan phone number.
10. Campaign duplication is prohibited & will result in account suspension with no refund. Campaign duplication occurs when a user submits multiple campaigns with the same content messages, same attachment & same list of phone numbers per day.&#x20;
11. To ensure your campaigns always deliver with deliver ability ratio, we assign one sender number for every 5 recipients number. We always use the same number to send to the same recipients to lower the risk of getting banned.&#x20;
12. Client is not allowed to determine the way we run our business operation, especially the way we setup our blasting sequence.&#x20;
13. We are allowed to run and change the business operation the w**ay we de**em fit.

SMS

1. Our report only shows you the message that has been successfully sent out from our server. Not the number of messages received by your customer. We are not able to track which recipients receive your message since we are not using any API to blast your message. There is no transparency here.
2. We will deduct the credit as long as we have sent out your messages from our server.
3. Since we are using Malaysia telco network to send out your SMS, your sms delivery is closely tight to these telco network's capability and their infrastructure. We will not be responsible if your recipients fail to receive sms.
4. You are not able to insert links into your content due to government regulation.
5. All submitted campaigns will take 24 hours to complete. You are not able to choose/schedule time to send out your sms.
6. Illegal content is not allowed such as online gambling, drug and etc.

Advise performing to insert your own number in the list that you want to blast out. If your number is received, you can only safely assume that all the numbers you have uploaded in the campaign are received as well. Even though your number didn't receive the message, the credit will still be deducted from your account as we have used up our sim card quota to send out messages. In this scenario, we are not responsible for ensuring you receive your message on your end.&#x20;

⭐Understand how blasting really works: <https://youtu.be/B6ggrhTTSfs> ⭐Understand what limitations & solutions WhatsApp blasting: <https://youtu.be/AcAFGzde85Y>

{% hint style="warning" %}
After you have placed the order, it also implies that you have agreed to our Terms & Conditions.
{% endhint %}


# LINE Blasting Terms & Conditions

Details the no-refund policy, 24-hour campaign SLA, 3-campaigns-per-day limit, and profile picture resets from shared LINE accounts.

Please take note of our Terms & Conditions before placing your order. It is very important:

General

1. We do not 100% guarantee the blasting speed. All campaigns will be completed in 24 hours. You will not be able to choose which exact time to start sending out your message.
2. We do not 100% guarantee on receiving rate. Our job is to send out your message. Whether or not your recipients receive or read, we do not know and have this information.
3. We do not have a refund policy. Client not receiving the message may be caused by WhatsApp/Telegram/LINE/Zalo/Signal/iMessage server-side error, SIM card got banned, the recipient has set his own privacy in their own app & other factors.
4. The credits for all completed campaigns will be refunded back to you within 24 hours after your campaign has been completed
5. This is 1-way blasting/communication. There is no way to reply back to your interested audience.
6. You are allowed to submit/create 3 campaigns per day (max). 1 campaign can contains unlimited numbers in it (depend on remaining credit left in your wallet). Any additional campaign created will be rejected. This is to protect our 24-hour campaign fulfillment SLA level to our customers.
7. Campaign spamming is prohibited. If our QA team finds out that you submit multiple campaigns with same content message, your account will be suspended with no refund given.
8. Our delivery rate defines as percentage of messages sent out from our server. It doesn't mean percentage of messages received by your recipients.
9. We are not able to send to China, Hong Kong & Taiwan phone number.
10. Campaign duplication is prohibited & will result in account suspension with no refund. Campaign duplication occurs when a user submits multiple campaigns with the same content messages, same attachment & same list of phone numbers per day.&#x20;
11. To ensure your campaigns always deliver with deliver ability ratio, we assign one sender number for every 5 recipients number. We always use the same number to send to the same recipients to lower the risk of getting banned.&#x20;
12. Client is not allowed to determine the way we run our business operation, especially the way we setup our blasting sequence.&#x20;
13. We are allowed to run and change the business operation the w**ay we de**em fit.

LINE

1. Our report only shows you the message that has been successfully sent out from our server. Not the number of messages received by your customer. We are not able to track which recipients receive your message since we are not using any API to blast your message. There is no transparency here.
2. We will deduct the credit as long as we have sent out your messages from our server.
3. The profile picture that you inserted during creating the campaign will not stay there forever because we are sharing our LINE accounts with all of our customers. Other customers also have their profile picture to upload which will cause your profile picture to be replaced by theirs once your campaign has been completed.

Advise performing to insert your own number in the list that you want to blast out. If your number is received, you can only safely assume that all the numbers you have uploaded in the campaign are received as well. Even though your number didn't receive the message, the credit will still be deducted from your account as we have used up our sim card quota to send out messages. In this scenario, we are not responsible for ensuring you receive your message on your end.&#x20;

⭐Understand how blasting really works: <https://youtu.be/B6ggrhTTSfs> ⭐Understand what limitations & solutions WhatsApp blasting: <https://youtu.be/AcAFGzde85Y>

{% hint style="warning" %}
After you have placed the order, it also implies that you have agreed to our Terms & Conditions.
{% endhint %}


# Signal Blasting Terms & Conditions

Details the no-refund policy, 24-hour campaign SLA, 3-campaigns-per-day limit, and profile picture resets from shared Signal accounts.

Please take note of our Terms & Conditions before placing your order. It is very important:

General

1. We do not 100% guarantee the blasting speed. All campaigns will be completed in 24 hours. You will not be able to choose which exact time to start sending out your message.
2. We do not 100% guarantee on receiving rate. Our job is to send out your message. Whether or not your recipients receive or read, we do not know and have this information.
3. We do not have a refund policy. Client not receiving the message may be caused by WhatsApp/Telegram/LINE/Zalo/Signal/iMessage server-side error, SIM card got banned, the recipient has set his own privacy in their own app & other factors.
4. The credits for all completed campaigns will be refunded back to you within 24 hours after your campaign has been completed
5. This is 1-way blasting/communication. There is no way to reply back to your interested audience.
6. You are allowed to submit/create 3 campaigns per day (max). 1 campaign can contains unlimited numbers in it (depend on remaining credit left in your wallet). Any additional campaign created will be rejected. This is to protect our 24-hour campaign fulfillment SLA level to our customers.
7. Campaign spamming is prohibited. If our QA team finds out that you submit multiple campaigns with same content message, your account will be suspended with no refund given.
8. Our delivery rate defines as percentage of messages sent out from our server. It doesn't mean percentage of messages received by your recipients.
9. We are not able to send to China, Hong Kong & Taiwan phone number.
10. Campaign duplication is prohibited & will result in account suspension with no refund. Campaign duplication occurs when a user submits multiple campaigns with the same content messages, same attachment & same list of phone numbers per day.&#x20;
11. To ensure your campaigns always deliver with deliver ability ratio, we assign one sender number for every 5 recipients number. We always use the same number to send to the same recipients to lower the risk of getting banned.&#x20;
12. Client is not allowed to determine the way we run our business operation, especially the way we setup our blasting sequence.&#x20;
13. We are allowed to run and change the business operation the w**ay we de**em fit.

Signal

1. Our report only shows you the message that has been successfully sent out from our server. Not the number of messages received by your customer. We are not able to track which recipients receive your message since we are not using any API to blast your message. There is no transparency here.
2. We will deduct the credit as long as we have sent out your messages from our server.
3. The profile picture that you inserted during creating the campaign will not stay there forever because we are sharing our Signal accounts with all of our customers. Other customers also have their profile picture to upload which will cause your profile picture to be replaced by theirs once your campaign has been completed.

Advise performing to insert your own number in the list that you want to blast out. If your number is received, you can only safely assume that all the numbers you have uploaded in the campaign are received as well. Even though your number didn't receive the message, the credit will still be deducted from your account as we have used up our sim card quota to send out messages. In this scenario, we are not responsible for ensuring you receive your message on your end.&#x20;

⭐Understand how blasting really works: <https://youtu.be/B6ggrhTTSfs> ⭐Understand what limitations & solutions WhatsApp blasting: <https://youtu.be/AcAFGzde85Y>

{% hint style="warning" %}
After you have placed the order, it also implies that you have agreed to our Terms & Conditions.
{% endhint %}


# WhatsApp Cloud Blaster Terms & Conditions

Covers the no-refund policy, 24-48 hour bug-fix window, shared server queue, and that Yaeris is not liable for WhatsApp account blocks.

Please read our terms and conditions before placing an order with us

1. If there is any technical error, we will take 24 - 48 hours to fix it.
2. Our server will service your campaign on best effort basis. The traffic within the server is shared across all of our customers. Your submitted campaign will usually be in the queue.
3. Any technical glitch derived from the software will take 24 - 48 hours to fix it. If the issue is complicated, it will take more than 48 hours.
4. We are not responsible if your WhatsApp account gets blocked. In this case, we are just a software provider.
5. We are not responsible for achieving your expectation/assumption. You are the one who is responsible at the end of the day.
6. We do not have refund policy.

{% hint style="warning" %}
After you have placed the order, it also implies that you have agreed to our Terms & Conditions.
{% endhint %}


# Blasting as an Email Marketing Alternative

Yaeris's messaging blasting service works like email marketing software but without automated workflow sequences, suited to one-off bulk campaigns.

You can use our messaging blasting service as a platform that works similarly like email marketing software except there is no workflow sequence (automation). You can refer to our service for more information.

{% content-ref url="/pages/zTNsuslhBSkgcv967SzG" %}
[Services](/services/whatsapp-blasting-service)
{% endcontent-ref %}


# Reaching New Audiences via Blasting

Yaeris blasting lets you reach new audiences using a mobile number list; campaign success depends on a genuine, well-targeted contact database.

You can reach out to new set of audiences as long as you have gotten the list of mobile numbers to blast out your promotional message. Often times, the list of mobile numbers decides whether the campaign is successful or fail. It is extremely important to have a genuine, good & well resonated audience database.&#x20;


# Retargeting Existing Customers

Use Yaeris's messaging blasting service to retarget existing customers with new promotions and encourage repeat purchases.

You can also reach out to your existing customers using our messaging blasting service with new promotion. This will encourage repeat purchase.&#x20;